STEP 1
Download and Run BreviSoft Microsoft 365 Tenant to Tenant Migration Tool
STEP 2
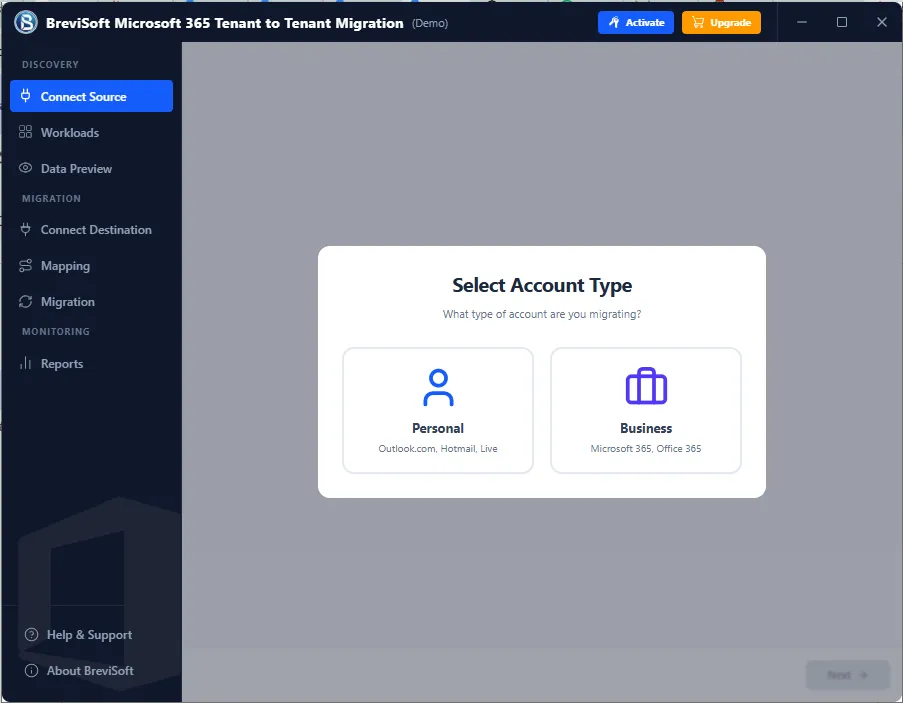
Select Account Type according to your requirement. For Personal ( Outlook.com, Hotmail or Outlook Live ) and For Business ( Microsoft or Office 365 )
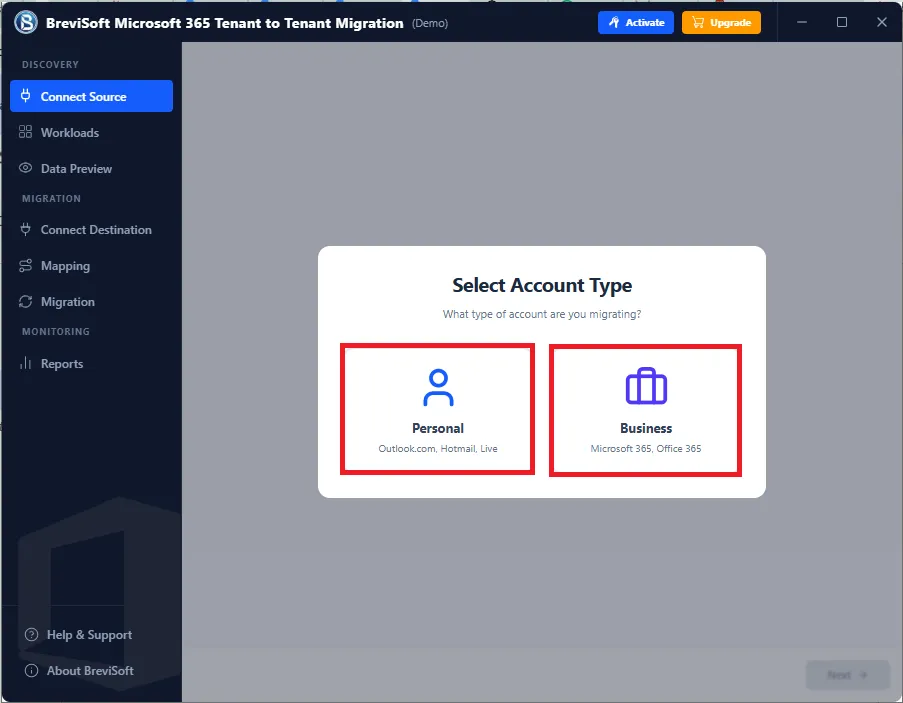
Note: When you Choose Personal ( Outlook.com, Hotmail or Outlook Live ) | Business ( Microsoft or Office 365 ) We explain here Personal Account:
STEP 3
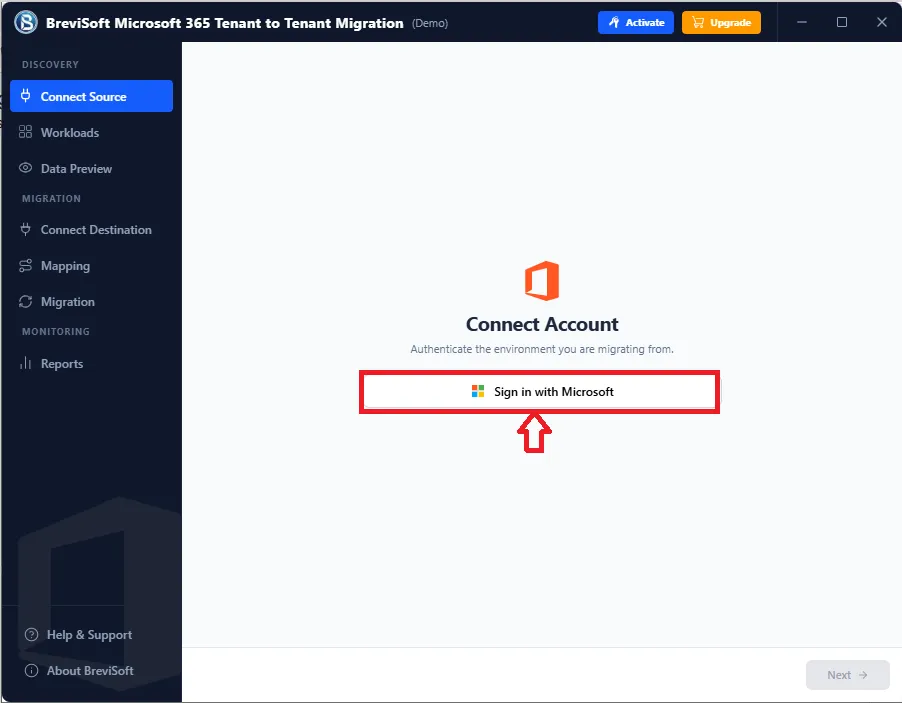
In Connect Source Click on Sign in with Microsoft button.
STEP 4
Copy Code and Click on Go to link
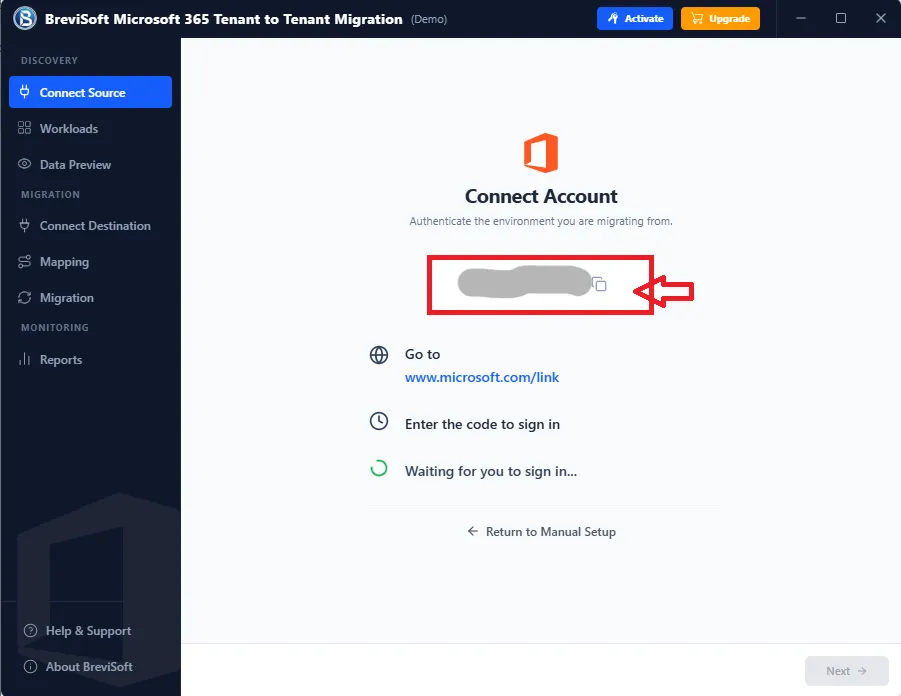
STEP 5
Enter the Copy Code Here and Click on Allow Access button
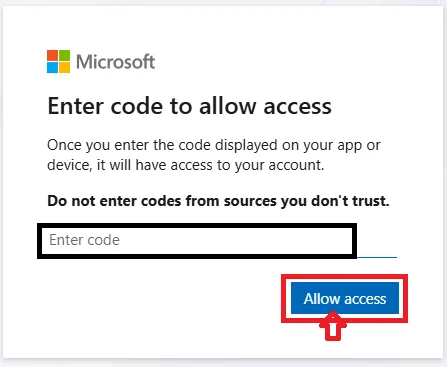
Note: If you are already login your Microsoft account on your default browser then you can select your account and proceed the process.OR You can login your account with a valid Microsoft ID.
STEP 6
Click on the Accept button and give permissions.
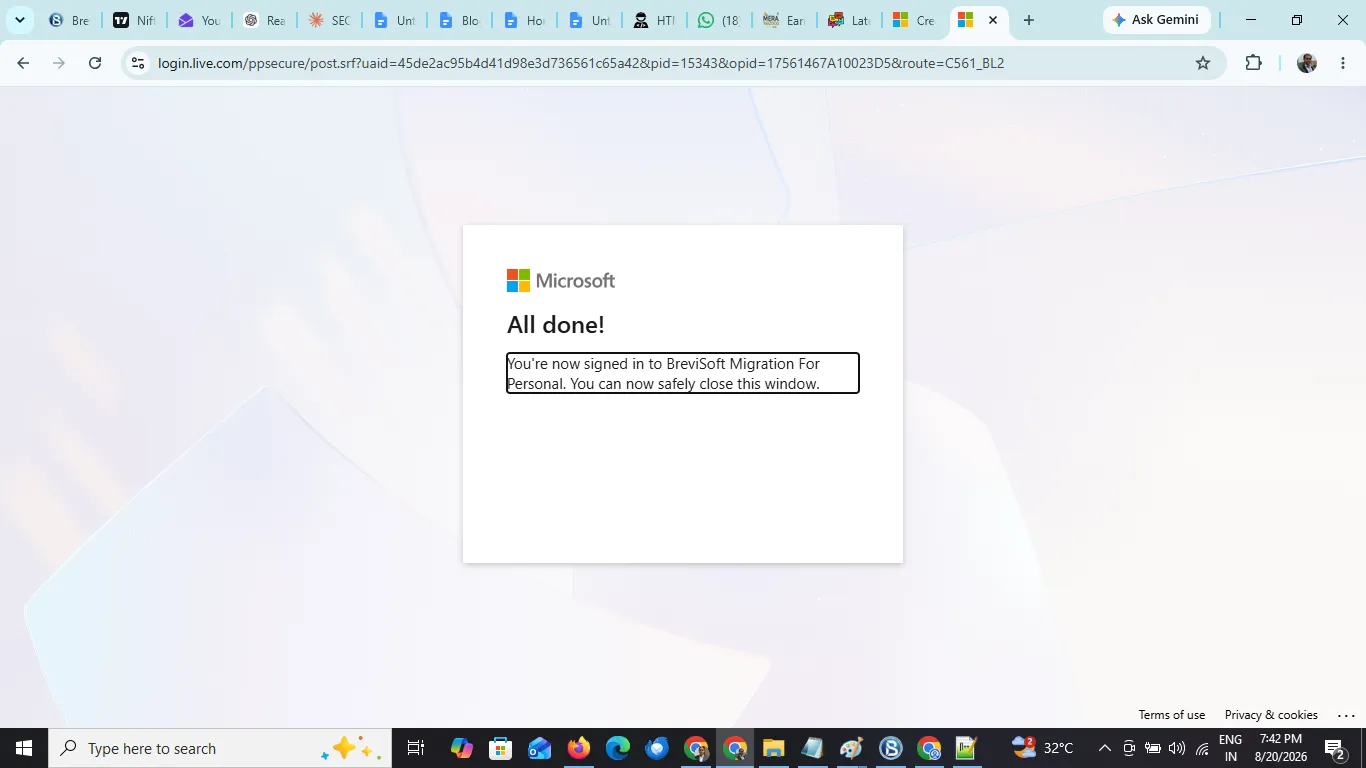
STEP 7
Click on the Accept button and give permissions.
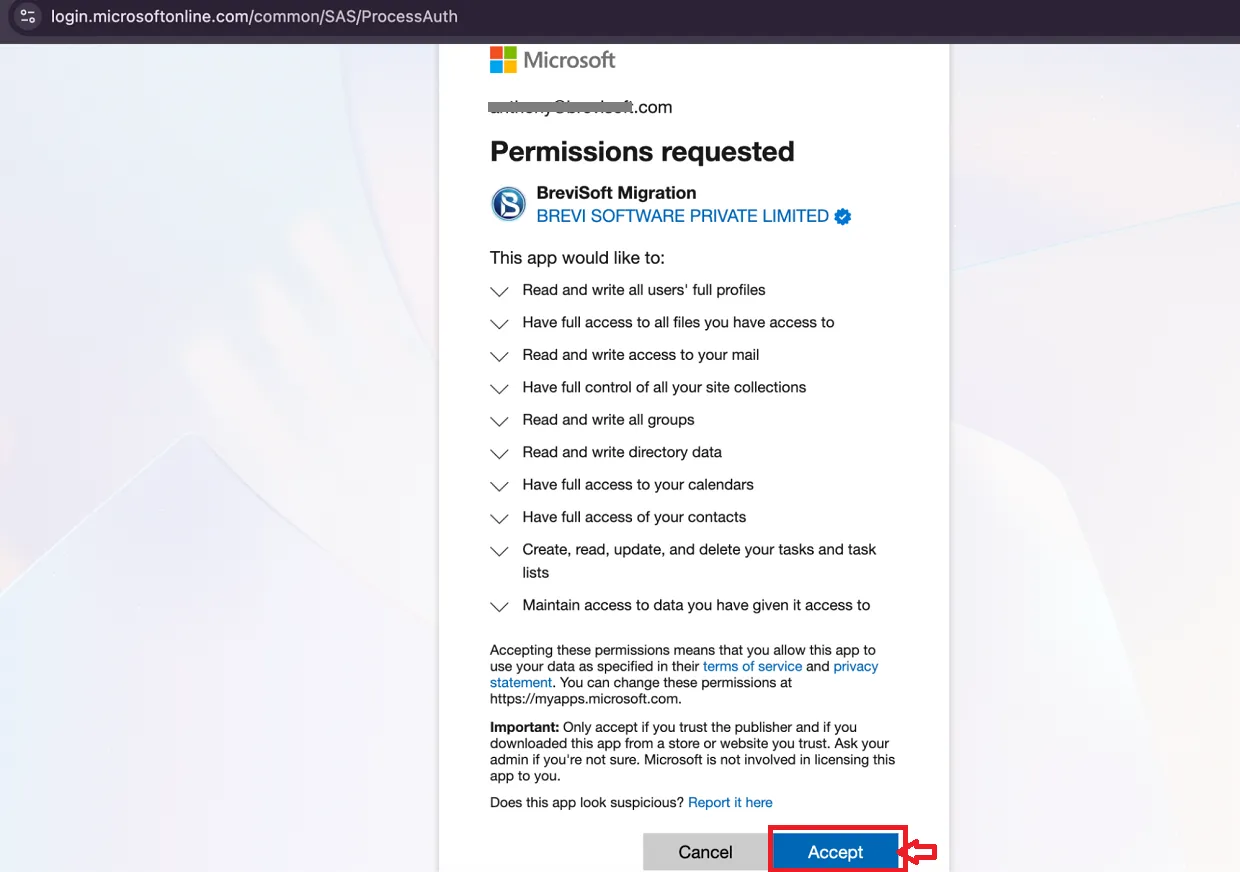
STEP 8
You can choose Mailbox or OneDrive as per your requirement, then click on Next button.
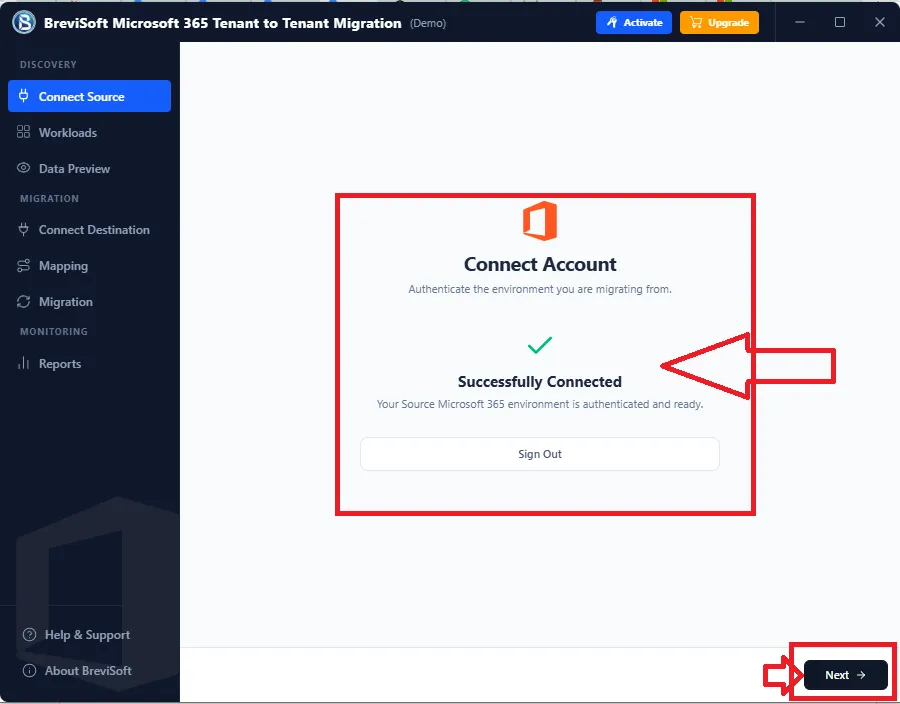
STEP 9
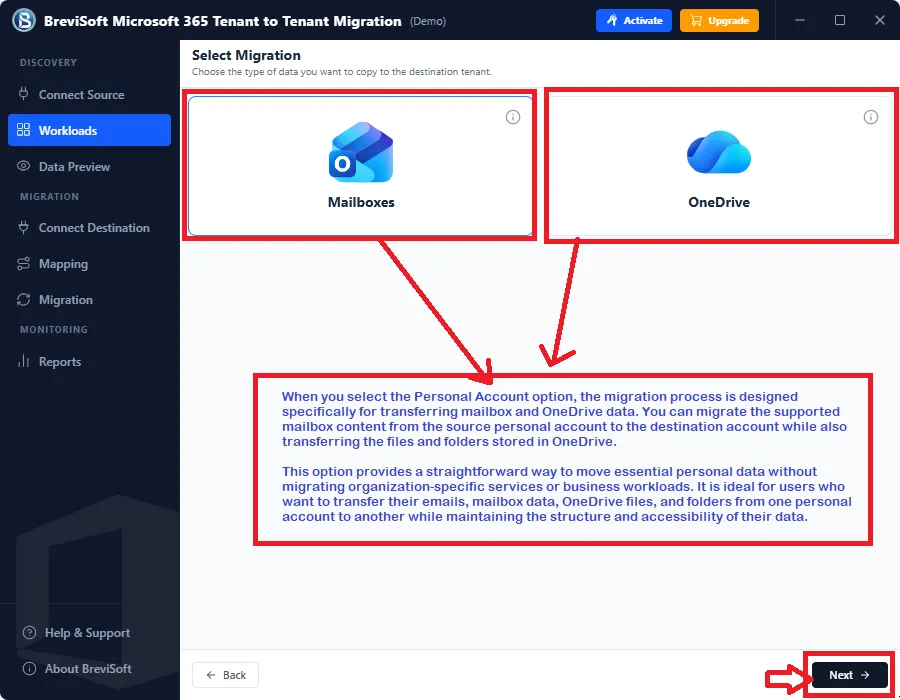
Before Migration you can preview all the data of selected accounts. After that click on the Migrate button.
Use OAuth2 Authentication: - Enter Gmail Address (ID), OAuth 2 Token, and Refresh Token then click on Authenticate button and login your Gmail account.
STEP 10
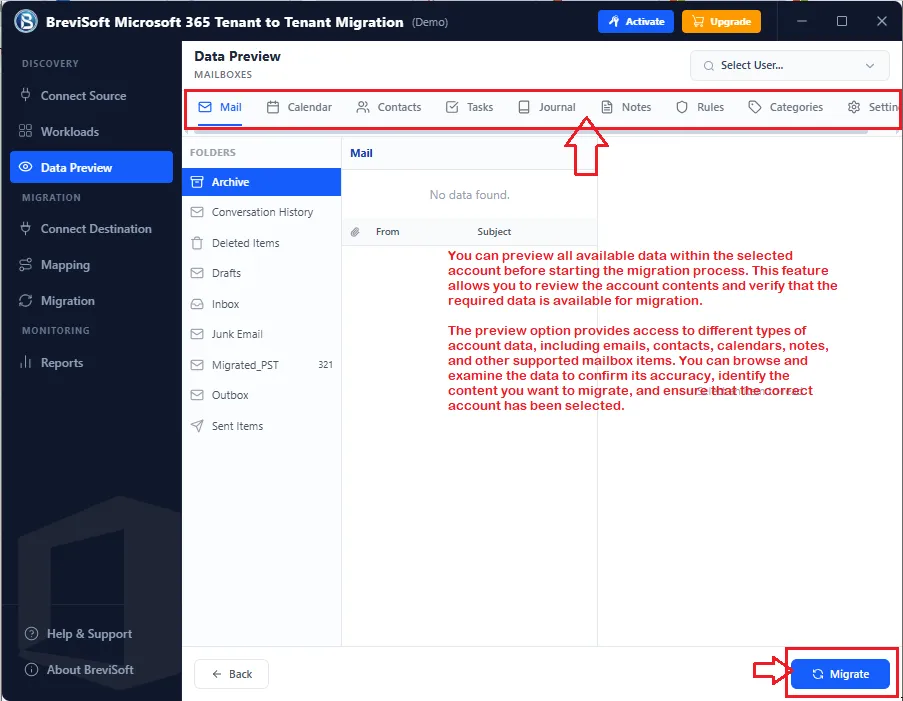
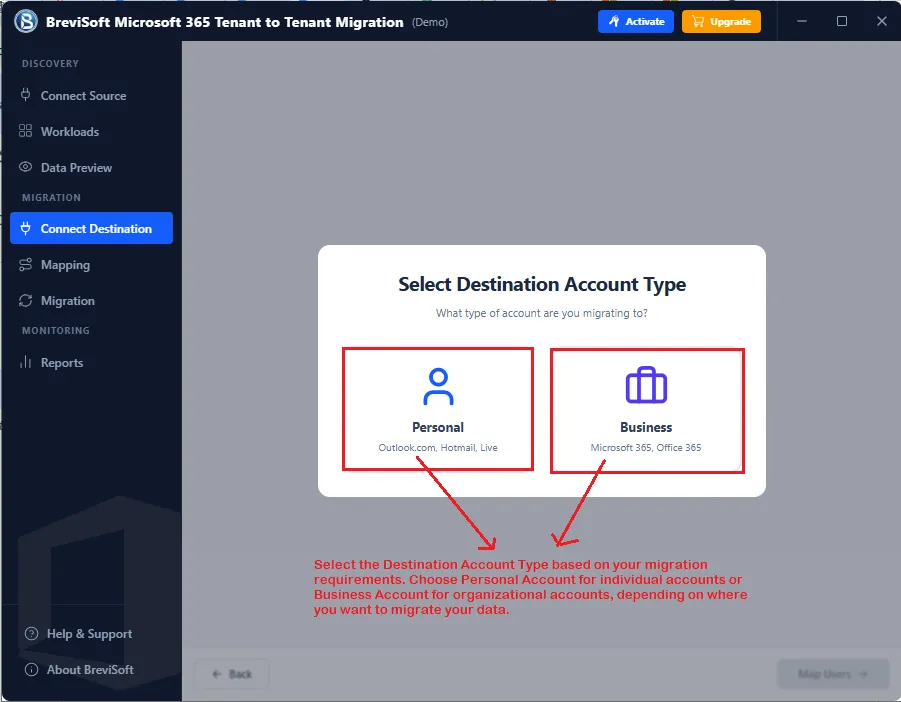
Now connect the destination account where you want to migrate your source data.
Note: Here you can choose a Personal or Business account as per your requirements. We are selecting a Personal Account and explain:-
STEP 11
Connect Destination account by Click on Sign In with Microsoft button
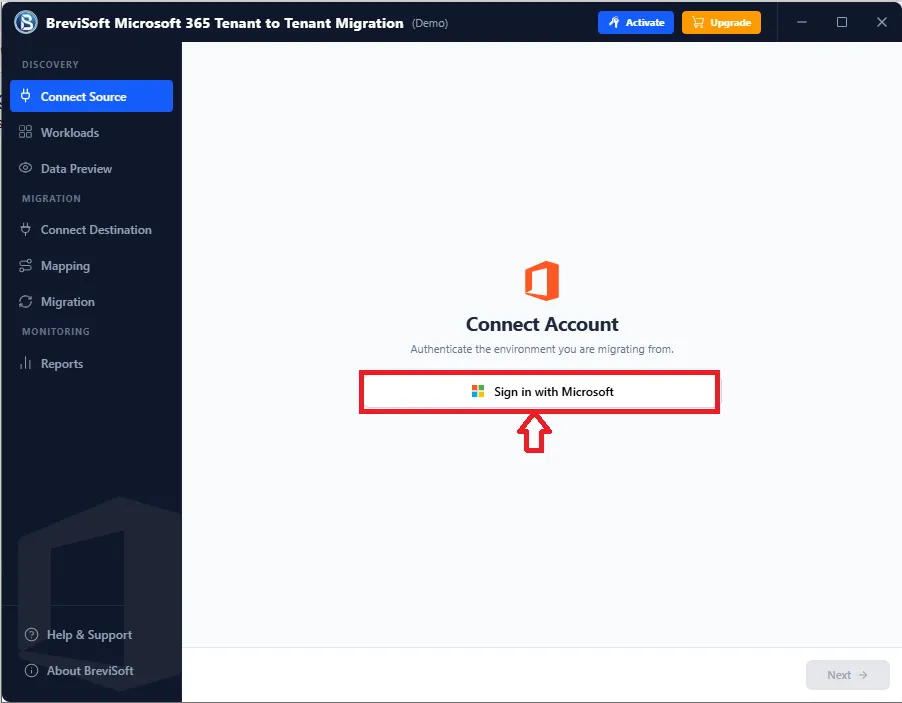
STEP 12
Copy Code and Click on Go to link.
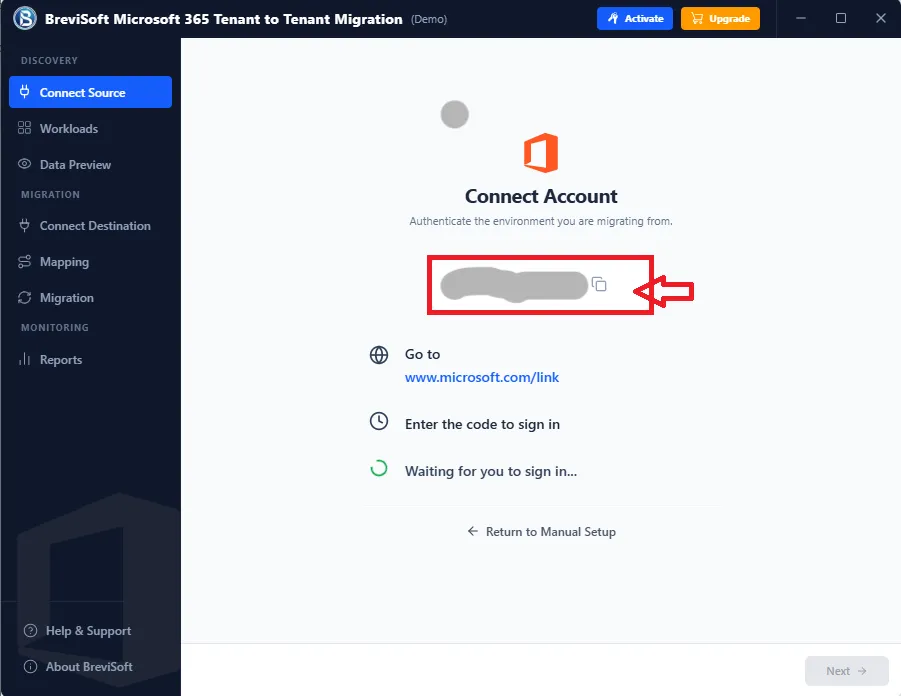
STEP 13
Enter the Copy Code Here and Click on Allow Access button.
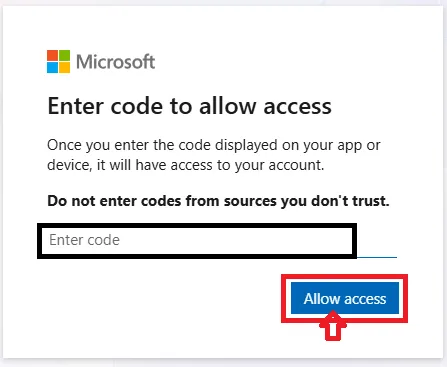
Note: If you are already login to your Microsoft account on your default browser then you can select your account and proceed the process. OR You can login your account with a valid Microsoft ID.
STEP 14
After successfully login Click on Accept button and give permissions.
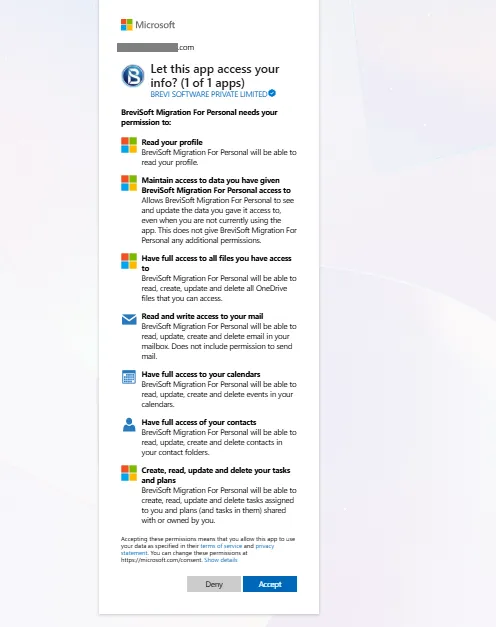
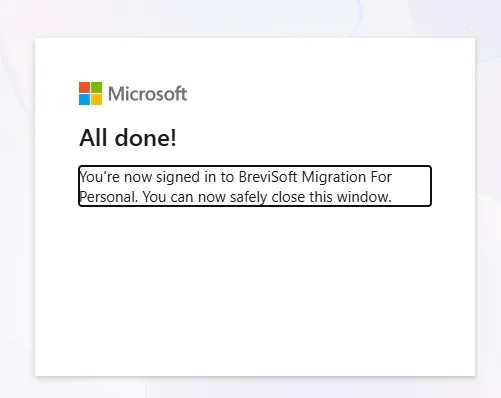
Note: Now get messages like this.
`
STEP 15
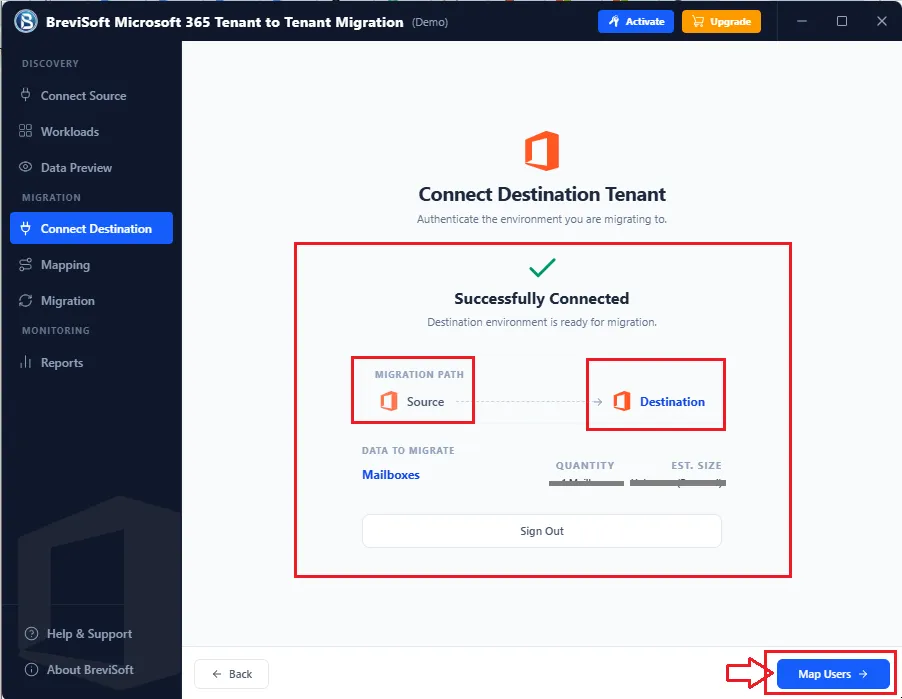
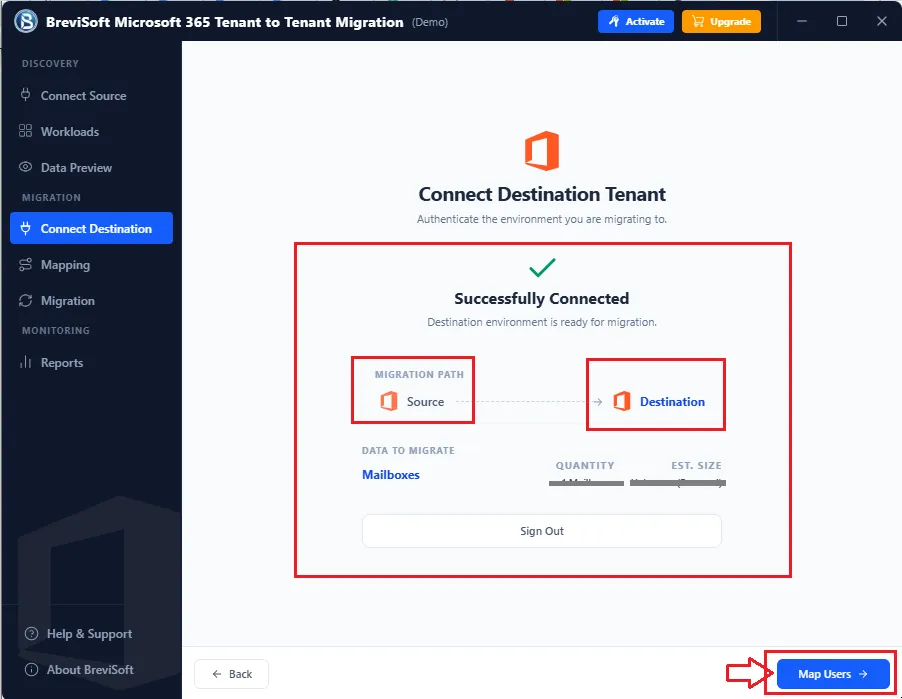
Now your Source and Destination account is successfully connected. After that now, Click on Map Users button.
STEP 16
Map Mailboxes
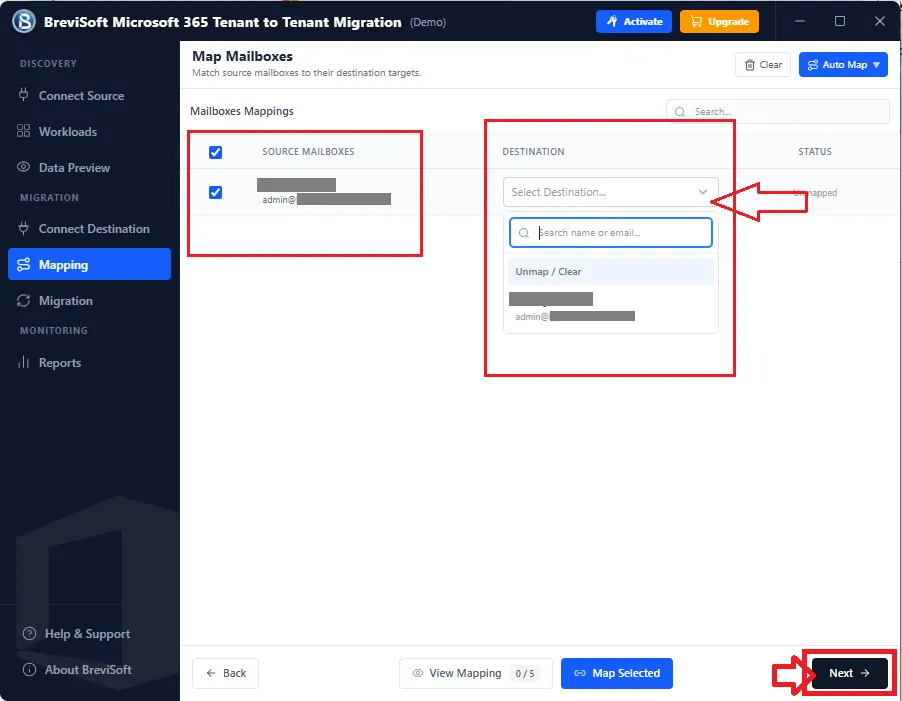
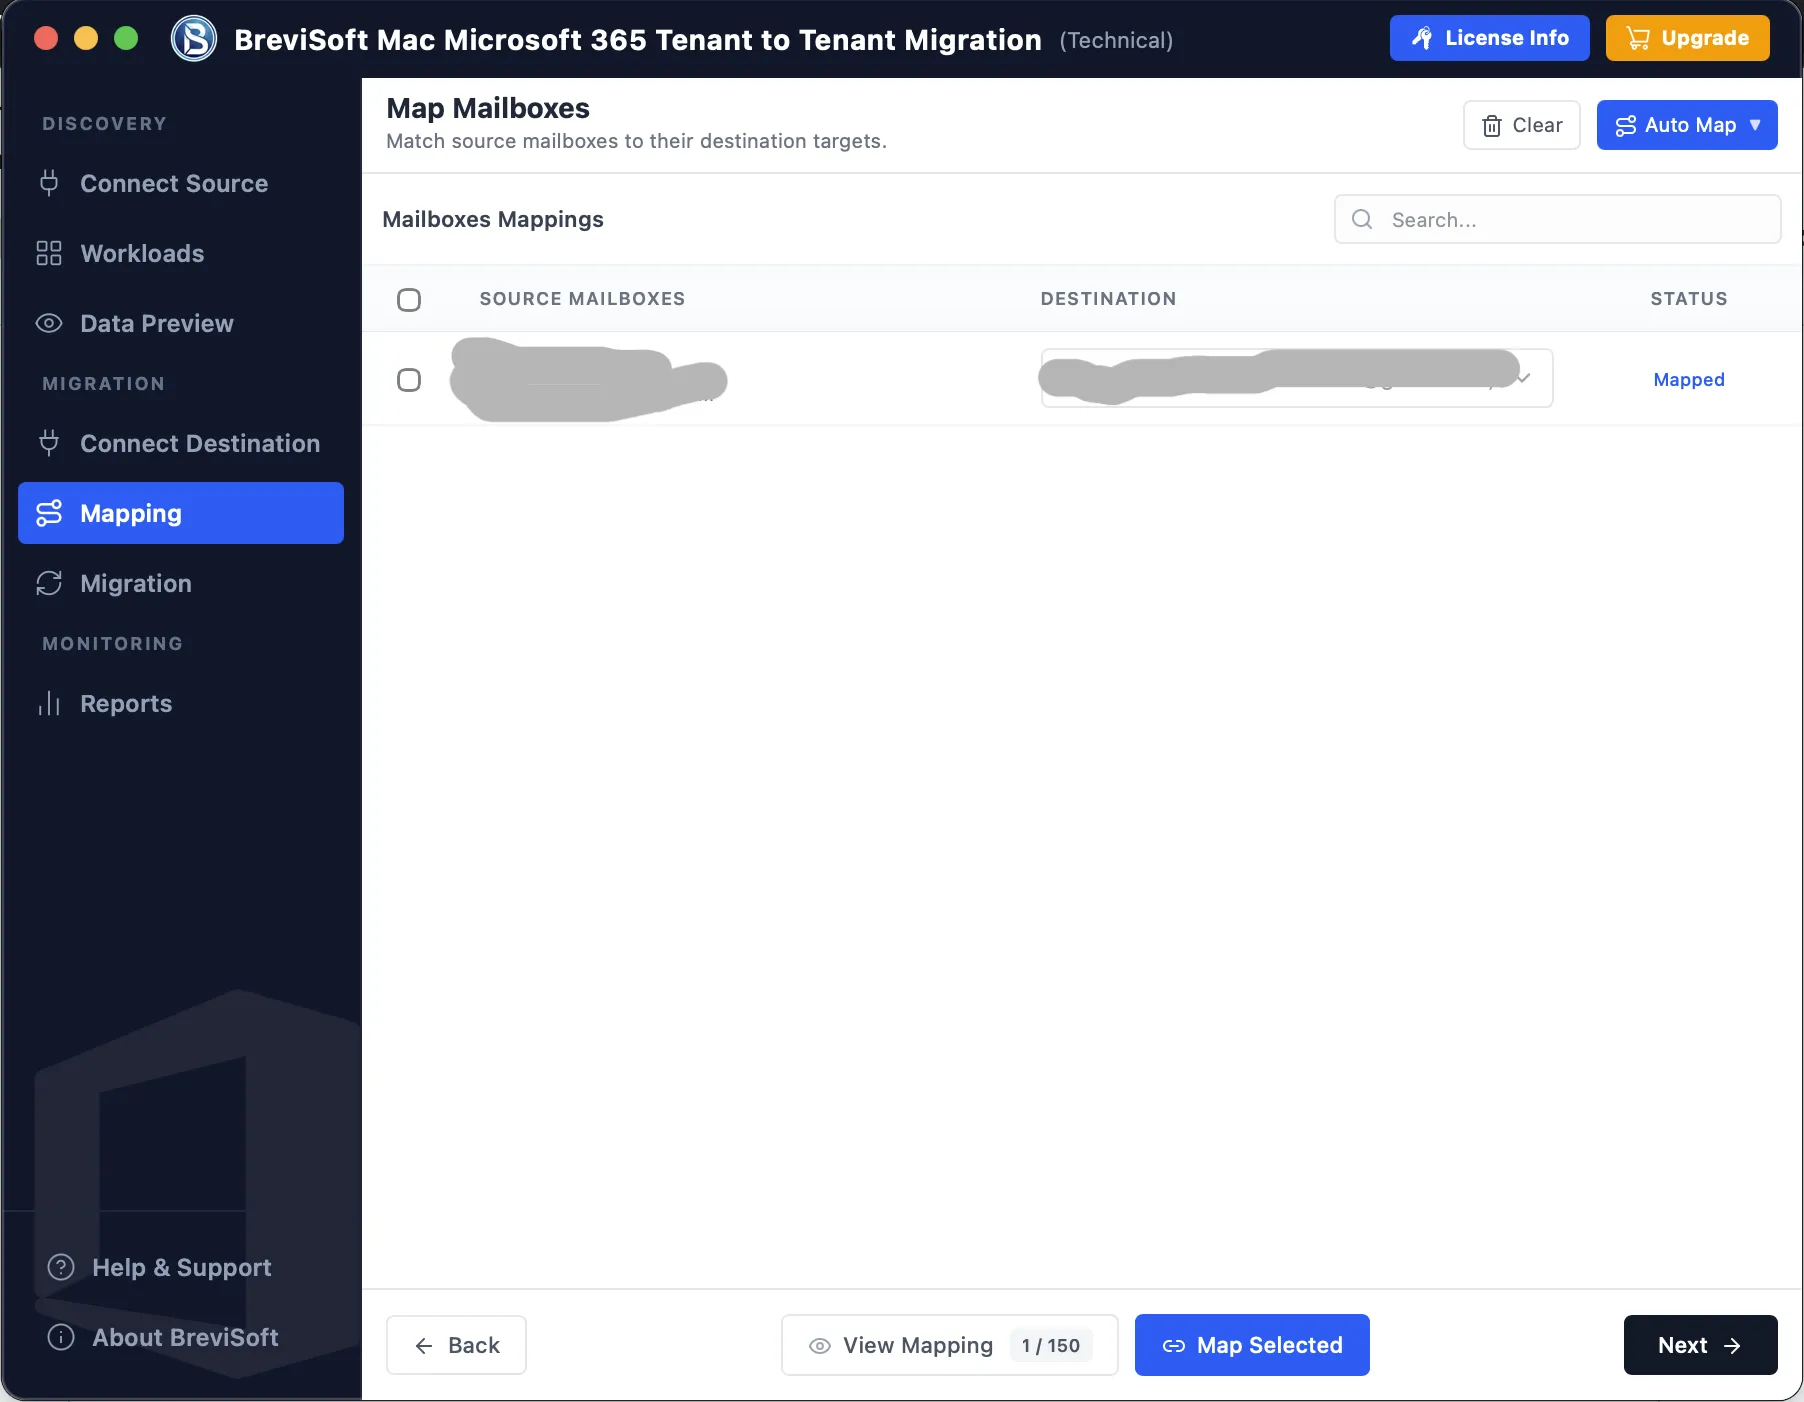
The Map Mailboxes screen in BreviSoft Microsoft 365 Tenant to Tenant Migration is used to match source mailboxes with their corresponding destination mailboxes. This mapping ensures that mailbox data is transferred to the correct user account in the destination Microsoft 365 tenant.
Mailboxes Mappings
The Mailboxes Mappings section displays the available source mailboxes that need to be mapped to destination accounts.
The interface includes the following columns:
- Source Mailboxes – Displays the mailboxes available in the source Microsoft 365 tenant.
- Destination – Allows users to select the corresponding destination mailbox.
- Status – Displays the current mapping status of each mailbox.
A checkbox is available beside each source mailbox, allowing users to select the mailboxes that need to be mapped.
Select Source Mailboxes
The Source Mailboxes section lists the mailbox accounts discovered from the source tenant. Users can select individual mailboxes using the checkbox or use the selection option to process the required accounts.
In the displayed interface, one source mailbox is selected and ready to be mapped to a destination account.
Select Destination Mailbox
The Destination column contains a Select Destination... dropdown for choosing the target mailbox.
When the dropdown is opened, users can search for the required destination account using the Search name or email... field. This makes it easier to locate a specific destination mailbox, especially when the destination tenant contains a large number of user accounts.
The destination list also provides an Unmap / Clear option. This allows users to remove an existing mailbox mapping if the wrong destination account has been selected.
Search Mailboxes
The Search field at the top-right of the mapping screen allows users to quickly locate mailbox mapping entries.
There is also a dedicated search field inside the destination dropdown where users can search by:
- User name
- Email address
- Mailbox account
This helps users efficiently map the correct source and destination accounts.
Auto Map
The Auto Map button at the top-right provides an automated way to match source mailboxes with destination mailboxes.
Instead of manually selecting a destination for every source mailbox, users can use Auto Map to automatically create mappings based on matching mailbox information.
This can significantly reduce manual effort when migrating multiple mailboxes between Microsoft 365 tenants.
Clear Mapping
The Clear button can be used to remove existing mailbox mappings. This is useful when users want to reset the mapping configuration and create new source-to-destination mappings.
Mapping Status
The Status column displays whether a source mailbox has been successfully mapped to a destination mailbox.
A mapped status indicates that the source mailbox has a corresponding destination account selected and is ready for the migration process.
Mailbox Mapping Workflow
Users can complete mailbox mapping through the following process:
- Select Source Mailboxes – Choose the source mailbox accounts that need to be migrated.
- Open Destination Selection – Click Select Destination... for the selected source mailbox.
- Search Destination Account – Enter the destination user's name or email address in the search field.
- Select Destination Mailbox – Choose the appropriate destination account from the available results.
- Verify Mapping Status – Check the Status column to confirm that the mailbox has been mapped.
- Use Auto Map if Required – For multiple mailboxes, use Auto Map to automatically match accounts where possible.
- Clear and Remap if Needed – If an incorrect mapping is created, use Clear or Unmap / Clear and select the correct destination mailbox.
Why Mailbox Mapping Is Important
Correct mailbox mapping ensures that data from each source user is migrated to the intended destination user. It helps prevent data from being transferred to the wrong account and provides better control over tenant-to-tenant migration.
Once all required source mailboxes are correctly mapped to their destination accounts, users can proceed to the next stage of the migration process.
STEP 17
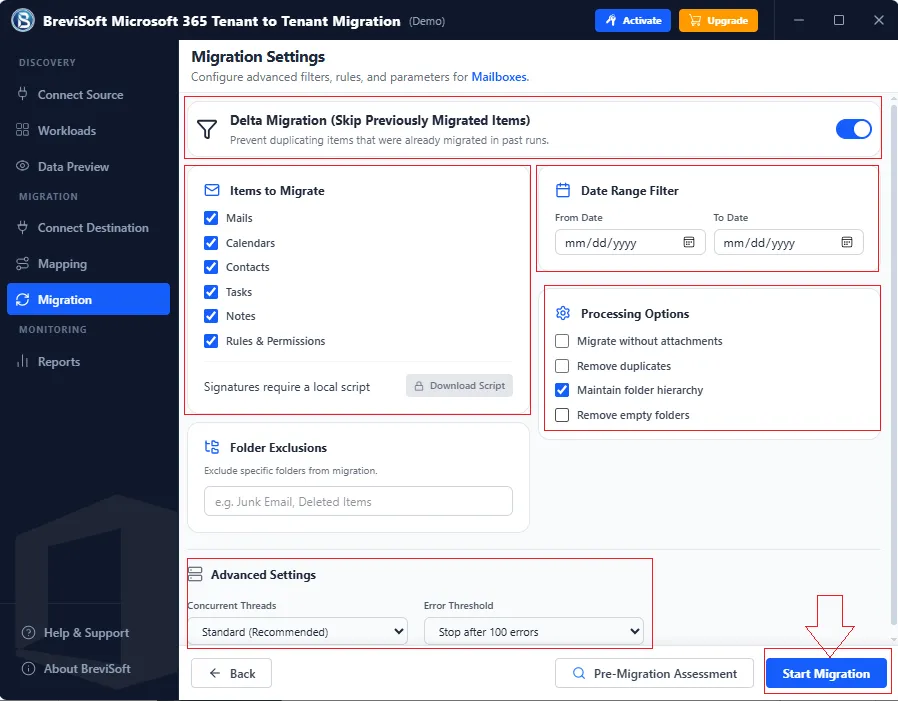
Migration Settings - Before migration you can set the options as per your needs, then Click on Migrate button.
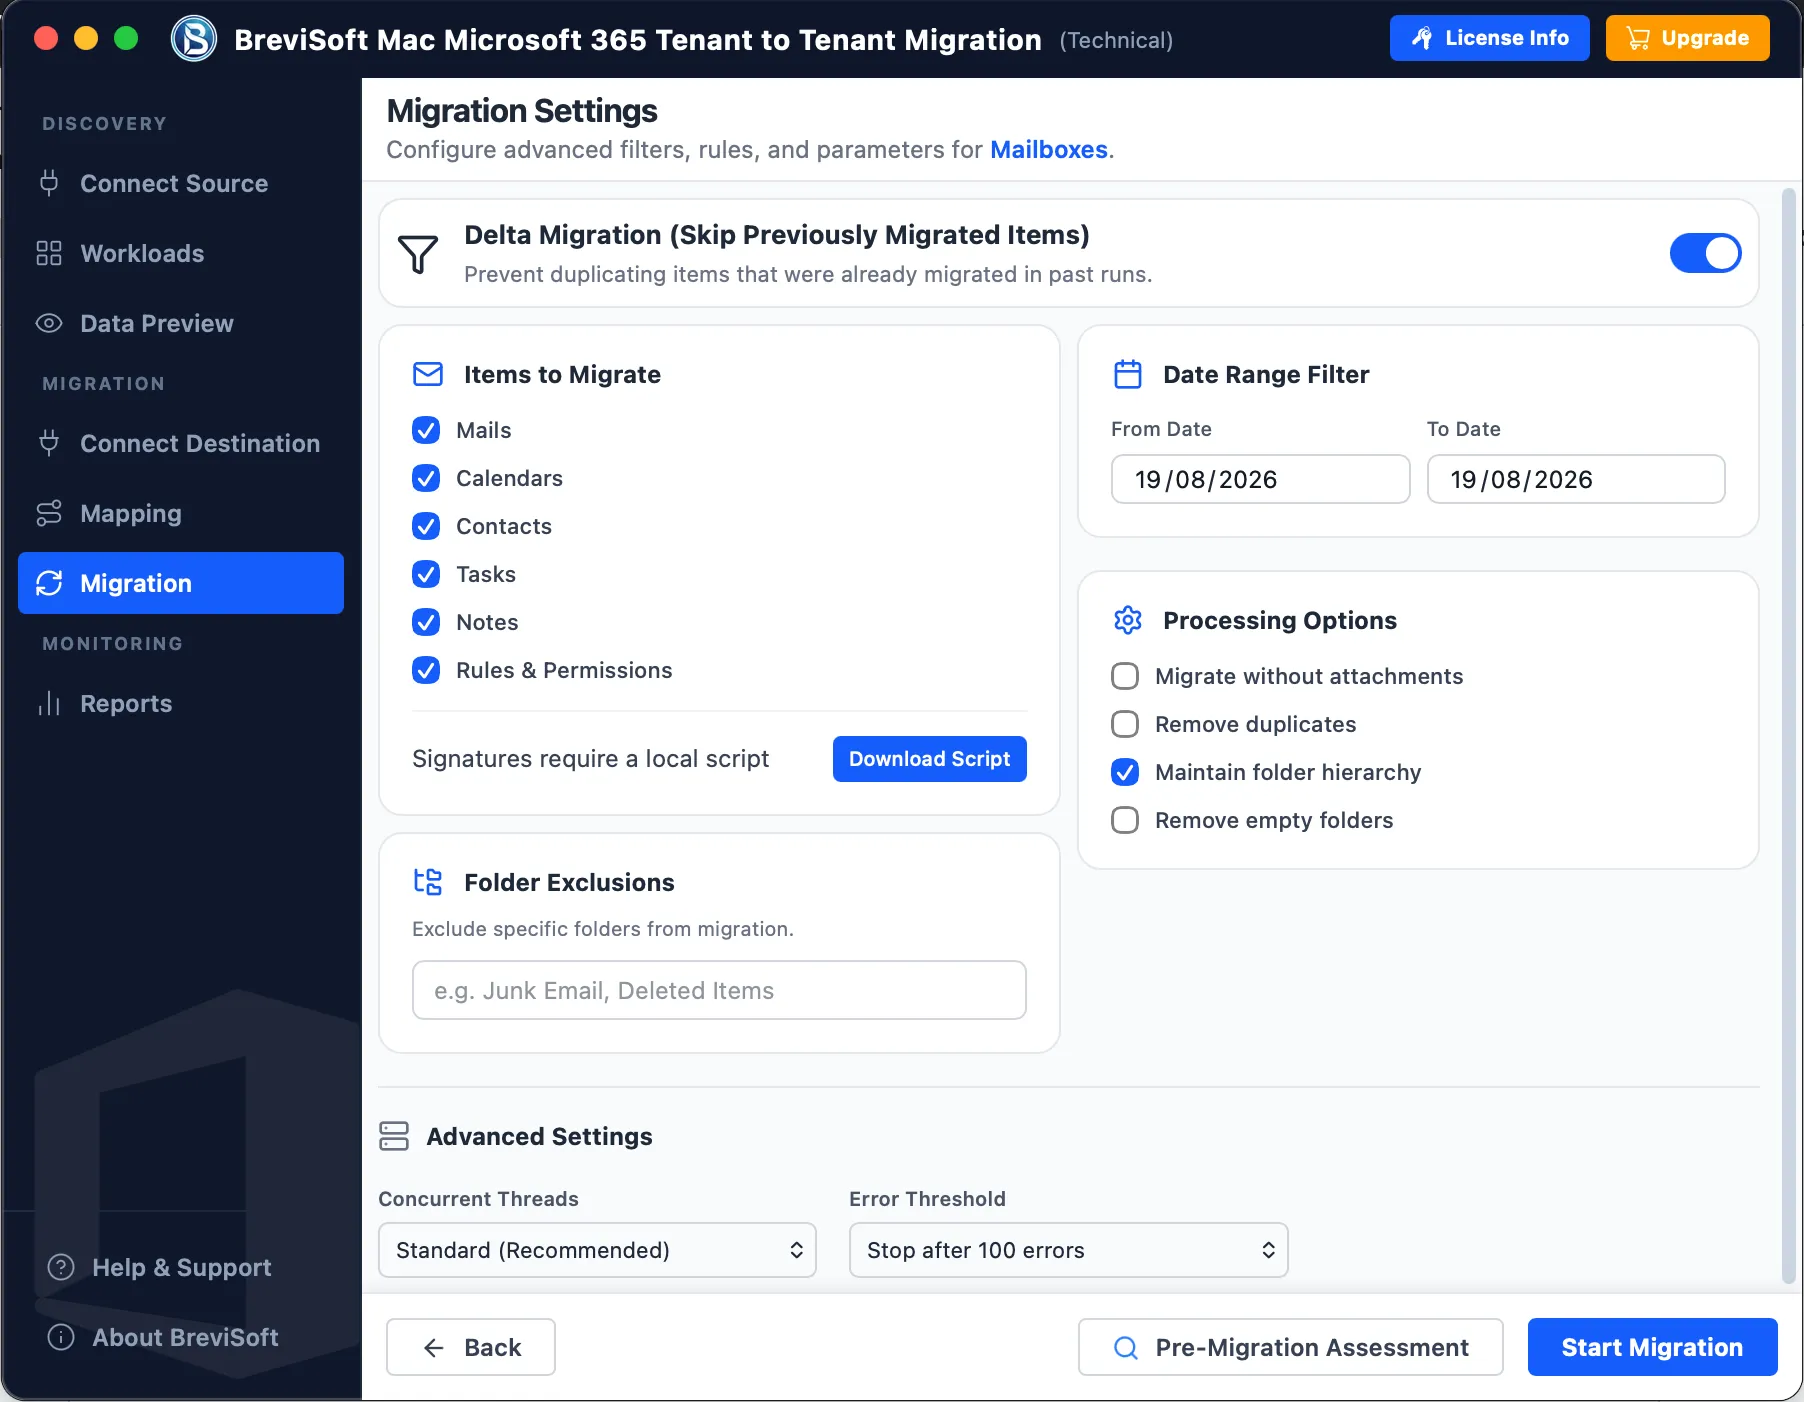
The Migration Settings screen in BreviSoft Microsoft 365 Tenant to Tenant Migration allows users to configure advanced migration filters, item selection, processing options, folder exclusions, and performance settings before starting the migration. These options help control exactly which mailbox items are migrated and how the migration process is performed.
Delta Migration (Skip Previously Migrated Items)
The Delta Migration option prevents duplicate migration of items that were already migrated during previous migration runs. When enabled, the tool identifies previously migrated items and skips them during subsequent migration runs.
This feature is useful when performing incremental or repeated migrations because it reduces unnecessary data processing and helps prevent duplicate items in the destination mailbox.
Items to Migrate
The Items to Migrate section allows users to select the mailbox data they want to transfer. The available options shown in the interface include:
- Mails – Migrates emails from the source mailbox to the destination mailbox.
- Calendars – Transfers calendar events and appointments.
- Contacts – Migrates contacts and their associated information.
- Tasks – Transfers tasks from the source mailbox.
- Notes – Migrates mailbox notes.
- Rules & Permissions – Transfers configured mailbox rules and permissions.
Users can select or deselect the required data types according to their migration requirements.
The interface also displays a note that signatures require a local script, with a Download Script option provided for obtaining the required script.
Date Range Filter
The Date Range Filter allows users to migrate mailbox items within a specific date period. Users can enter:
- From Date – Specifies the starting date for migration.
- To Date – Specifies the ending date for migration.
This filtering option is helpful when users do not want to migrate the complete mailbox and instead need to transfer only emails or other supported items from a particular time period.
Processing Options
The Processing Options section provides additional controls for managing how mailbox data is processed during migration.
Available options include:
- Migrate without attachments – Migrates emails without their attached files.
- Remove duplicates – Helps prevent duplicate items from being transferred to the destination.
- Maintain folder hierarchy – Preserves the original folder structure during migration.
- Remove empty folders – Removes folders that do not contain any migrated data.
The Maintain folder hierarchy option is enabled in the displayed configuration, ensuring that the source mailbox folder structure is preserved in the destination.
Folder Exclusions
The Folder Exclusions option allows users to exclude specific folders from the migration. Users can enter folder names in the provided field, such as Junk Email or Deleted Items.
This feature is useful when certain folders contain unwanted, unnecessary, or sensitive data that should not be transferred to the destination mailbox.
Advanced Settings
The Advanced Settings section provides controls for managing migration performance and error handling.
Concurrent Threads
The Concurrent Threads setting controls how many migration processes can run simultaneously. The interface currently shows Standard (Recommended) as the selected option.
Using the recommended setting can provide a balanced migration speed while maintaining stable processing.
Error Threshold
The Error Threshold setting determines how many errors can occur before the migration process is stopped. The displayed configuration is Stop after 100 errors.
This helps prevent the migration from continuing indefinitely when a large number of errors occur during processing.
Pre-Migration Assessment
Before starting the actual migration, users can select Pre-Migration Assessment. This option can be used to review the migration environment and identify potential issues before transferring the mailbox data.
Running an assessment before migration can help users verify the configuration and prepare the source and destination environments.
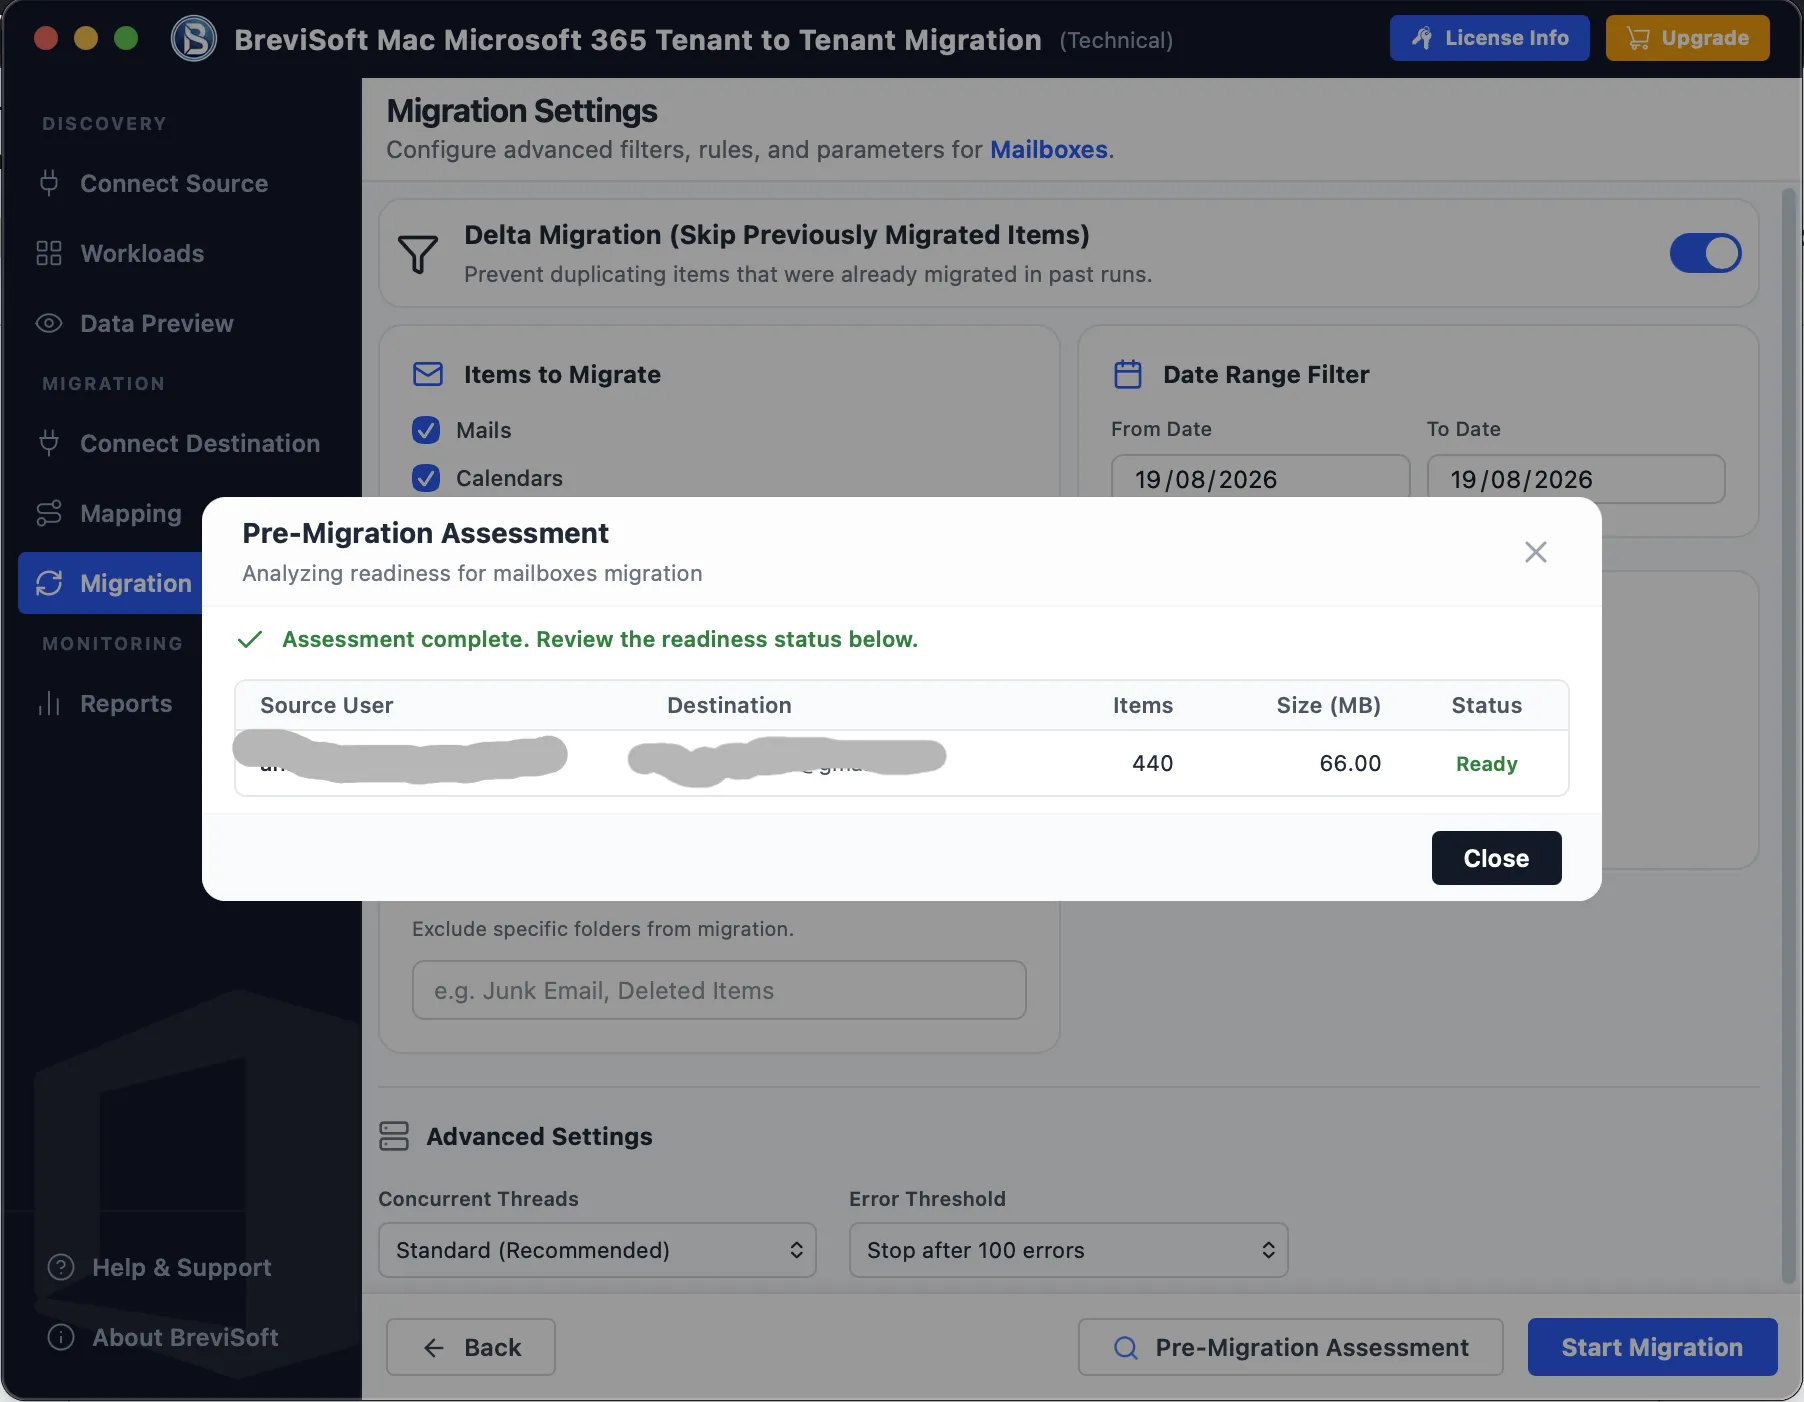
Start Migration
After configuring all required migration settings, users can click the Start Migration button at the bottom-right corner of the interface.
The migration process will then begin according to the selected:
- Migration mode
- Data types
- Date range
- Processing options
- Folder exclusions
- Concurrent thread settings
- Error threshold
The Back button can be used to return to the previous configuration screen and make changes before starting the migration.
Overall, the Migration Settings screen provides granular control over the Microsoft 365 tenant-to-tenant migration process, helping users migrate the required mailbox data while filtering unwanted content, maintaining folder structure, avoiding duplicates, and controlling migration performance.
STEP 18
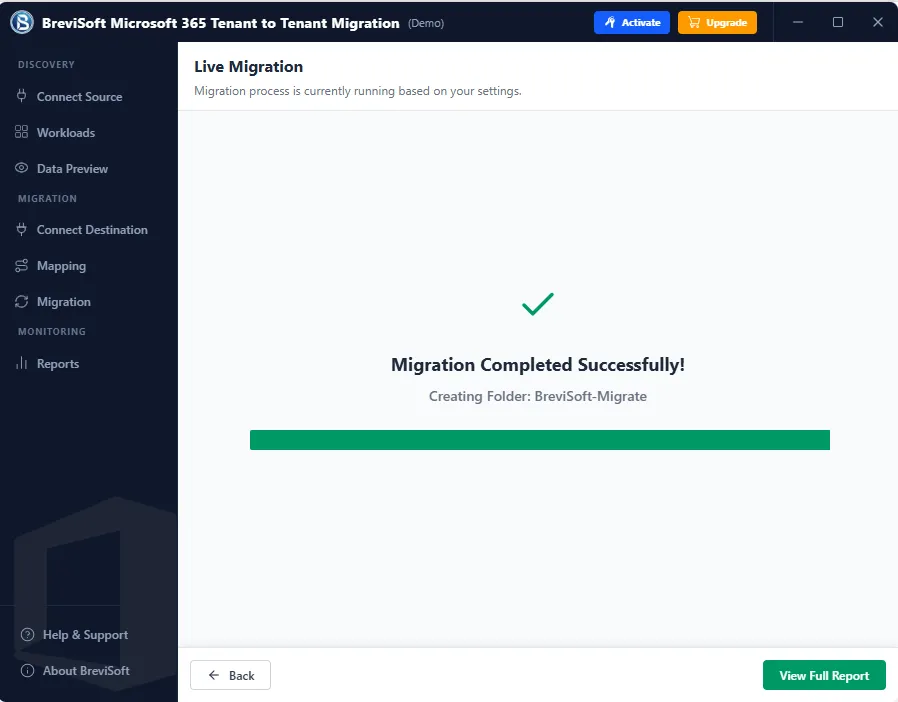
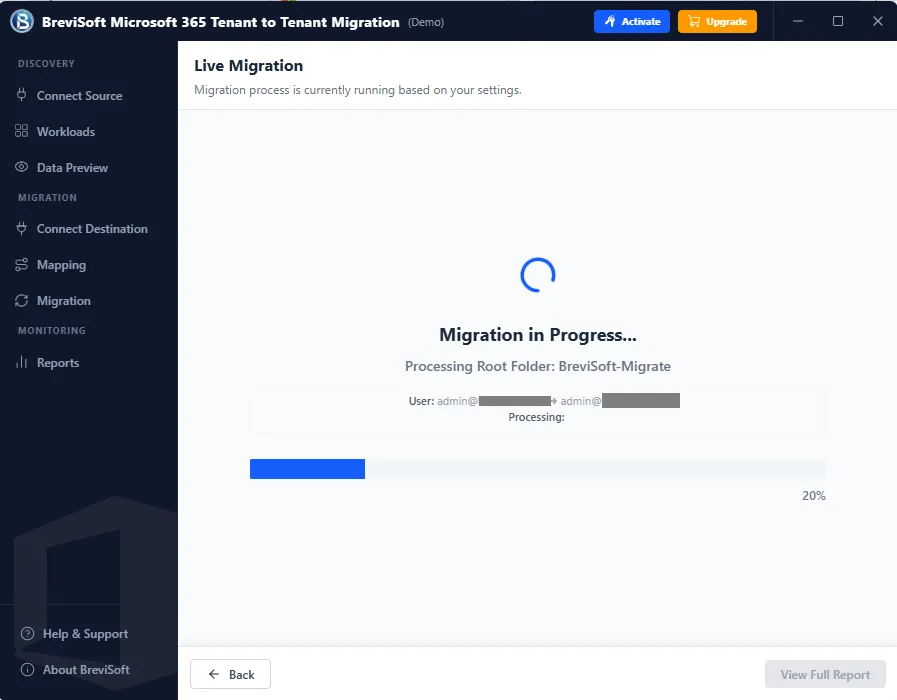
The migration process is now in progress. Wait until the migration is completed successfully.
STEP 19
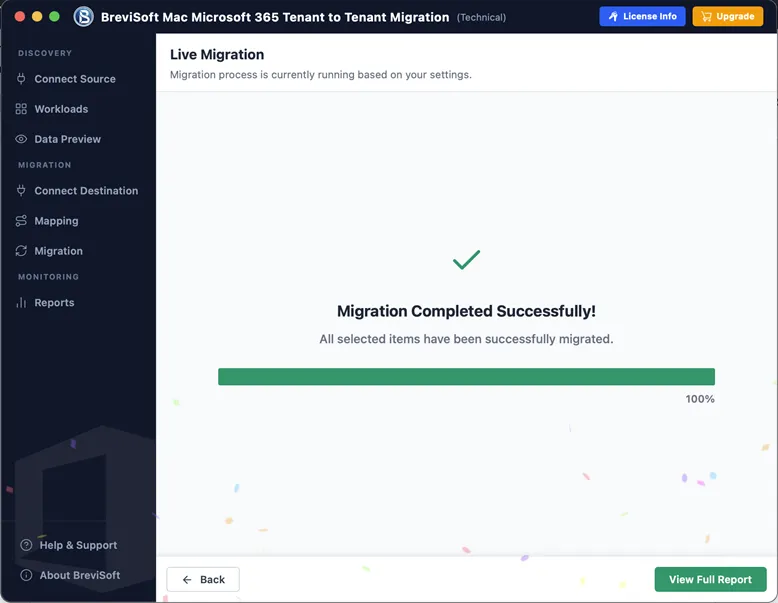
Now successfully completed your selected migrations.
STEP 20
Reports & Logs ( You can analyse the reports and logs in detail.)
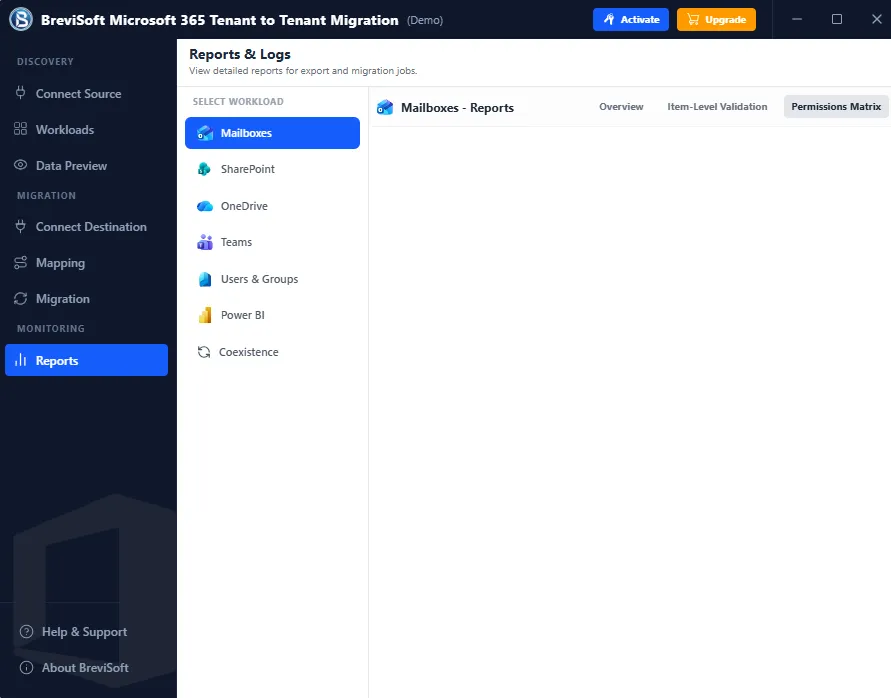
The Reports & Logs section in BreviSoft Microsoft 365 Tenant to Tenant Migration provides a centralized location to view detailed reports related to export and migration jobs. It helps administrators monitor migration activities, review results, and validate migrated data across different Microsoft 365 workloads.
Select Workload
The Select Workload panel appears on the left side of the Reports & Logs screen. It allows users to select the Microsoft 365 workload for which they want to view reports.
The available workloads shown in the interface are:
- Mailboxes – View reports related to mailbox migration activities.
- SharePoint – Review migration and export information for SharePoint data.
- OneDrive – View reports associated with OneDrive migration jobs.
- Teams – Review reports related to Microsoft Teams migration.
- Users & Groups – Access reporting information for users and groups.
- Power BI – View reports associated with Power BI migration activities.
- Coexistence – Review information related to coexistence operations between environments.
In the displayed screen, Mailboxes are selected.
Mailboxes – Reports
After selecting Mailboxes, the main reporting area displays Mailboxes - Reports. This section is designed to provide detailed information about mailbox-related export and migration jobs.
The mailbox reporting area contains multiple tabs for reviewing different aspects of the migration.
Overview
The Overview tab provides a general summary of mailbox migration activities. It can be used to review the overall status and results of mailbox-related jobs.
An overview report can help administrators understand the progress and outcome of migration operations without reviewing individual mailbox items.
Item-Level Validation
The Item-Level Validation tab provides a more detailed view of migrated mailbox data.
This section is intended to help administrators validate individual migrated items and compare migration results at a granular level. It can be useful for verifying whether specific mailbox data was successfully processed during migration.
Item-level validation can help identify migration discrepancies and provide more detailed information when troubleshooting migration results.
Permissions Matrix
The Permissions Matrix tab provides a dedicated view for reviewing mailbox permissions.
It can be used to verify permission-related information associated with migrated mailboxes and help administrators confirm that the required access permissions have been handled correctly during the migration process.
Monitoring Migration Results
The Reports & Logs section provides an important monitoring area after migration jobs have been initiated. Administrators can select the appropriate workload and review the corresponding reports to understand migration results.
For mailbox migrations, users can move between:
- Overview – Review the overall migration information.
- Item-Level Validation – Validate individual migrated mailbox items.
- Permissions Matrix – Review mailbox permission information.
Reports for Different Workloads
The workload selector makes it easier to manage reports when multiple Microsoft 365 services are included in a migration project. Instead of reviewing all migration information in one place, administrators can select a specific workload such as 365 Mailbox, SharePoint, OneDrive, Teams, Users & Groups, Power BI, or Coexistence.
This workload-based reporting approach helps organize migration information and makes it easier to focus on a particular Microsoft 365 service.
Benefits of Reports & Logs
The Reports & Logs section helps administrators:
- Monitor migration and export jobs.
- Review workload-specific migration information.
- Validate mailbox data at the item level.
- Review mailbox permission information.
- Analyze migration results after processing.
- Identify potential migration issues for further investigation.
- Keep migration reporting organized by workload.
Overall, the Reports & Logs feature provides centralized visibility into migration activities and gives administrators different reporting views for reviewing, validating, and monitoring Microsoft 365 tenant-to-tenant migration results.
STEP 1
Download and Run BreviSoft Microsoft 365 Tenant to Tenant Migration Tool.
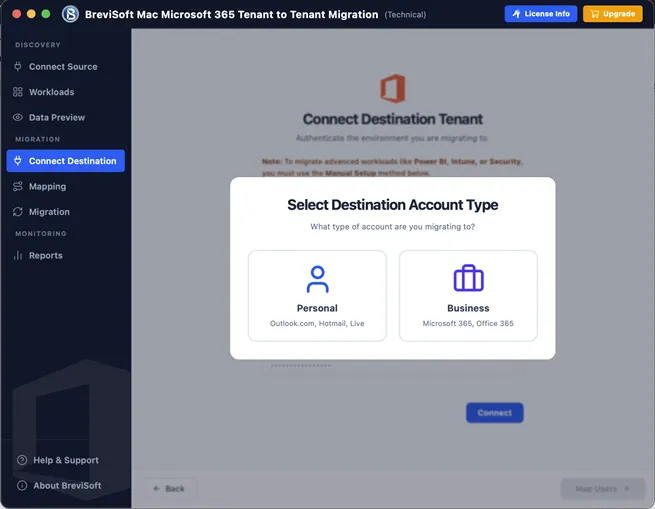
STEP 2
Select Account Type according to your requirement. For Personal ( Outlook.com, Hotmail or Outlook Live ) and For Business ( Microsoft or Office 365 )
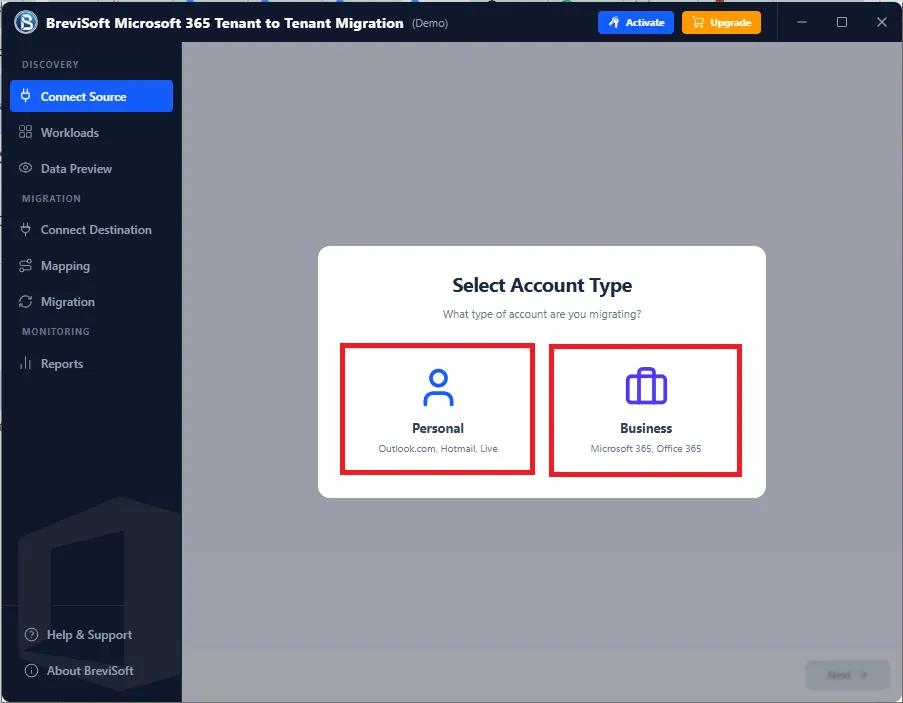
Note: When you Choose Business ( Microsoft or Office 365 ), We explain here Business Account:
STEP 2.1
In Connect Source Click on Sign in with Microsoft button.
In the screenshot, the two options define where the Microsoft 365 data is being moved and how the migration should be handled.
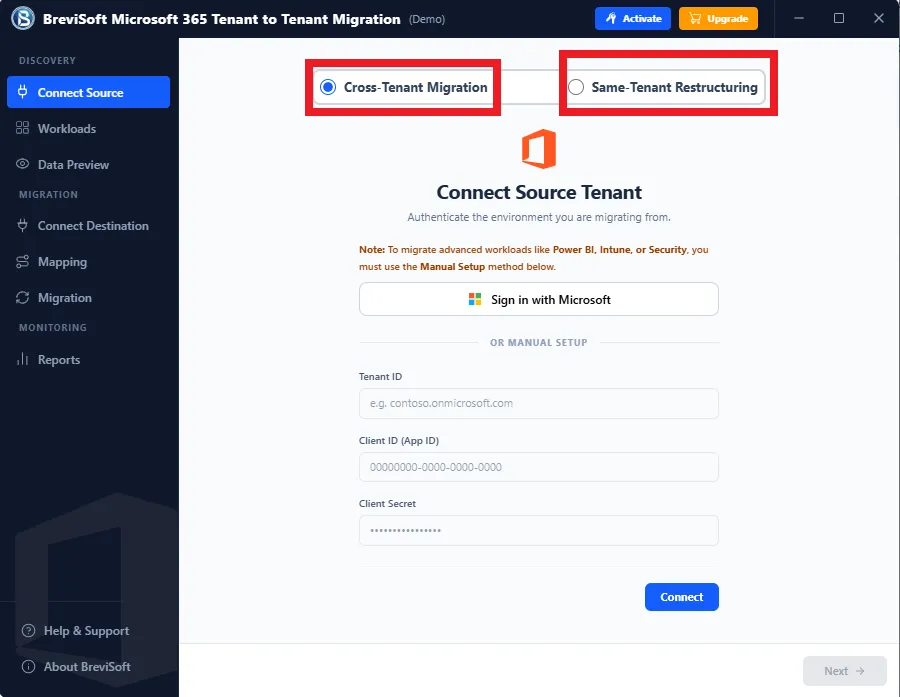
1. Cross-Tenant Migration
Cross-Tenant Migration means moving Microsoft 365 users, mailboxes, files, collaboration data, or other supported workloads from one Microsoft 365 tenant to a different Microsoft 365 tenant.
2. Same-Tenant Restructuring
This means reorganizing Microsoft 365 resources within the same Microsoft 365 tenant, rather than moving them to a completely different tenant.
Note: Here you can choose the options according to your needs.
Hint: You can connect the source account using either Browser Login by clicking Sign in with Microsoft or Manual Method using the Tenant ID, Client ID, and Client Secret.
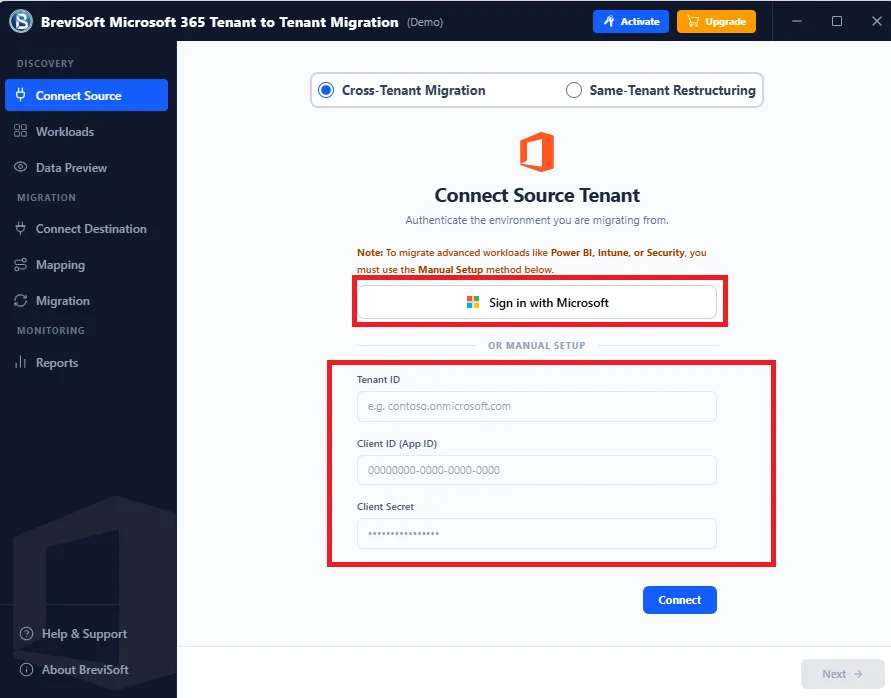
Note: To migrate advanced workloads like Power BI, Intune, or Security, you must use the Manual Setup method.
Use admin account for sign in with microsoft button Steps:
STEP 4
Click on the Sign in with Microsoft button (Browser Login)
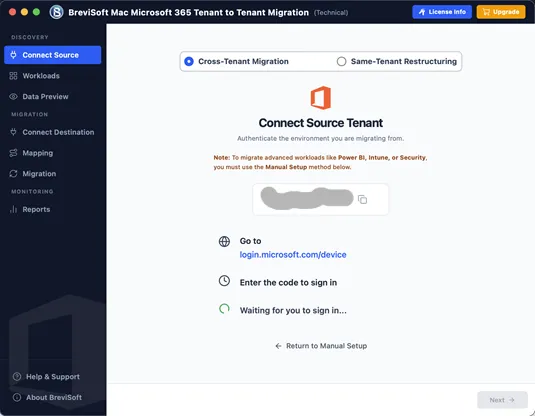
Copy the code and click go to link and Click next
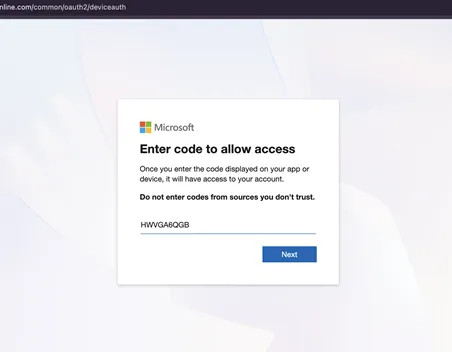
Select admin account and login
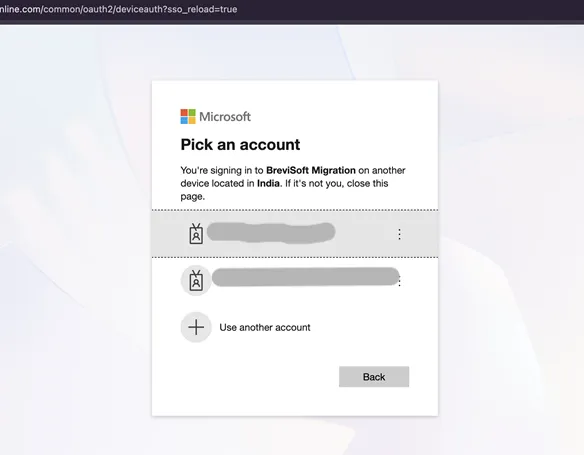
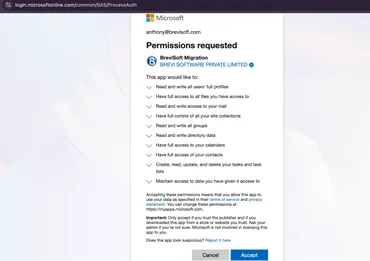
Read all the permission and click accept
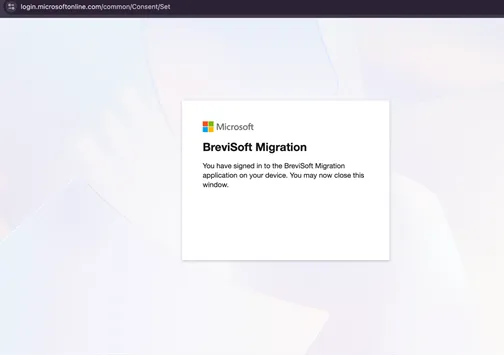
STEP 5
Check the app is successfully connected with your account now click next.
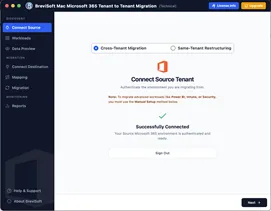
OR
Login with Manual Method Using Create Tenant ID, Client ID and Client Secret
1. Open azure portal
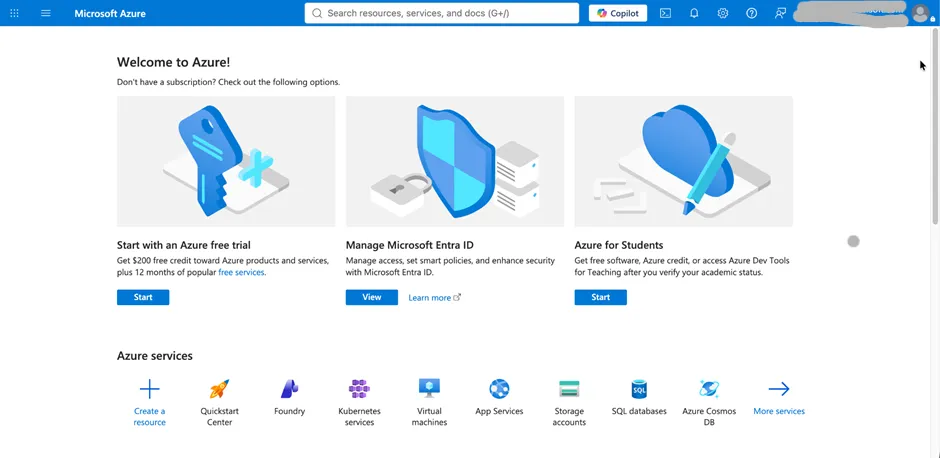
2. Search “App Registrations” and select first item
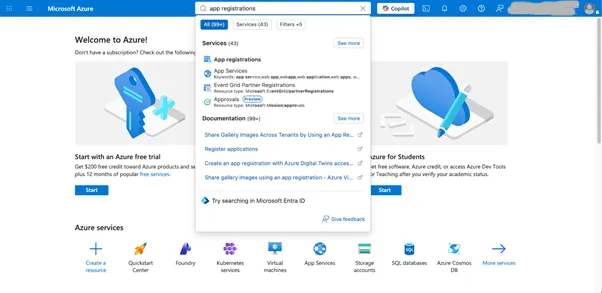
3. Navigate to all applications and click new registration
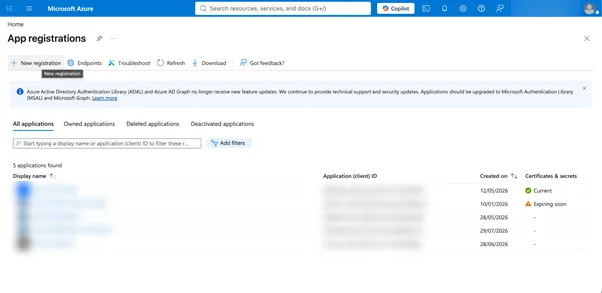
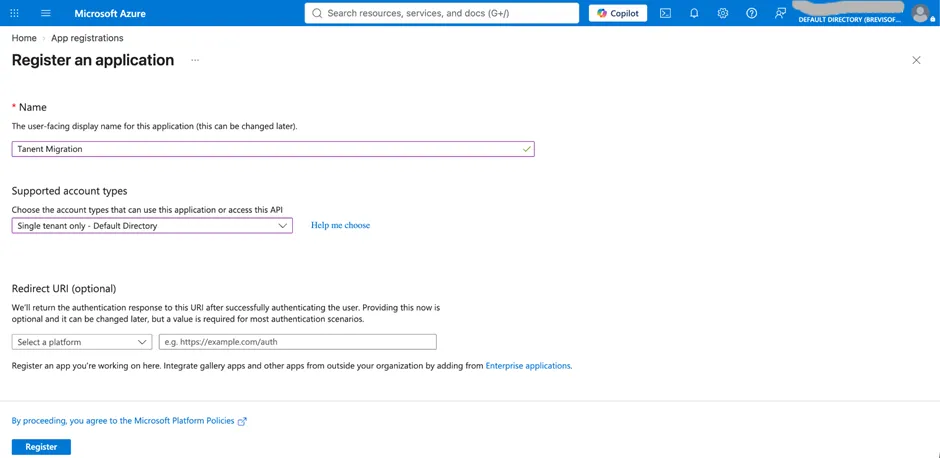
4. Give any name as you want and support account type should be - “Single tenant only - Default Directory” and click Register
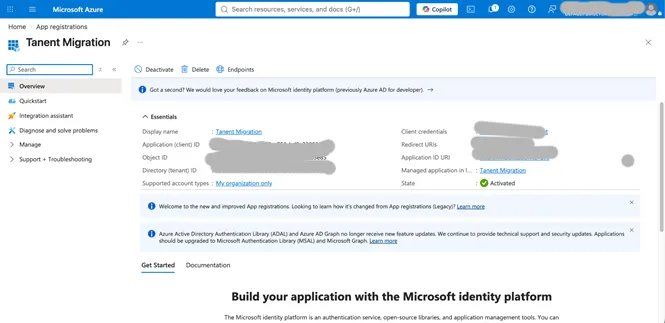
5. Now you will see the tenant id, client id and click add certificate or secret
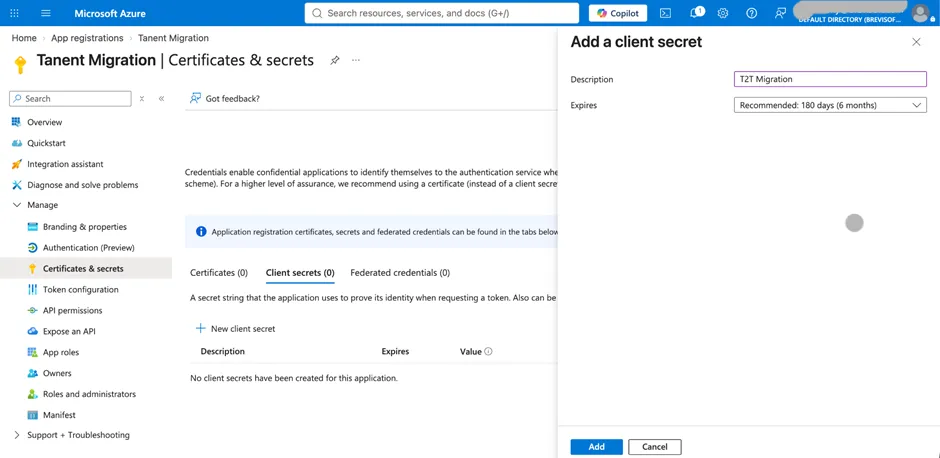
6. Click “New Client Secret”
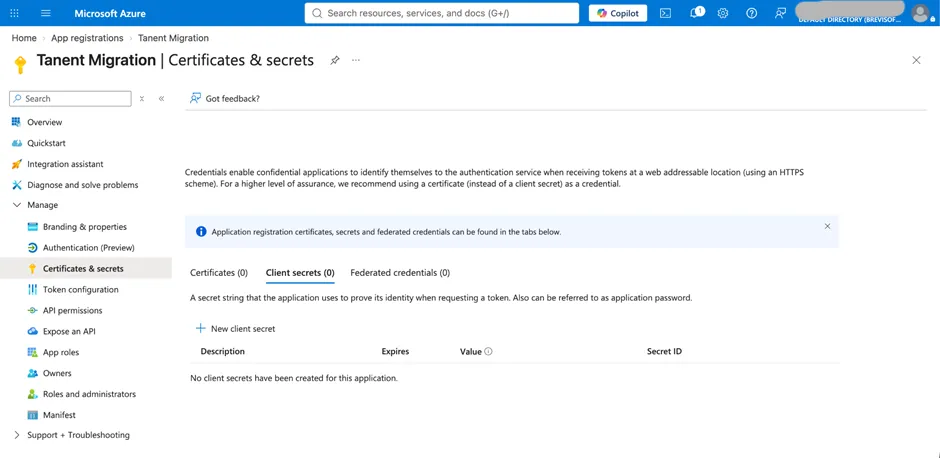
7. Give description and give expiry date and click add button
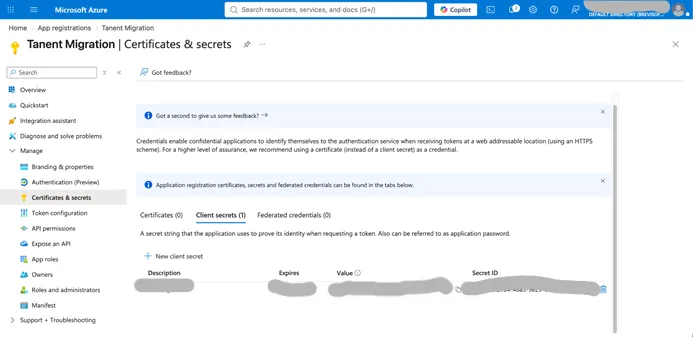
8. Now you will see this table where you have to copy value not secret id copy the value and save secure location (this will show only one time)
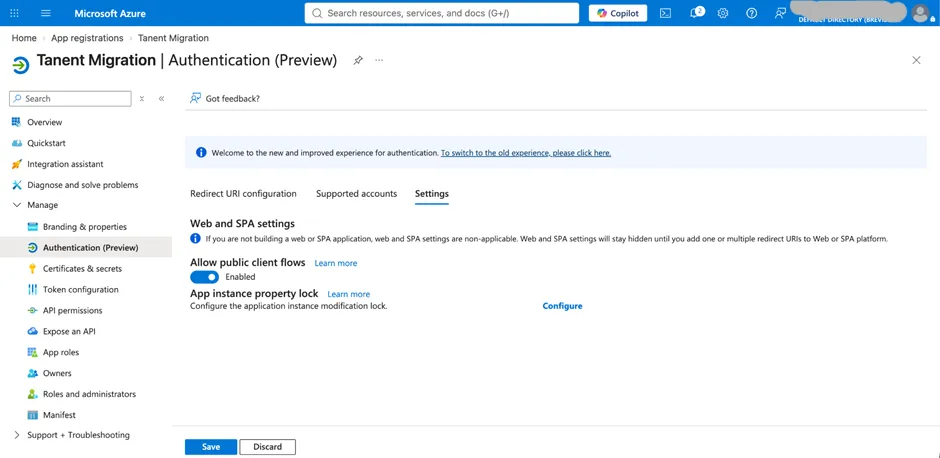
9. Now click authentication tab from Sidebar and come in settings tab and on “allow public” client flow and click save
10. Now click API Permission from sidebar
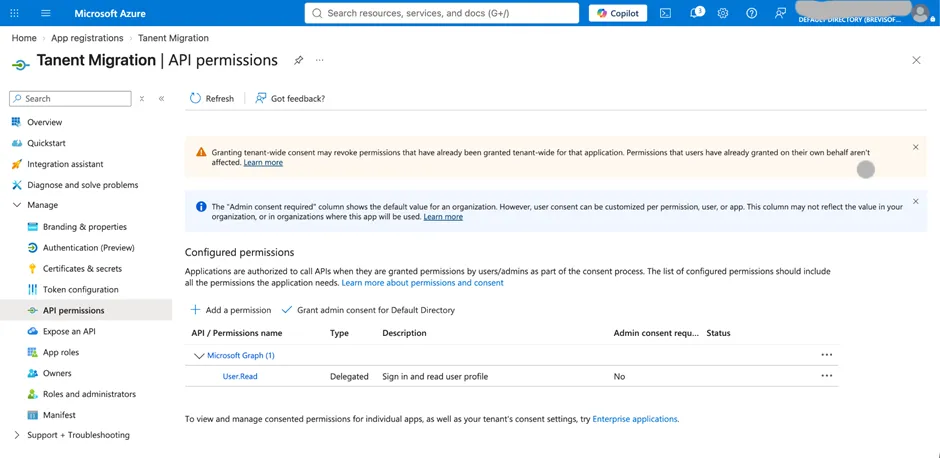
11. Now click “add a permission” click microsoft graph button
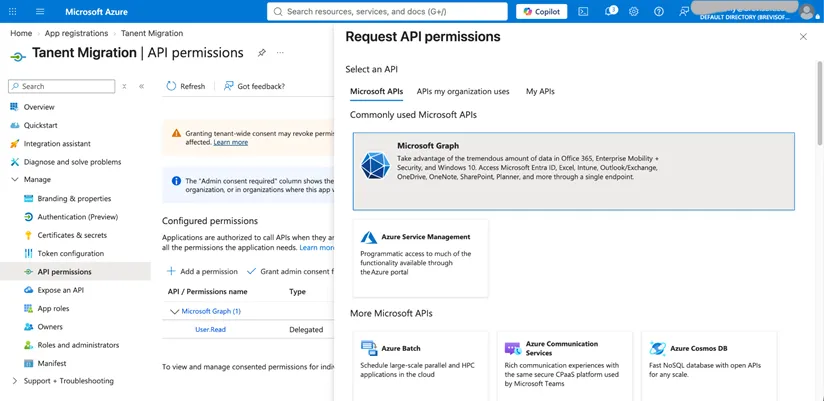
12. Click now delegate permission
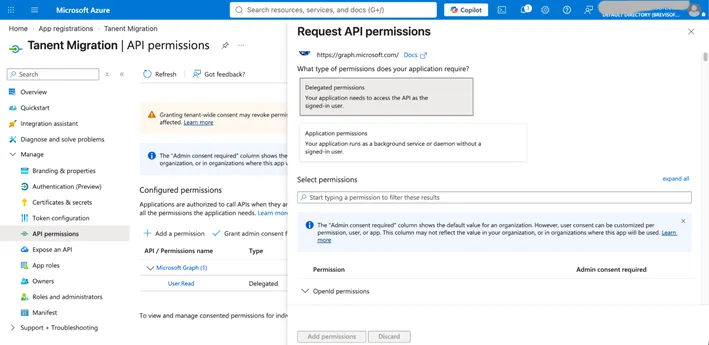
13. Now select all these permissions one by one and click add permission
ChannelMessage.Read.All
CrossTenantUserProfileSharing.ReadWrite.All
DeviceManagementConfiguration.Read.All
DeviceManagementManagedDevices.Read.All
Directory.ReadWrite.All
Files.ReadWrite.All
Group-Conversation.ReadWrite.All
Group.ReadWrite.All
GroupMember.ReadWrite.All
Mail.ReadWrite
Mail.ReadWrite.Shared
MailboxSettings.ReadWrite
Policy.Read.All
Reports.Read.All
SecurityEvents.Read.All
SecurityIncident.Read.All
Sites.FullControl.All
Tasks.ReadWrite
Tasks.ReadWrite.Shared
Team.ReadBasic.All
TeamMember.ReadWrite.All
User.Read
User.ReadWrite.All
14. Now again click add permissions then graph api and now click application
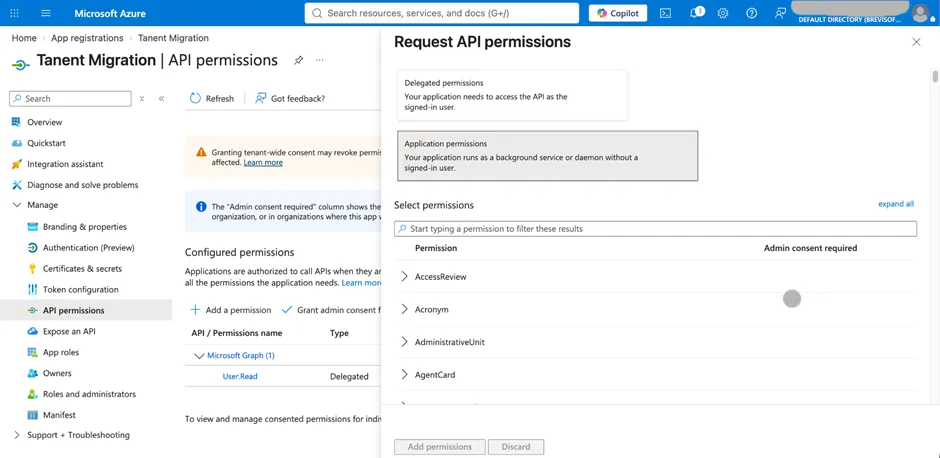
15. And add these 2 permissions
Chat.Read.All
Teamwork.Migrate.All
16. After this click “grant admin consent for default directory”
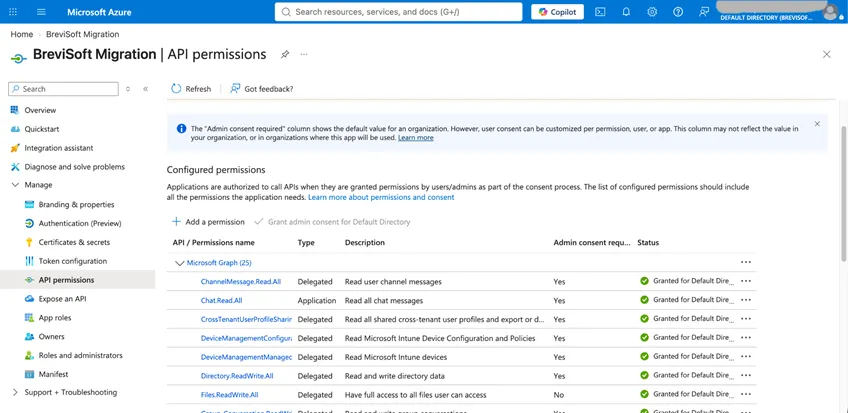
17. Now copy tenant id, client id and client secret and paste in the app and click connect button
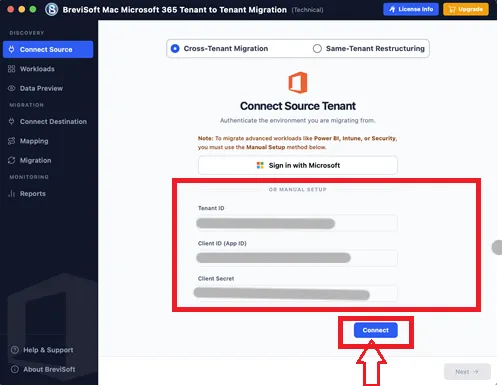
18. Now successfully connect your account.
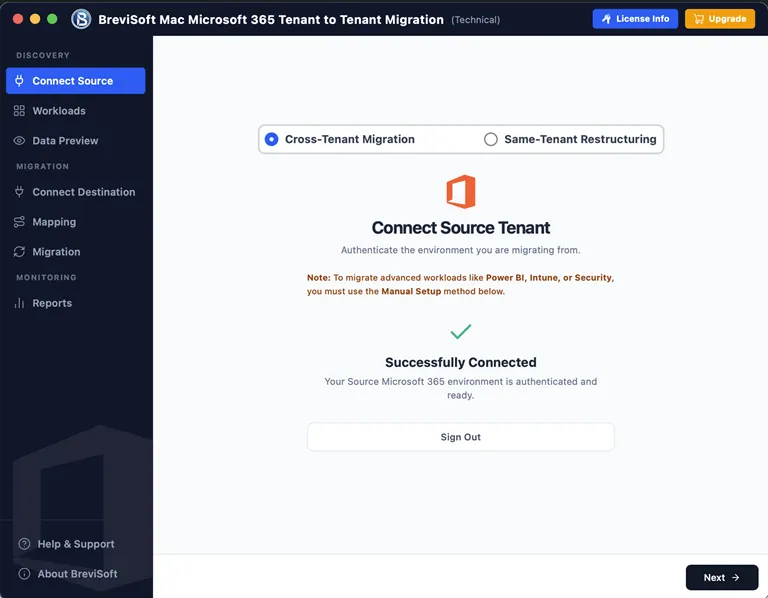
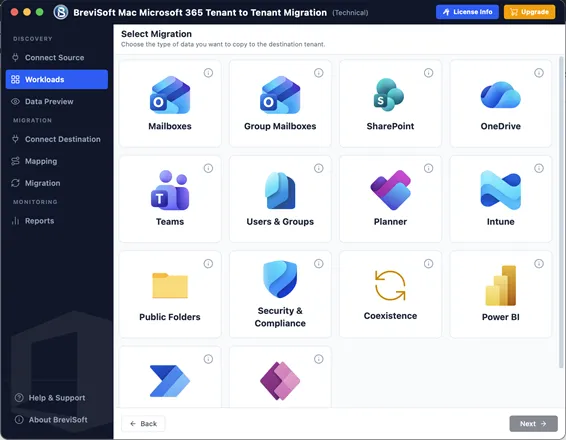
STEP 6
Select what you want to migrate and click next
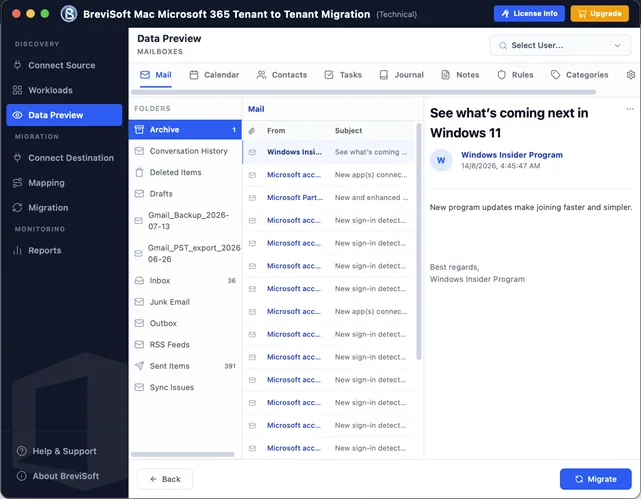
STEP 7
Preview you messages and attachments contact, calendar task journal all the things And click migrate button
STEP 8
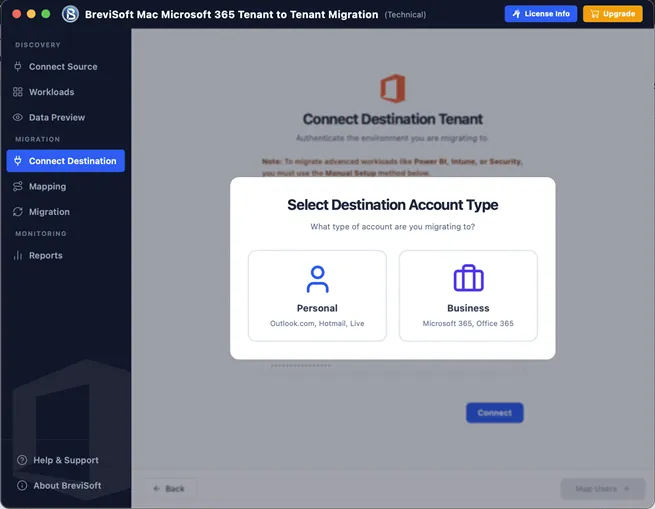
Select the type of account you want to migrate, then authenticate again using either “Sign in with Microsoft” or the manual authentication method.
Note: In the Connect Source section above, we have provided complete instructions for connecting the source Microsoft 365 account using either “Sign in with Microsoft” or the Manual Authentication method. You can follow the same steps to connect and log in to the destination Microsoft 365 account.
STEP 9
After signing in, your destination Microsoft 365 account will be connected successfully.
STEP 10
Now map the user from source to destination account and click next
STEP 11
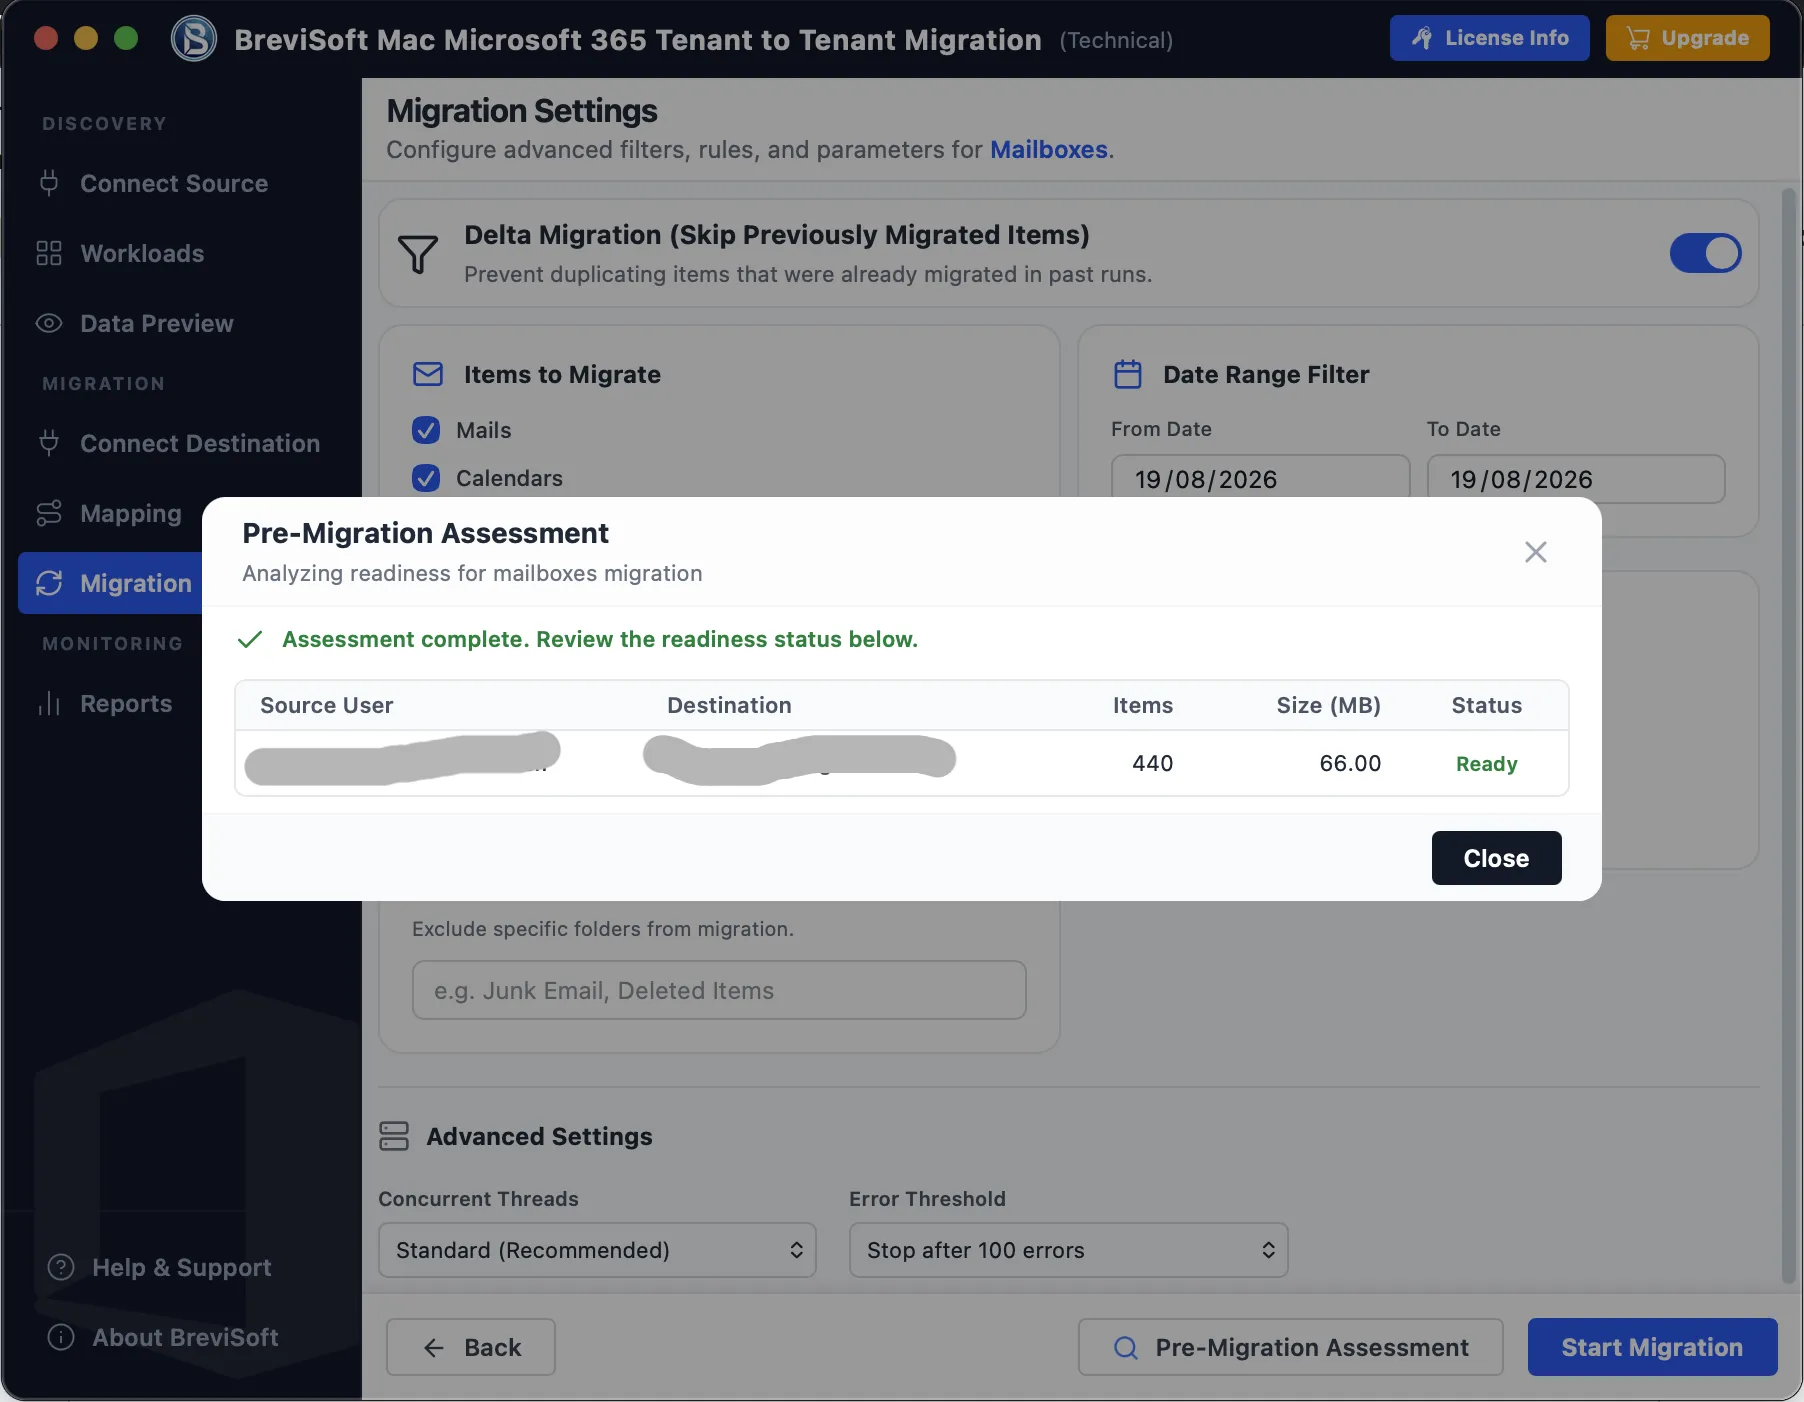
Apply filters and click pre migration assessment to check everything is fine
STEP 12
After successful assessment click close and click start migration button and wait until migration is not completed.