STEP 1
Download, Install & Runs BreviSoft MBOX Converter Tool.
STEP 2
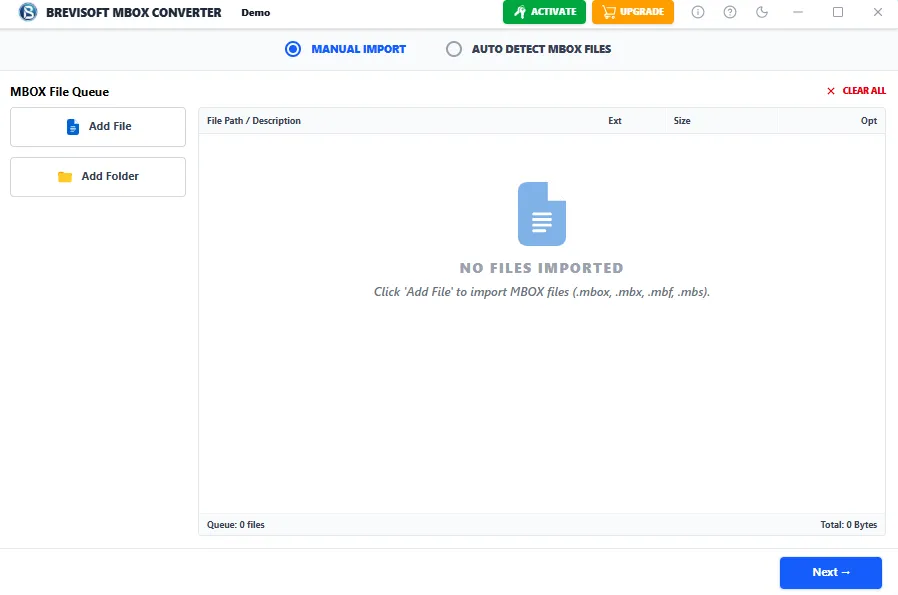
Open Software and Select MBOX File by Manual Import or Auto Detect MBOX Files.
Supported File Formats
The software indicates that users can import:
- .mbox
- .mbx
- .mbf
- .mbs
- Thunderbird MBOX
- Google Takeout MBOX File
- .mbox file created by email clients like Mozilla Thunderbird, Apple Mail, Eudora, Netscape Mail, SeaMonkey, Opera Mail, Postbox, Claws Mail, Sylpheed, Evolution, Spicebird, Entourage, Mulberry, PocoMail, The Bat!, Alpine, Mutt, KMail, Geary, Trojita, MailMate, Gnus, Pegasus Mail, Sylpheed-Claws, and Google Takeout.
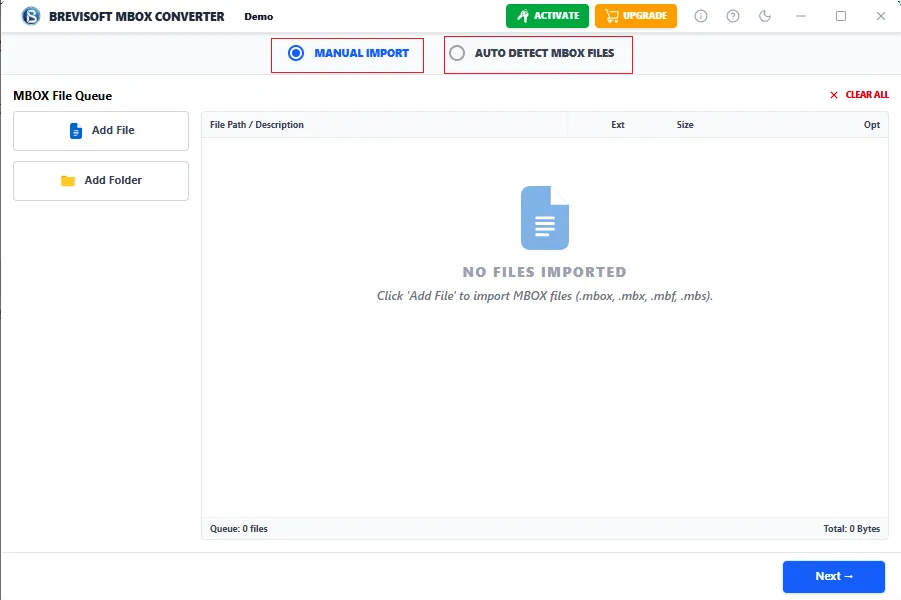
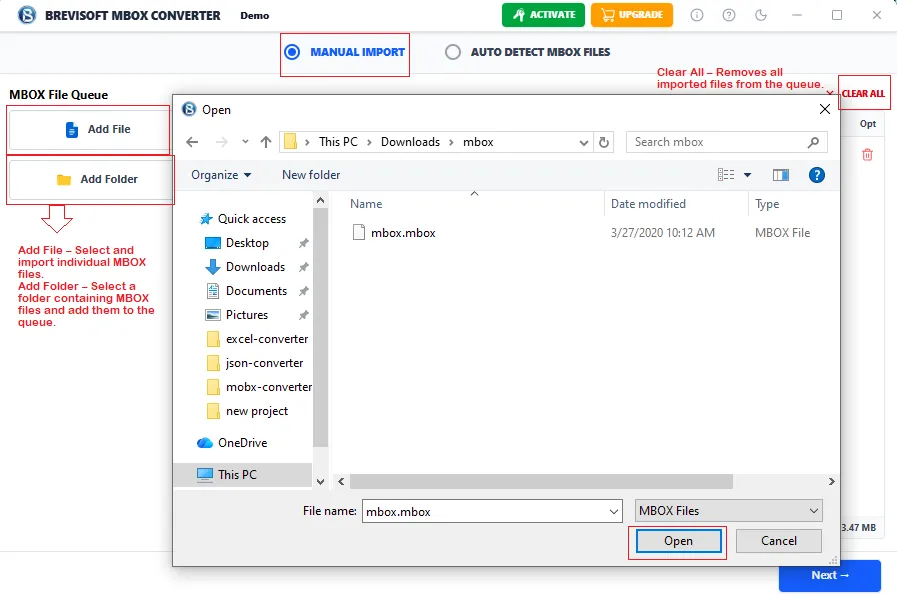
Manual Import- Selected by default. Users can manually choose MBOX files or folders.
Auto Detect MBOX Files- Automatically searches for MBOX files on the system.
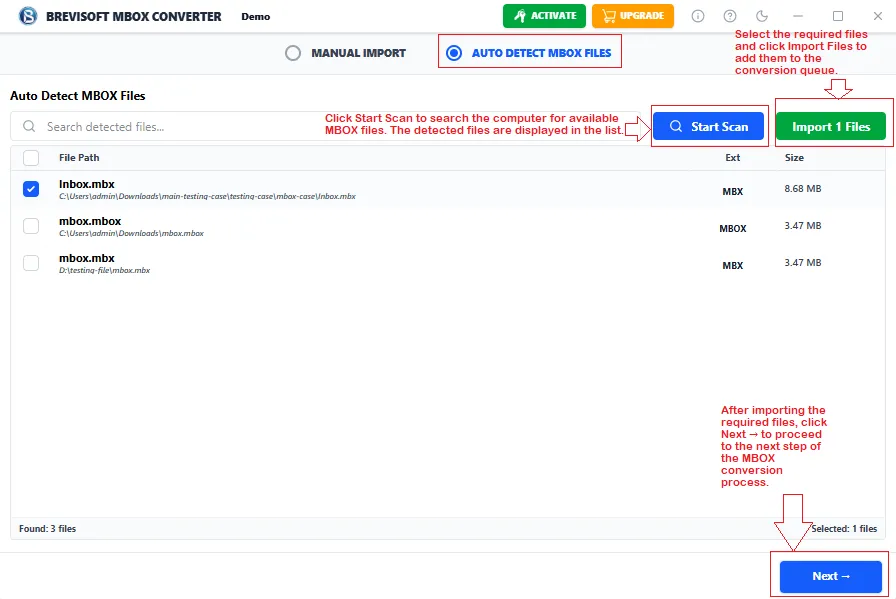
BreviSoft MBOX Converter provides two convenient options to add MBOX files— Manual Import and Auto Detect MBOX Files. Users can add individual files using Add File or import multiple MBOX files from a folder using Add Folder. The imported files are displayed in the MBOX File Queue along with their file path, extension, and size. Once the files are added, click Next to continue.
STEP 3
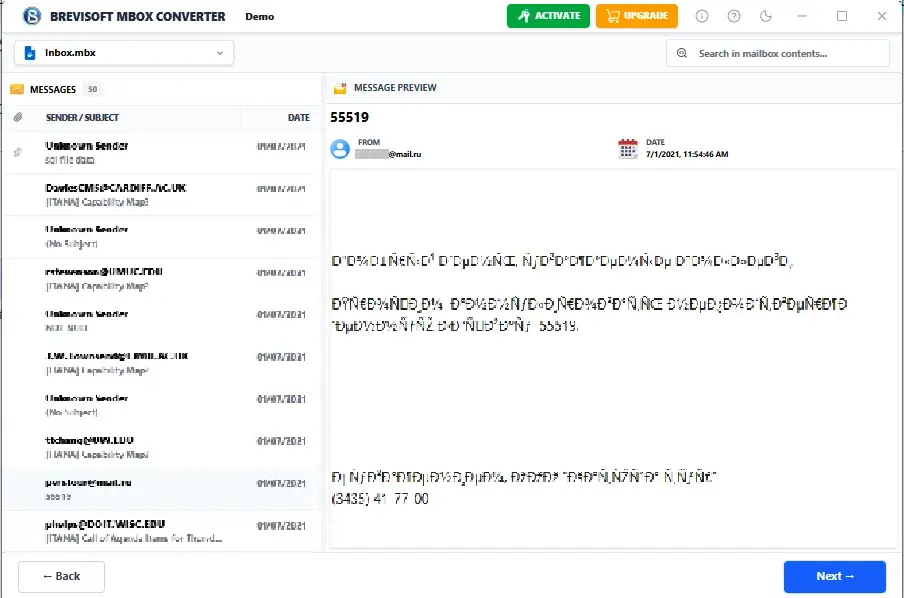
Select Email and Preview all email details. After Click on Next button for Conversion.
STEP 4
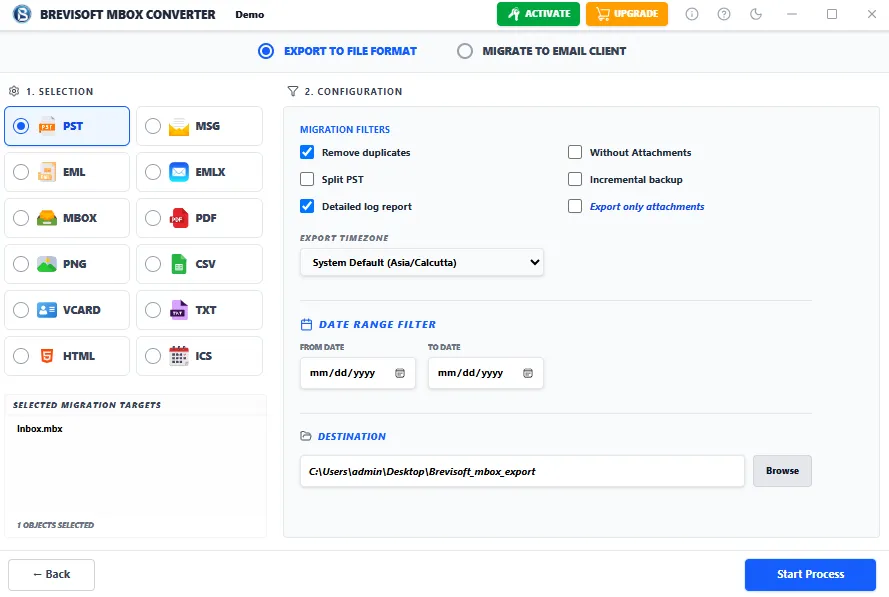
Selected output format: PST (Outlook Personal Storage Table)
Note:- The software converts MBOX files into various formats. The available output formats include: MSG, EML, EMLX, MBOX, PDF, PNG, CSV, vCard, TXT, HTML, and ICS.
Migration filters
The following options are enabled:
- Remove duplicates - It allows to remove duplicate items and export your selected emails.
- Detailed log report
The following are:
- Split PST - This options allows to split the large PST file into multiple size according to your needs.
- Without Attachments - This options export all emails without attachments.
- Incremental backup
- Export only attachments - When you choose this setting then you export only attachments from the selected emails.
Other settings
- Export timezone: System Default (Asia/Calcutta)
- Date range filter: No dates have been entered, so the export isn't restricted to a particular date range.
- Destination folder: C:\Users\admin\Desktop\Brevisoft_mbox_export
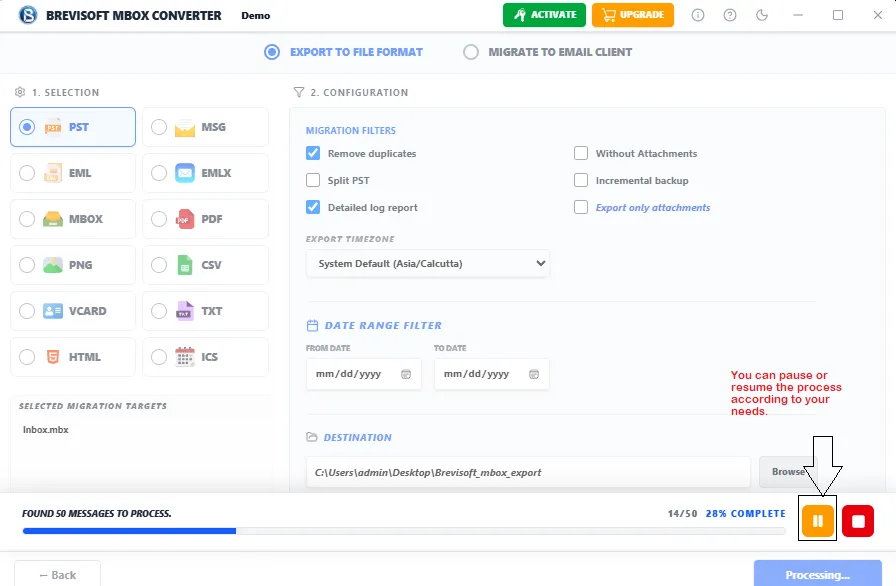
You can pause or resume the process according to your needs.
After the conversion process is complete, click the Browse button to view your converted files.
The software allows you to convert MBOX files into multiple file formats, including MSG, EML, EMLX, MBOX, PDF, PNG, CSV, vCard, TXT, HTML, and ICS.
STEP 1
Download, Install & Runs BreviSoft MBOX Converter Tool.
STEP 2
Open Software and Select MBOX File by Manual Import or Auto Detect MBOX Files.
Supported File Formats
The software indicates that users can import:
- .mbox
- .mbx
- .mbf
- .mbs
- Thunderbird MBOX
- Google Takeout MBOX File
- .mbox file created by email clients like Mozilla Thunderbird, Apple Mail, Eudora, Netscape Mail, SeaMonkey, Opera Mail, Postbox, Claws Mail, Sylpheed, Evolution, Spicebird, Entourage, Mulberry, PocoMail, The Bat!, Alpine, Mutt, KMail, Geary, Trojita, MailMate, Gnus, Pegasus Mail, Sylpheed-Claws, and Google Takeout.
Manual Import – Selected by default. Users can manually choose MBOX files or folders.
Auto Detect MBOX Files – Automatically searches for MBOX files on the system.
BreviSoft MBOX Converter provides two convenient options to add MBOX files —Manual Import and Auto Detect MBOX Files. Users can add individual files using Add File or import multiple MBOX files from a folder using Add Folder. The imported files are displayed in the MBOX File Queue along with their file path, extension, and size. Once the files are added, click Next to continue.
STEP 3
Select Email and Preview all email details. After Click on Next button for Conversion.
STEP 4
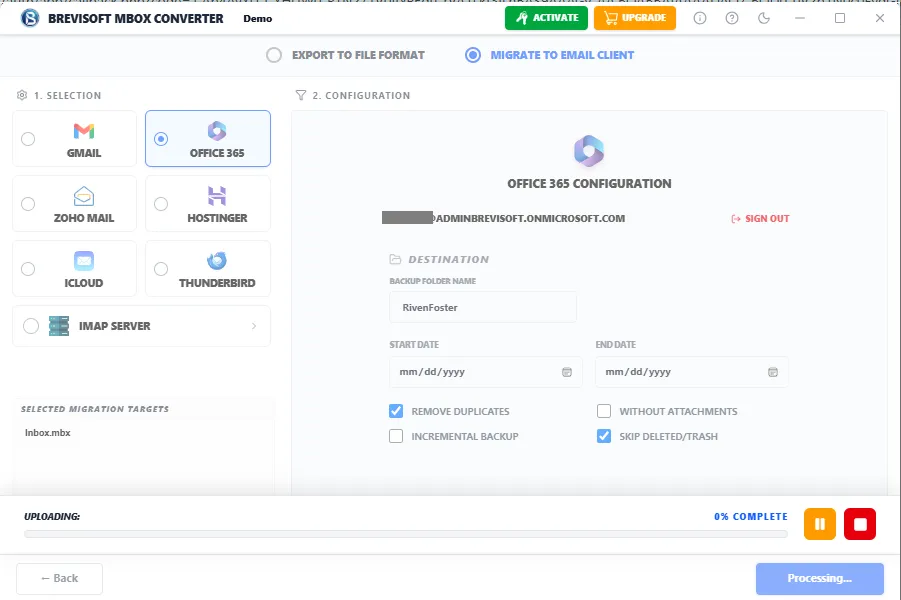
Choose the Email clients Click on Radio button and select email clients in destination for migration. We choose Office 365 for further process.
Select the email client
The software provides several migration destinations:
- Gmail
- Office 365
- Zoho Mail
- Hostinger
- iCloud
- Thunderbird
- IMAP Server
The selected source file is Inbox.mbx, shown under Selected Migration Targets.
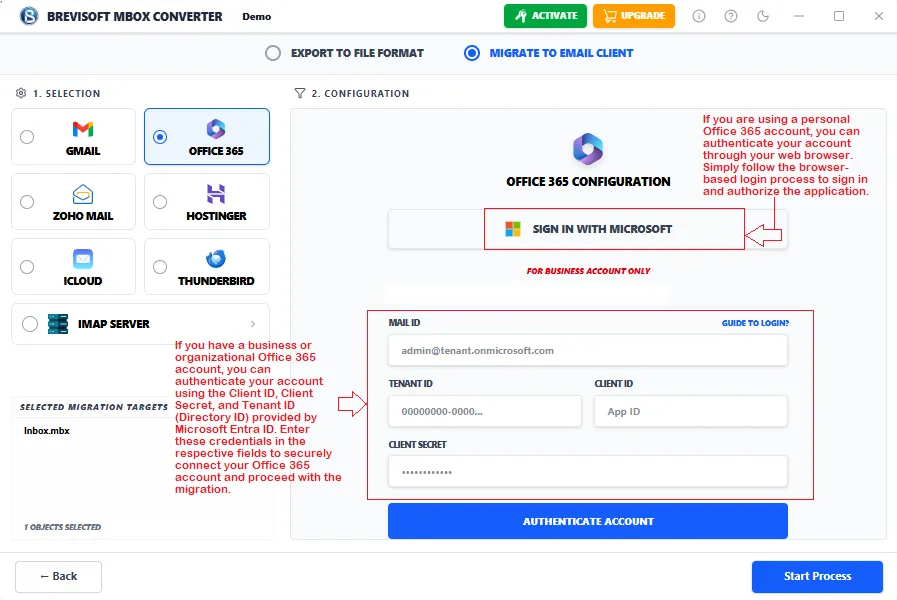
When we choose Office 365 Account then:
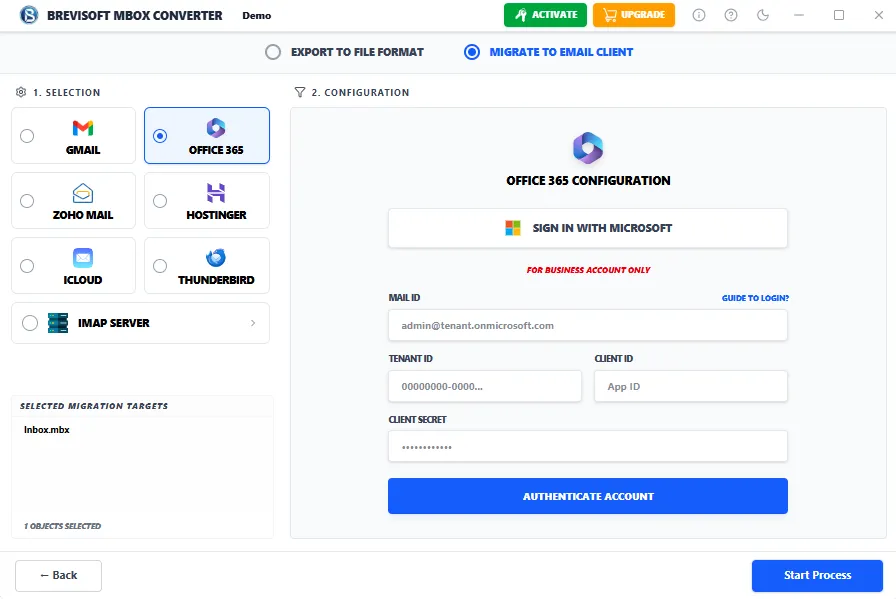
If you choose a Personal account then you can go with Sign in with Microsoft - Click on it and authenticate login process with web browser.
OR
If you choose business account then you can login with Create Tenant ID, Client ID and Client Secret
STEP 5
After login you can check the setting and click on Start Process button then migration will start.