To migrate and back up mailboxes from Microsoft 365 or OneDrive using Brevi Software, select Office 365 and provide the Application (Client) ID, Client Secret value, Azure Admin ID, and Tenant ID. Follow the steps below:
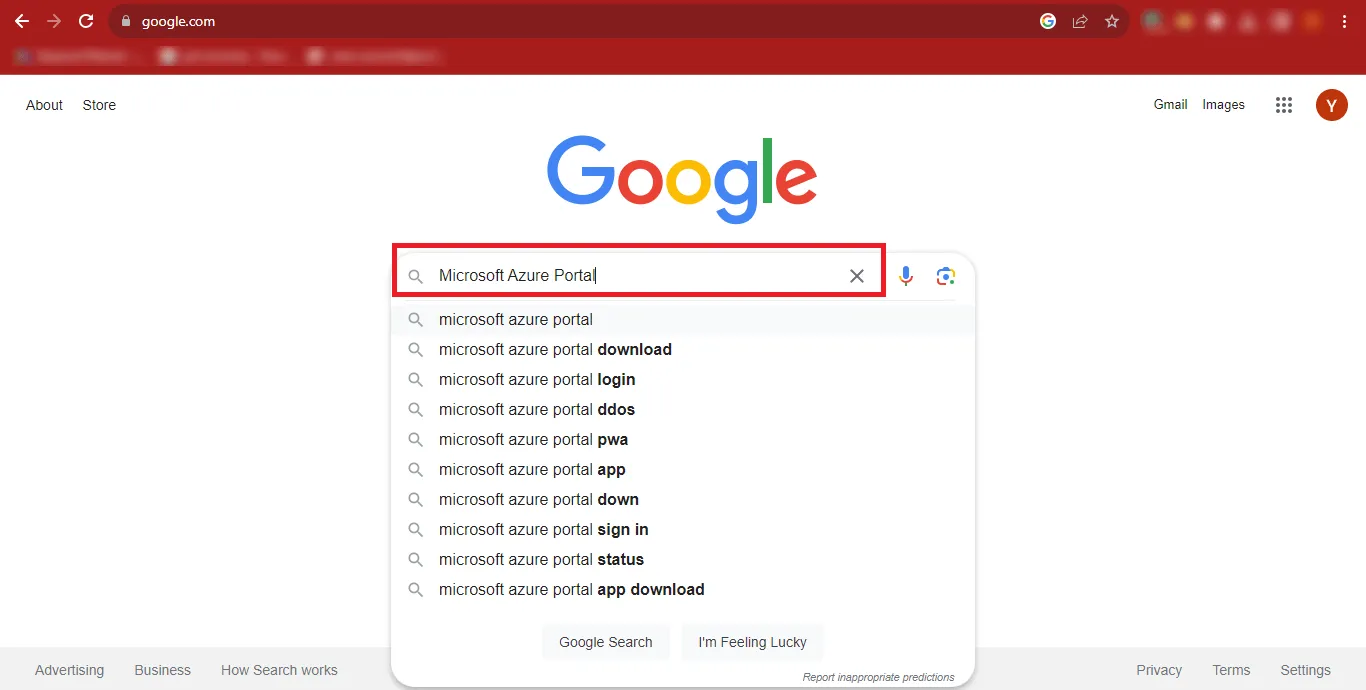
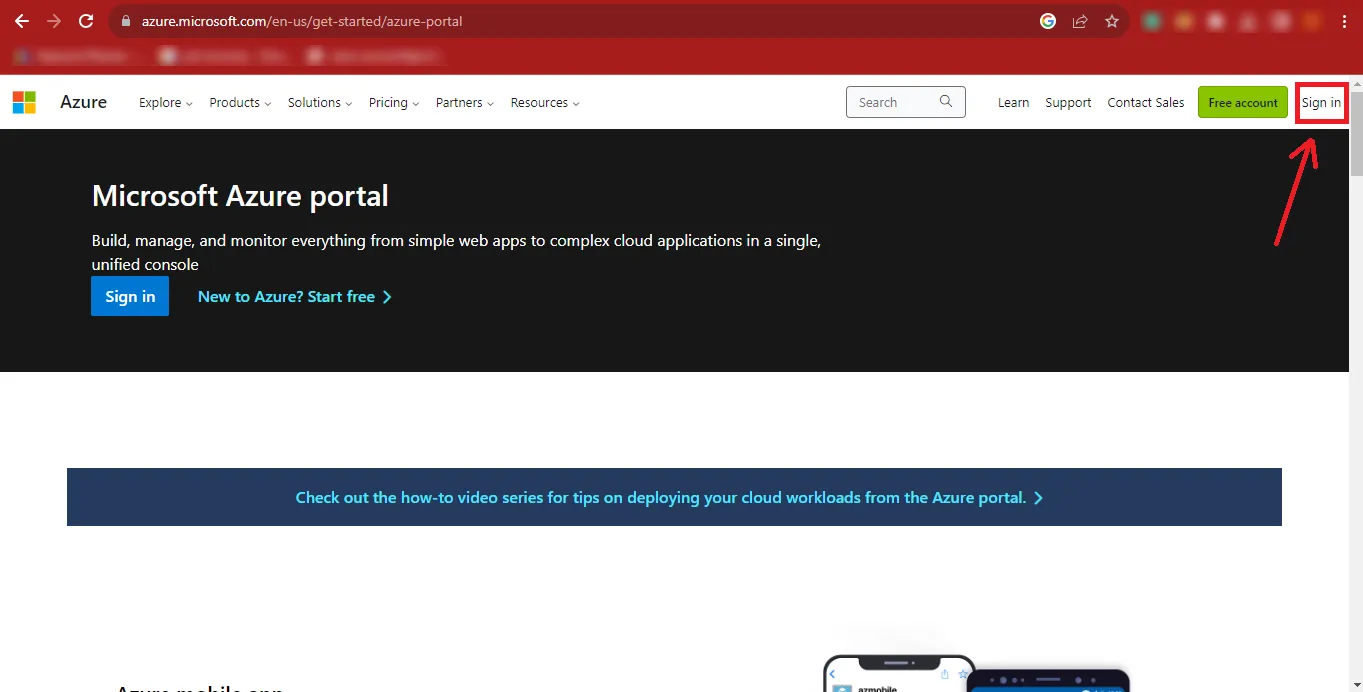
Step 1: Open Google and search for Microsoft Azure Portal.
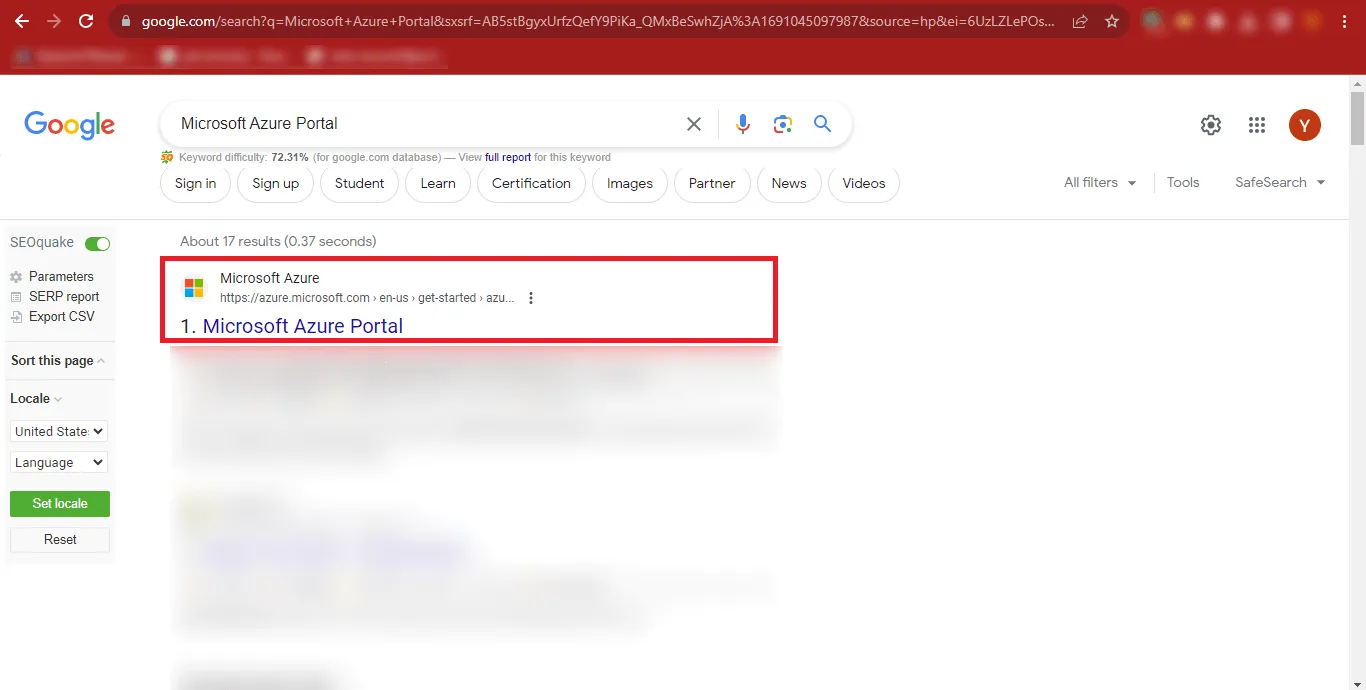
Step 2: Click the first result shown in the search results, or directly open: https://azure.microsoft.com/en-us/get-started/azure-portal
Step 3: The Microsoft Azure Portal page will open. Click the Sign In button at the top-right corner of the page.

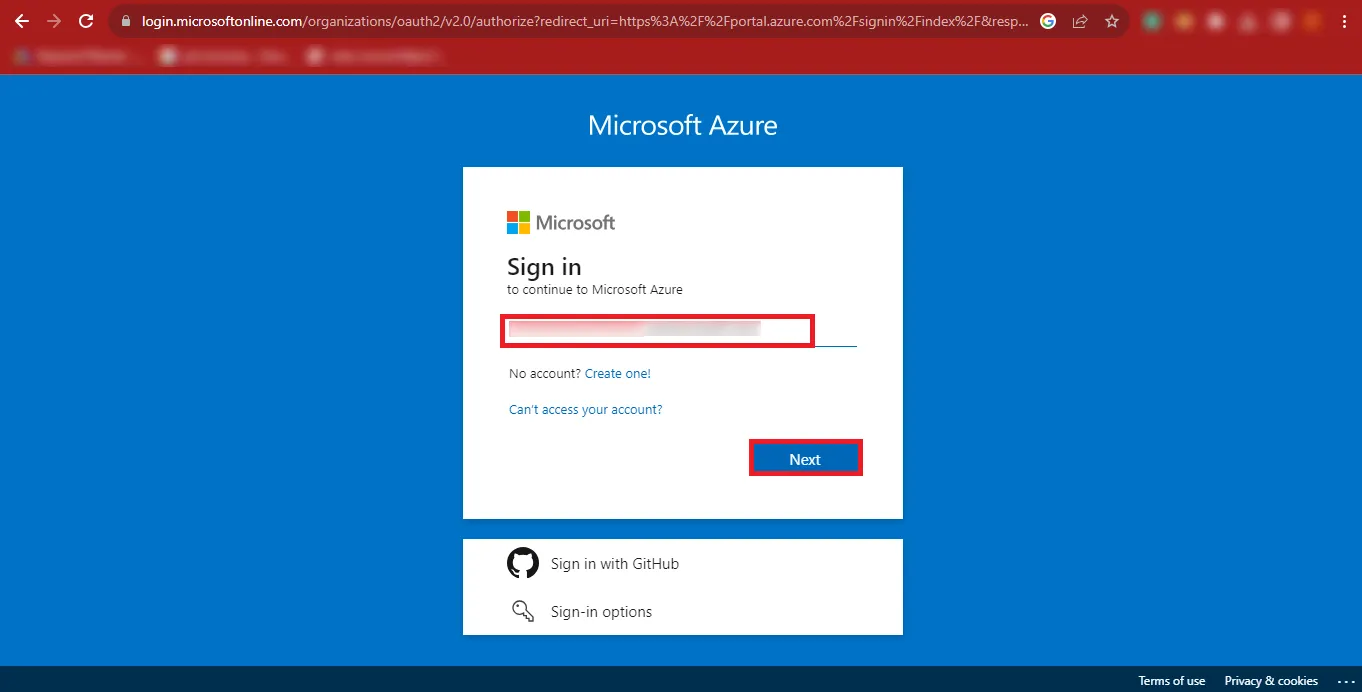
Step 4: Enter your Microsoft Admin ID and click Next

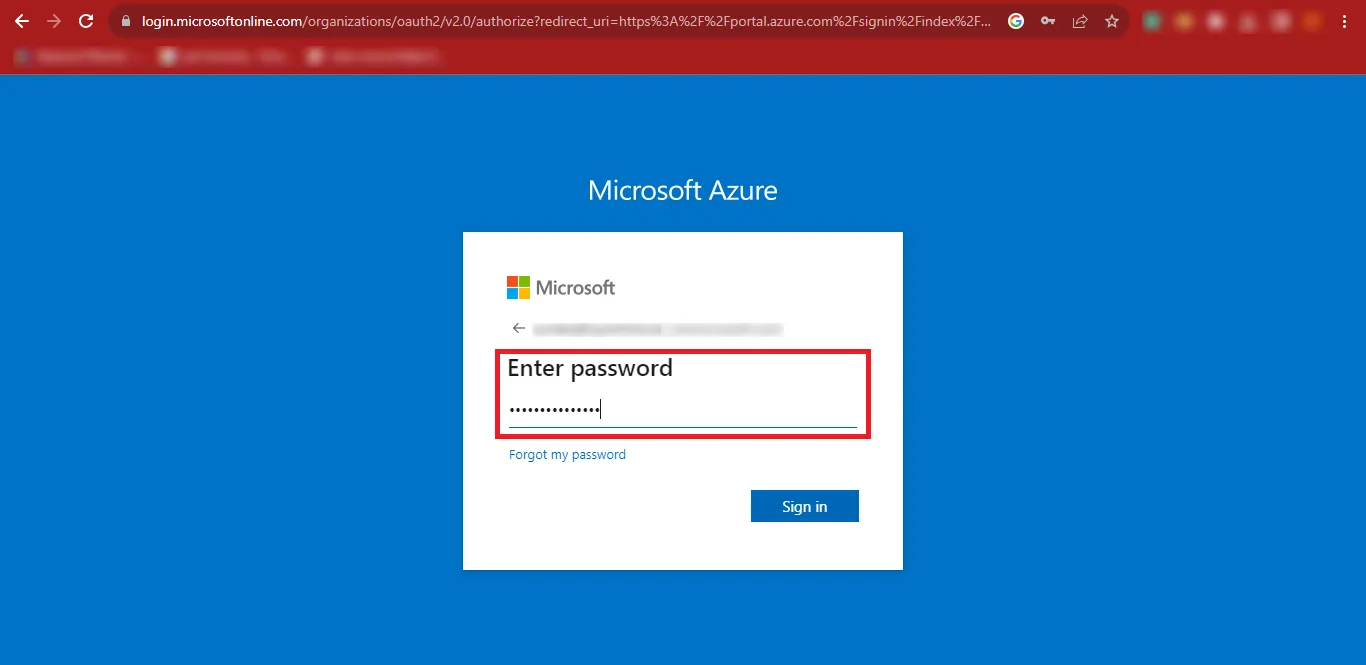
Step 5: Enter your password and click Sign In.

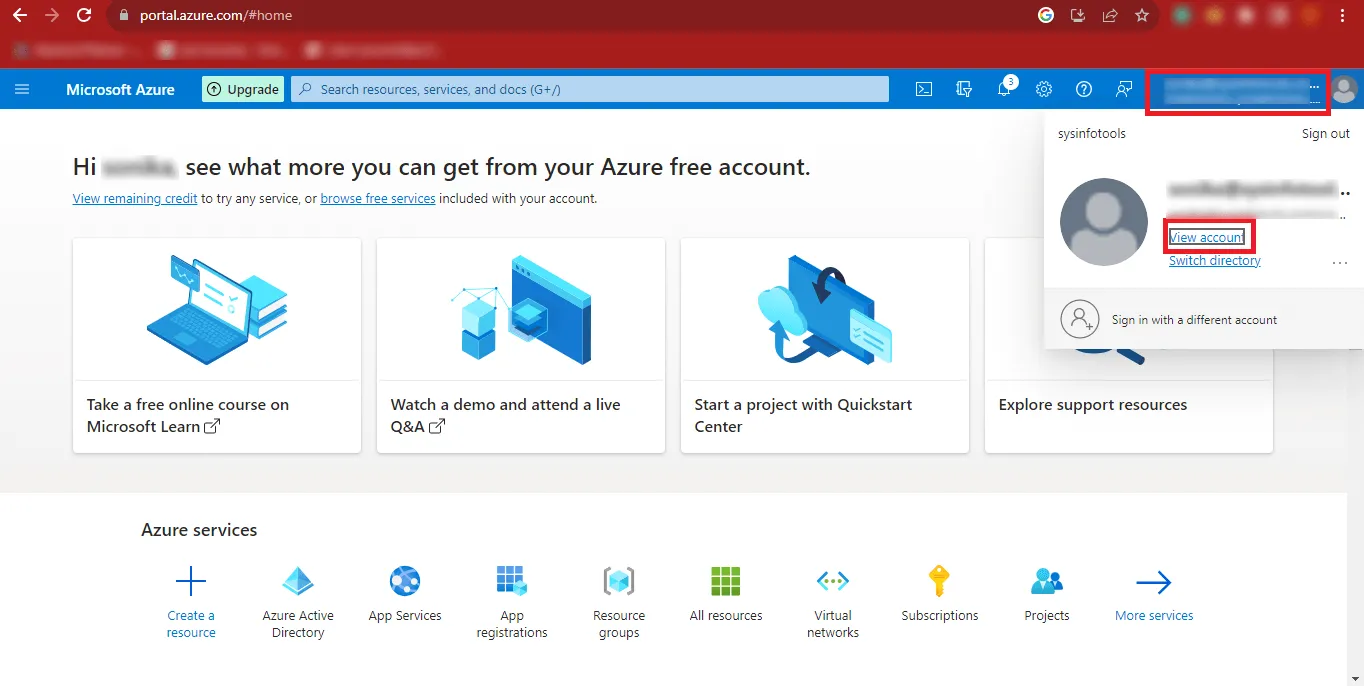
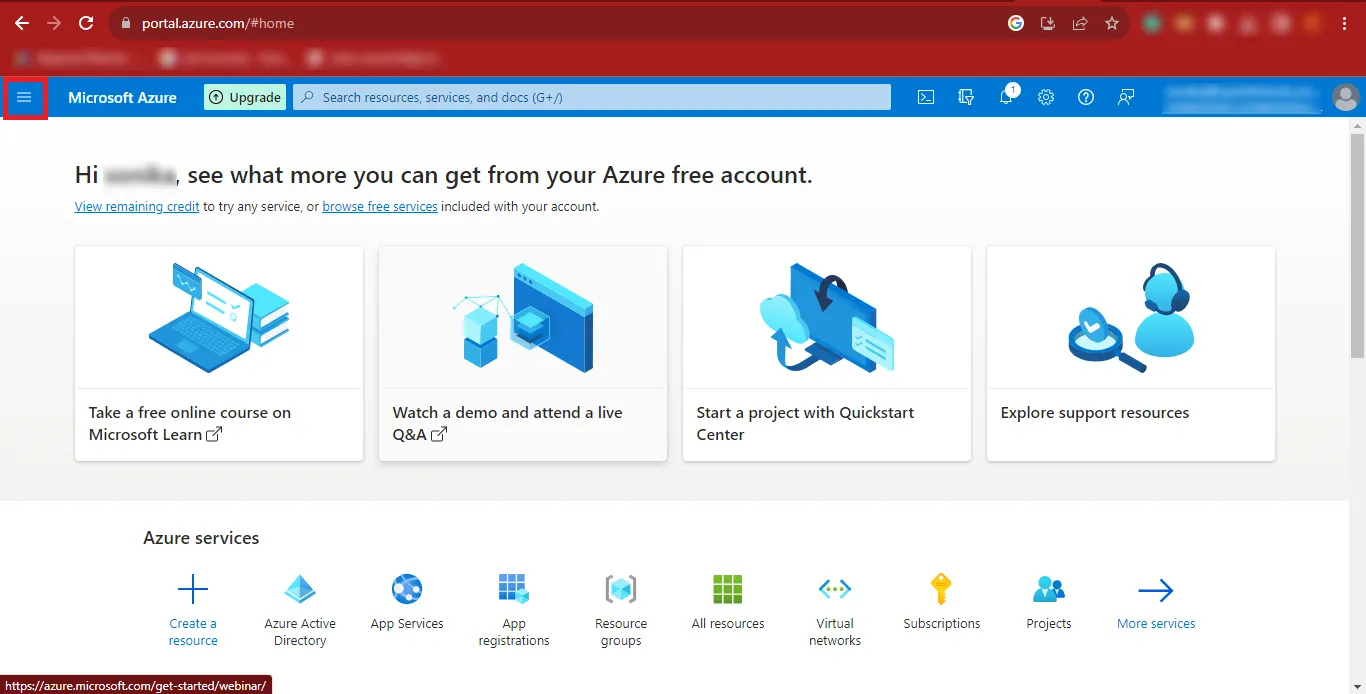
Step 6: Click your User ID at the top-right corner and select View Account.
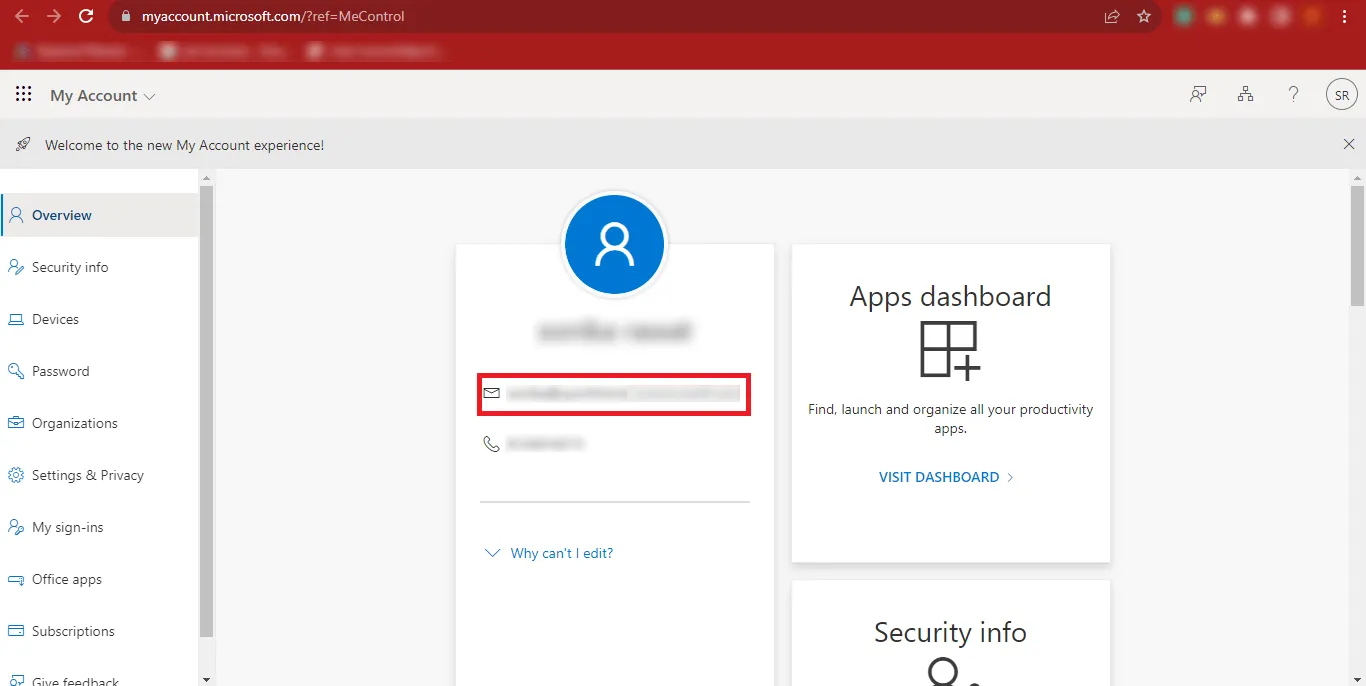
Step 7: Copy your Admin ID and save it in a safe location.
Step 8: Go back to the previous page and click the three horizontal bars (menu icon) at the top-left corner.
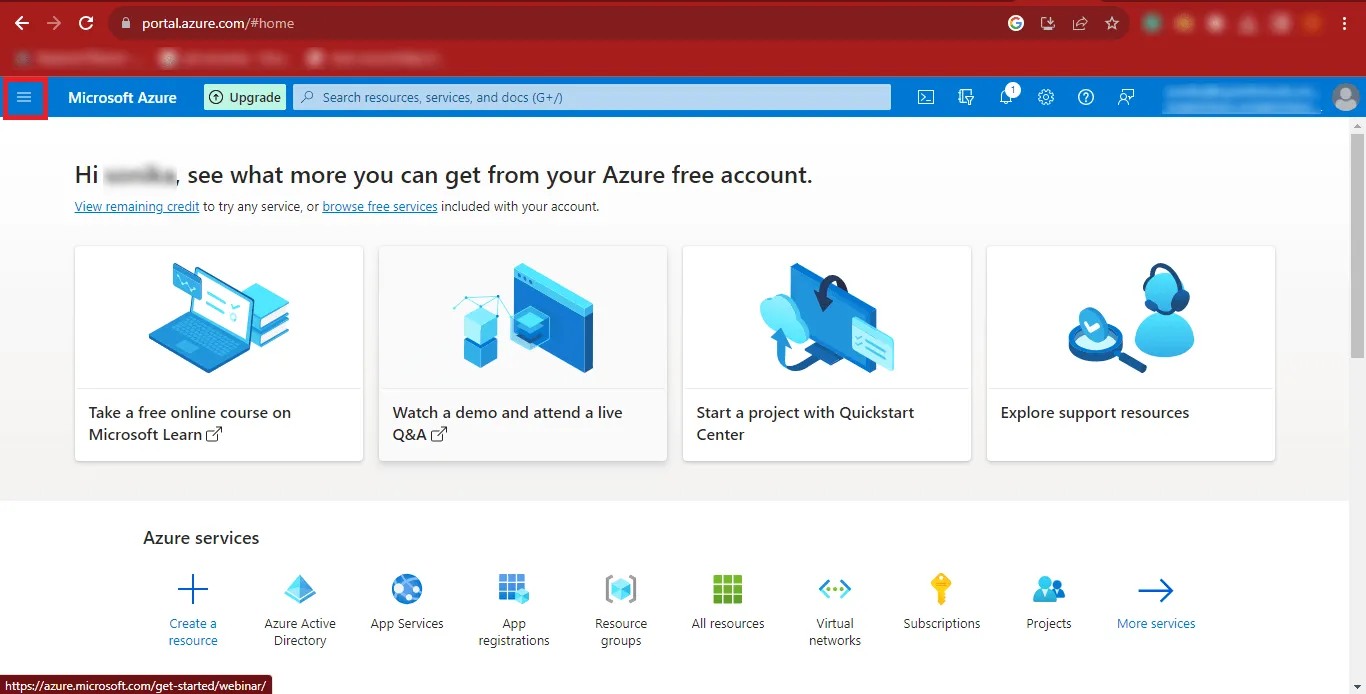
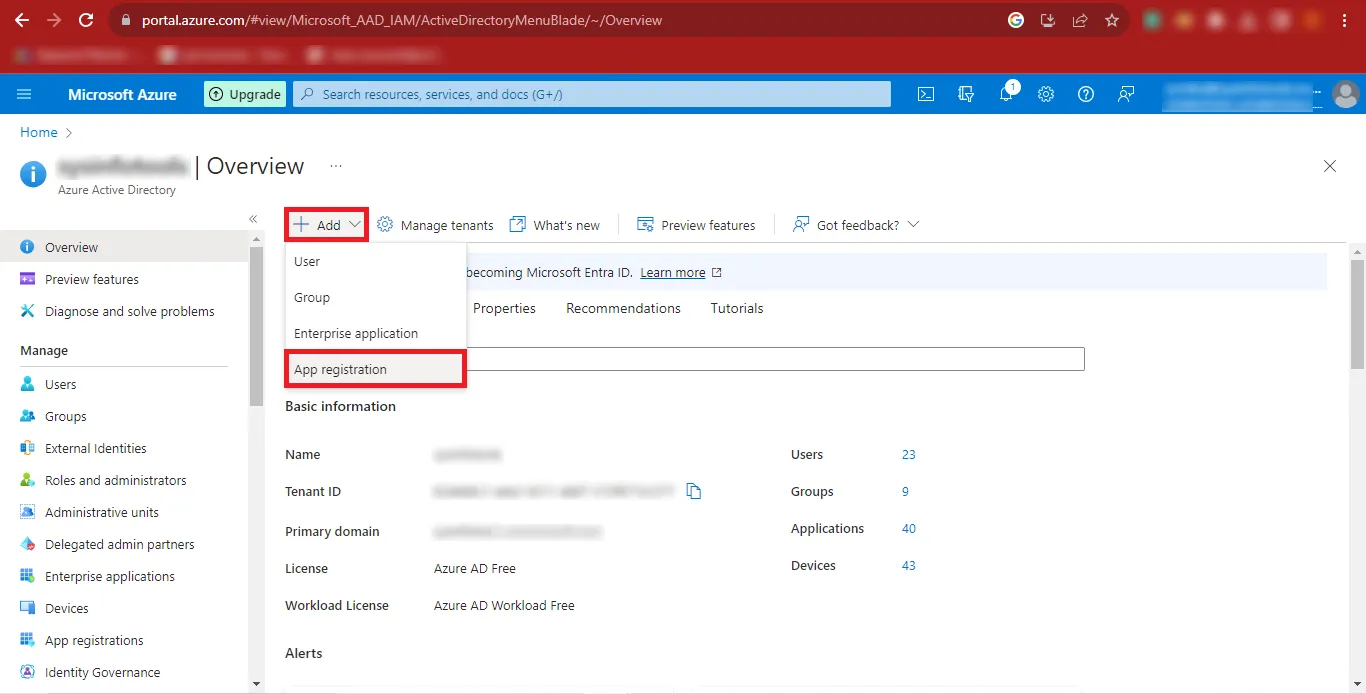
Step 9: From the menu, click Azure Active Directory.
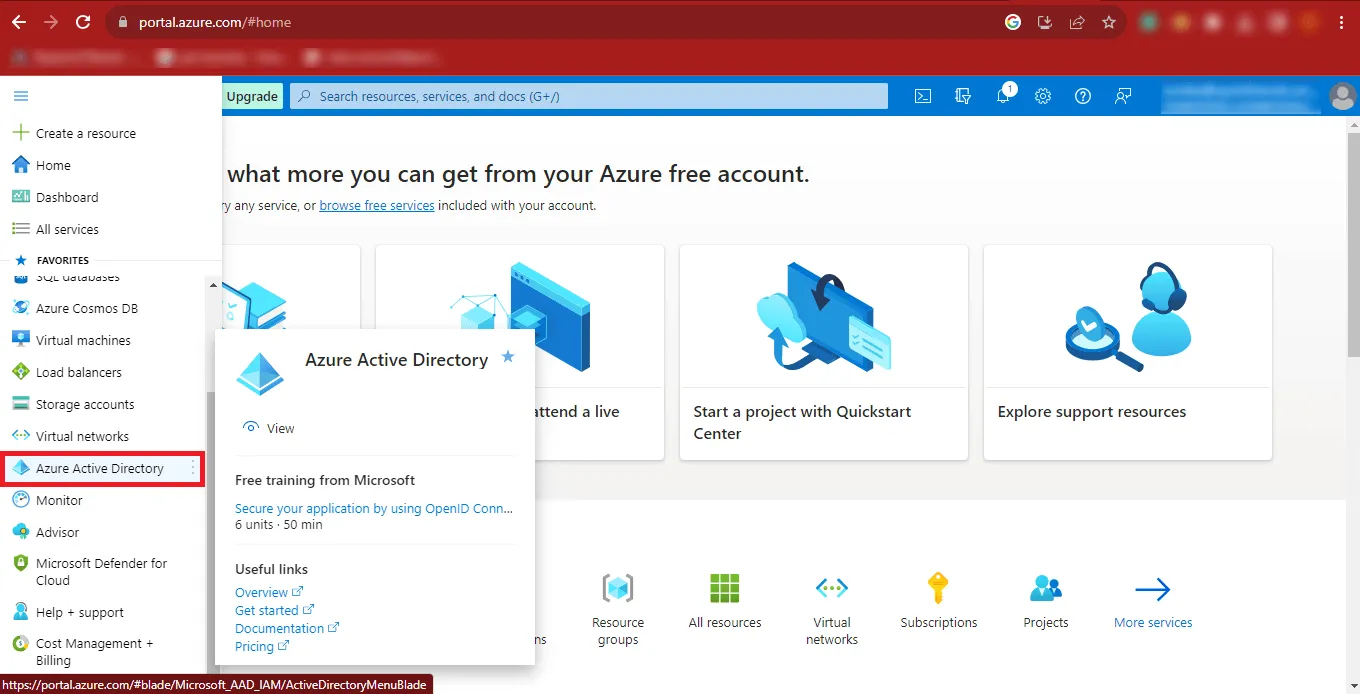
Step 10: The Azure Active Directory dashboard will appear on your screen.
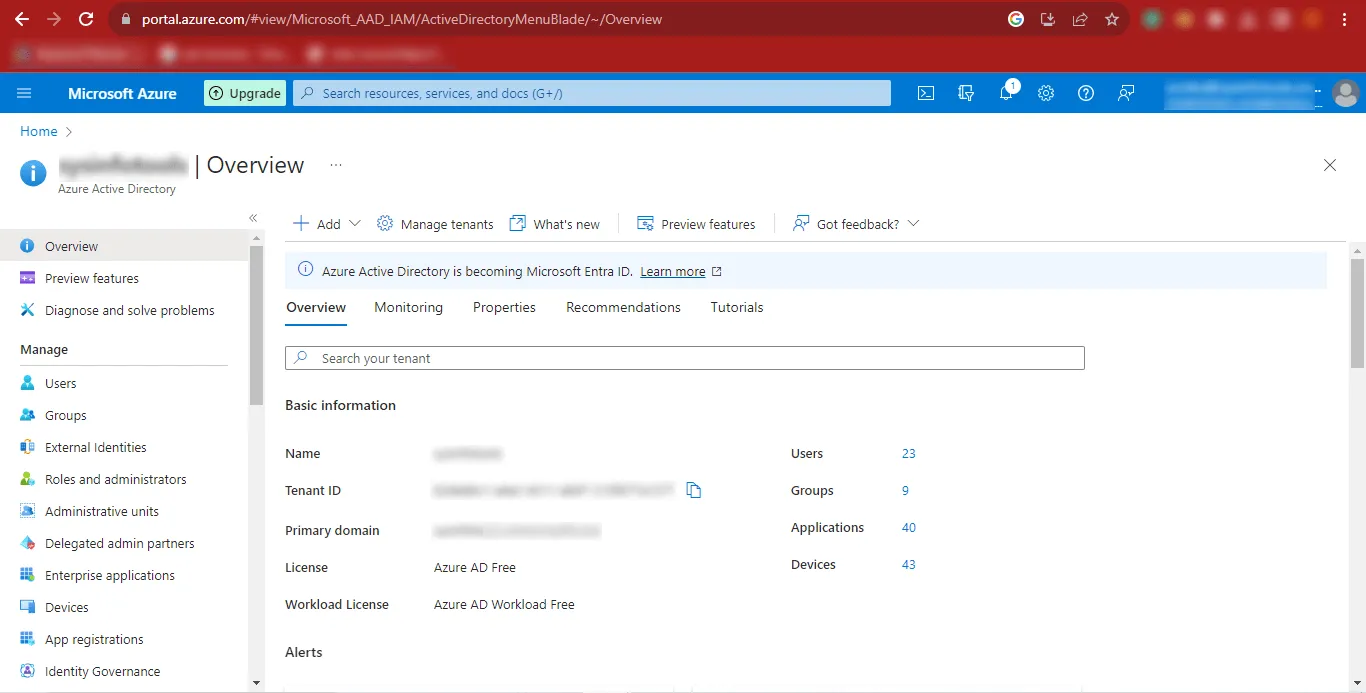
Step 11: Click Add, then select App Registration from the expanded options.

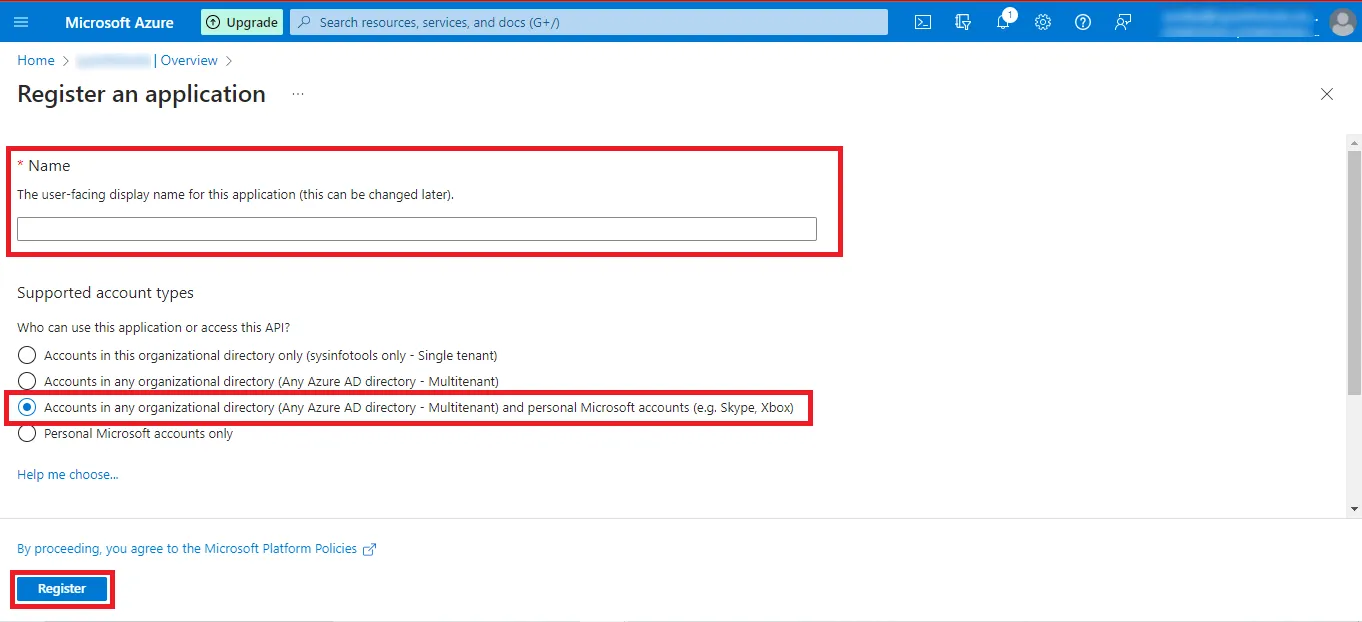
Step 12: Enter the desired app name and select:
Accounts in any organizational directory (Any Azure AD directory – Multitenant) and personal Microsoft accounts (e.g., Skype, Xbox).
Click Register to continue.

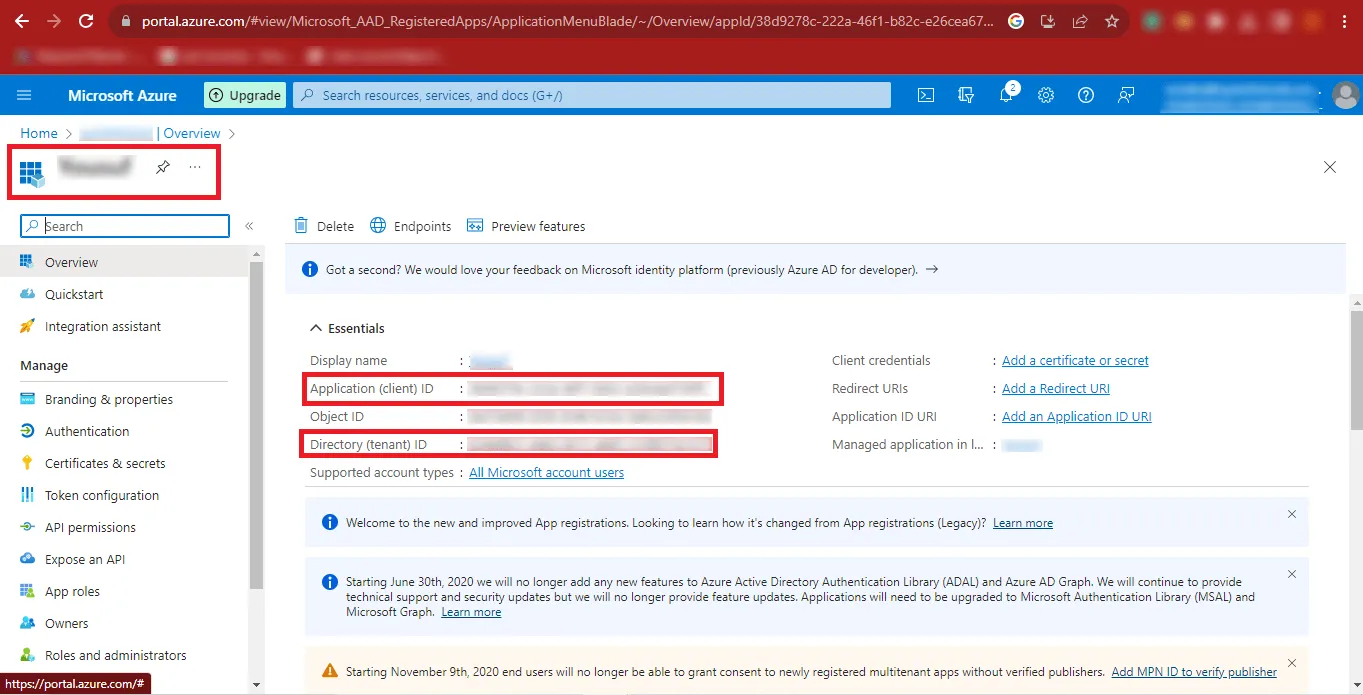
Step 13: Copy the Application (Client) ID and Directory (Tenant) ID and store them safely.
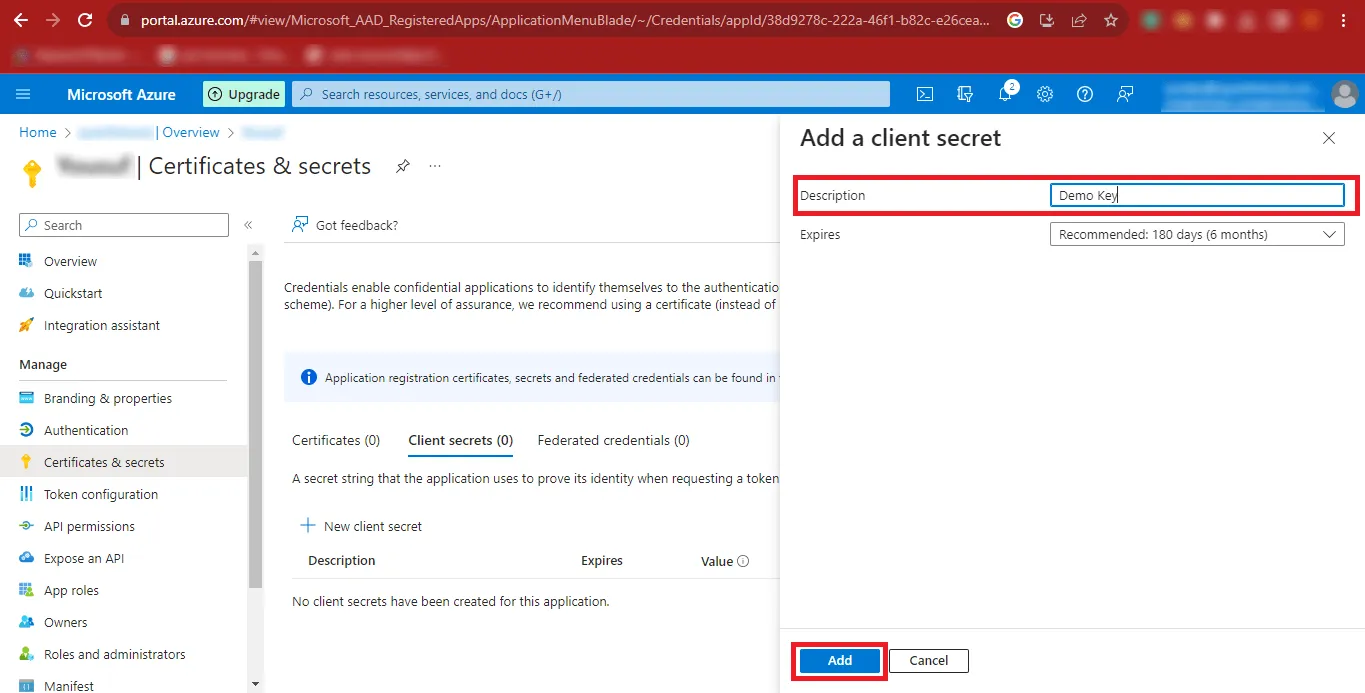
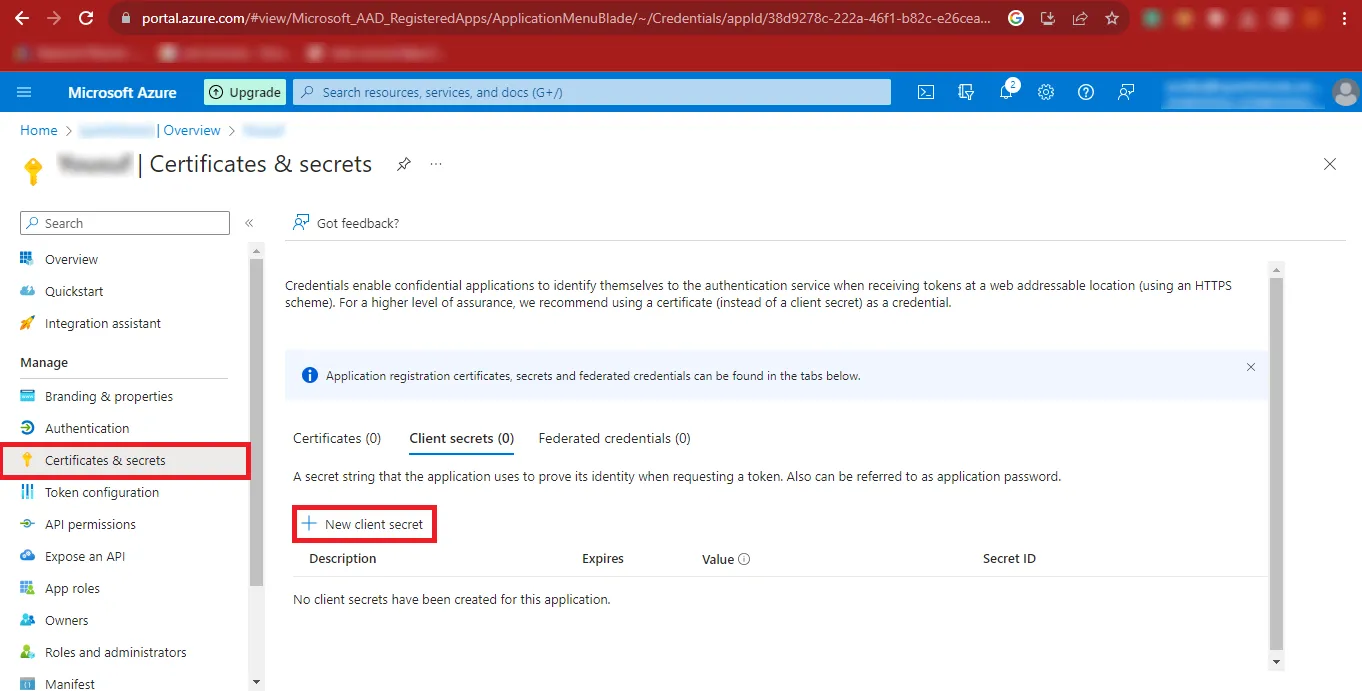
Step 14: From the left panel, click Certificates & Secrets, then select New Client Secret.

Step 15: Enter a description and click Add.
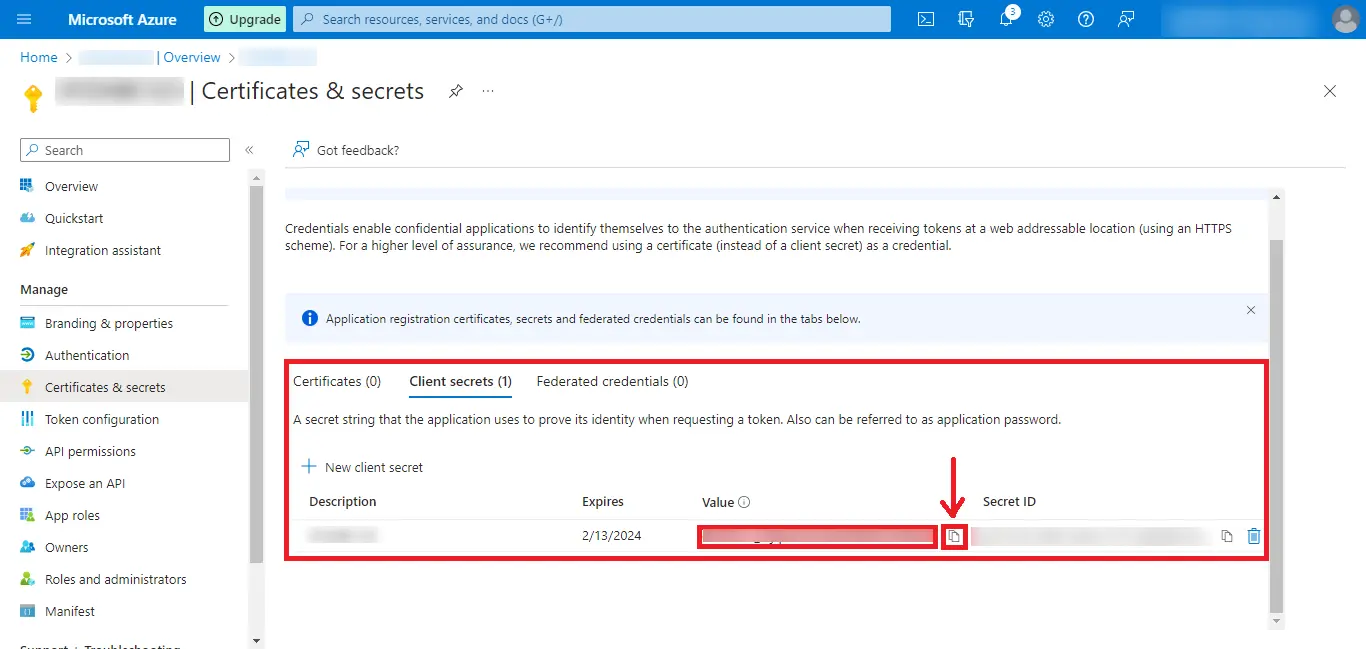
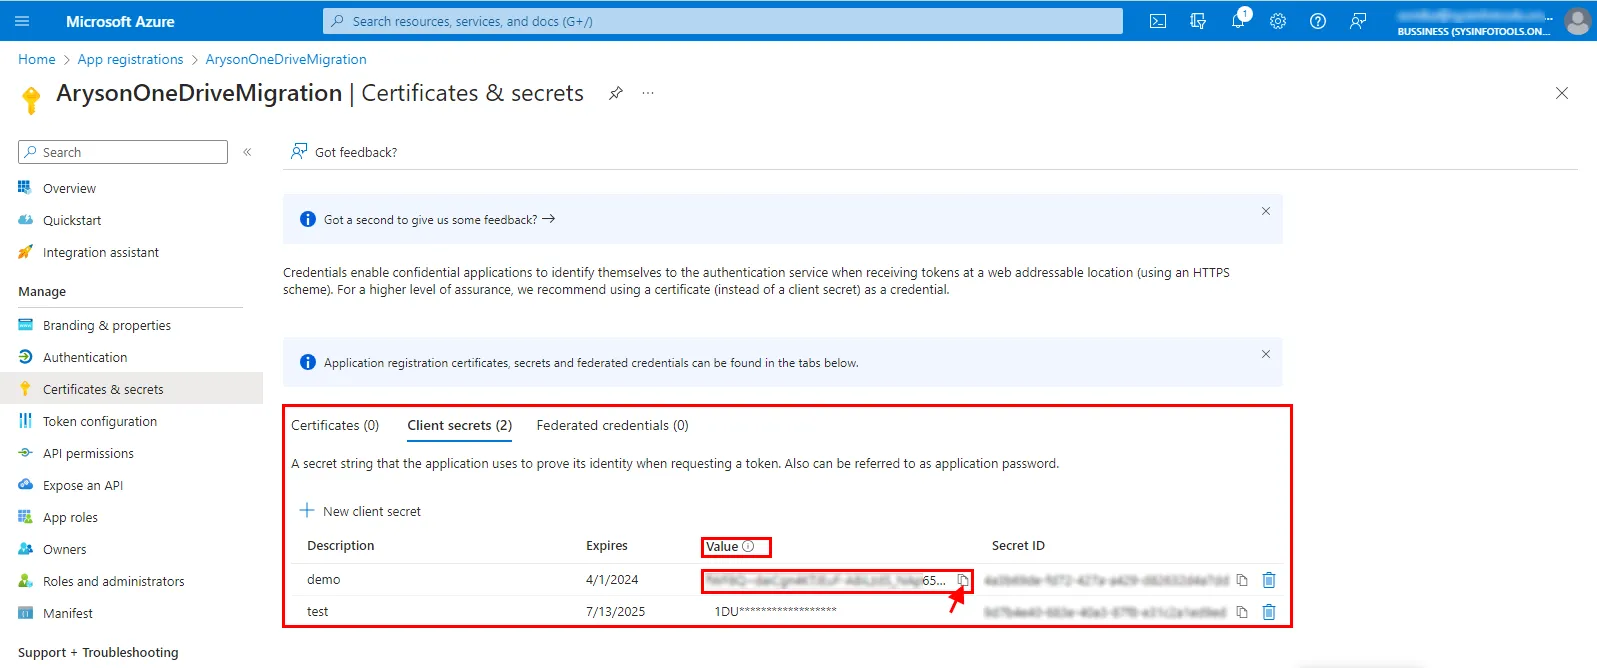
Step 16: Copy the Client Secret Value and save it securely (it is shown only once).
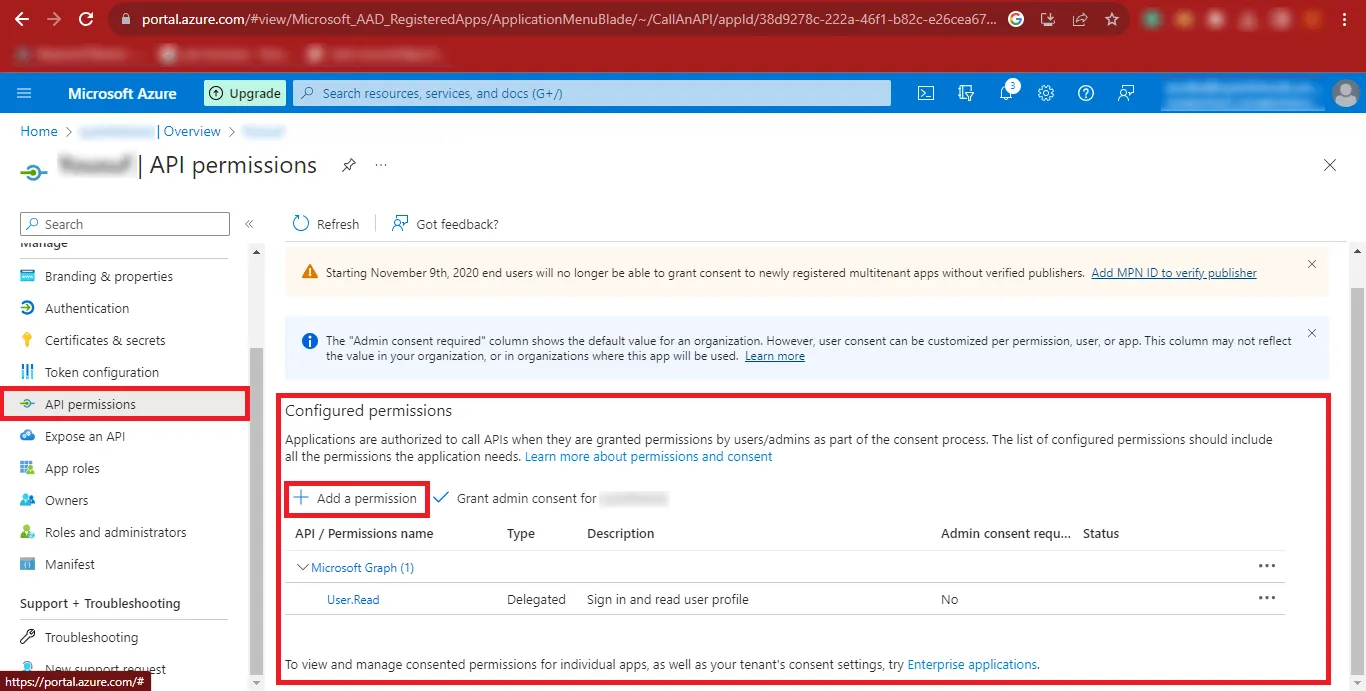
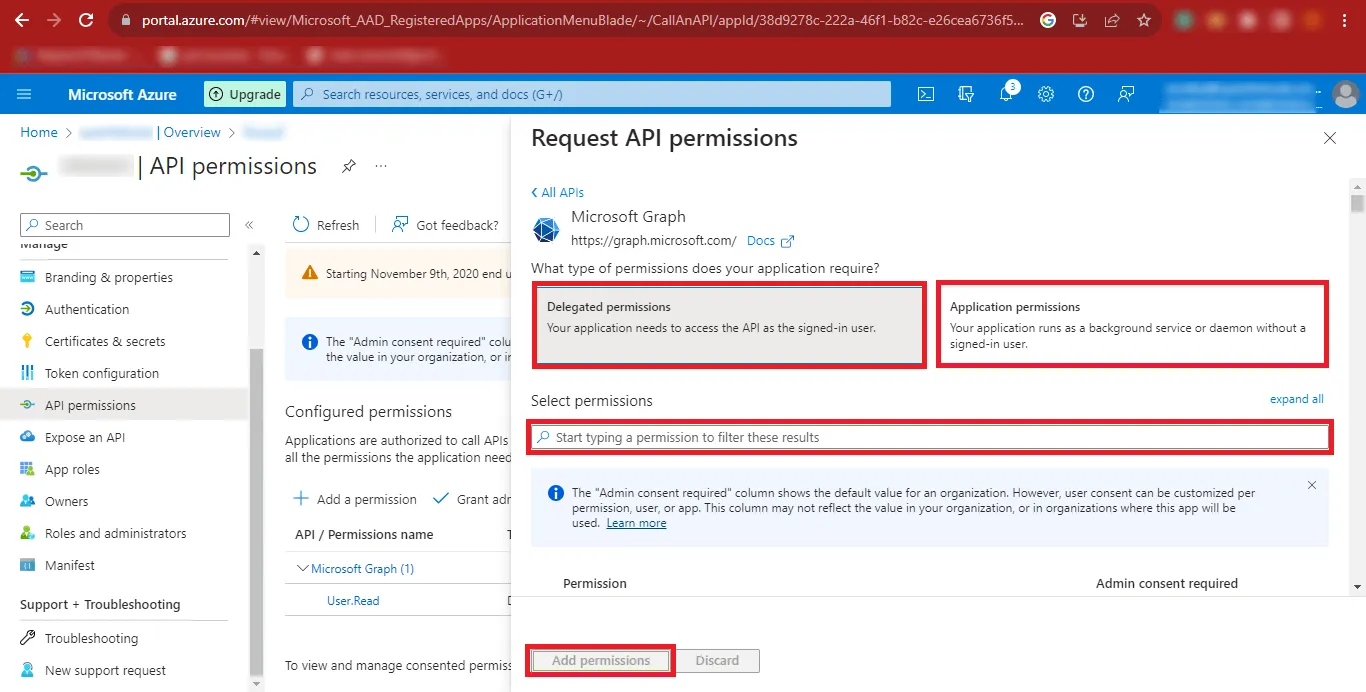
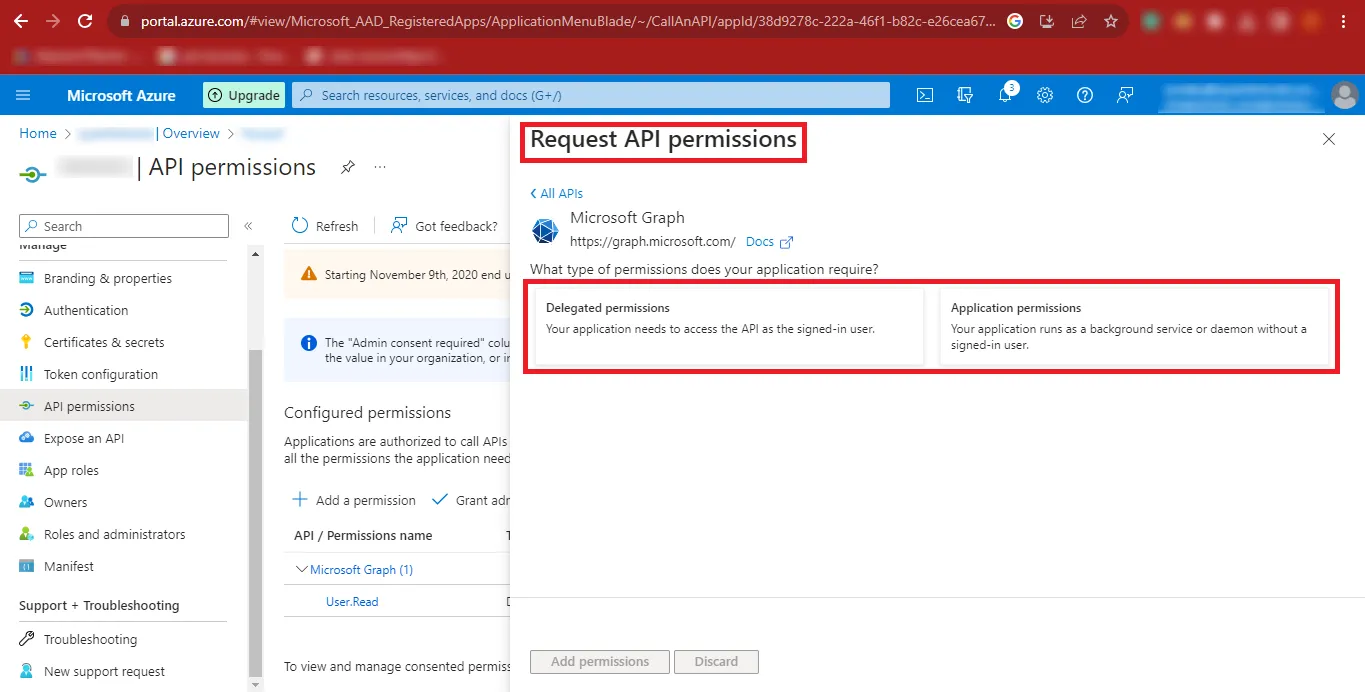
Step 17: Click API Permissions from the left panel and select Add a Permission.
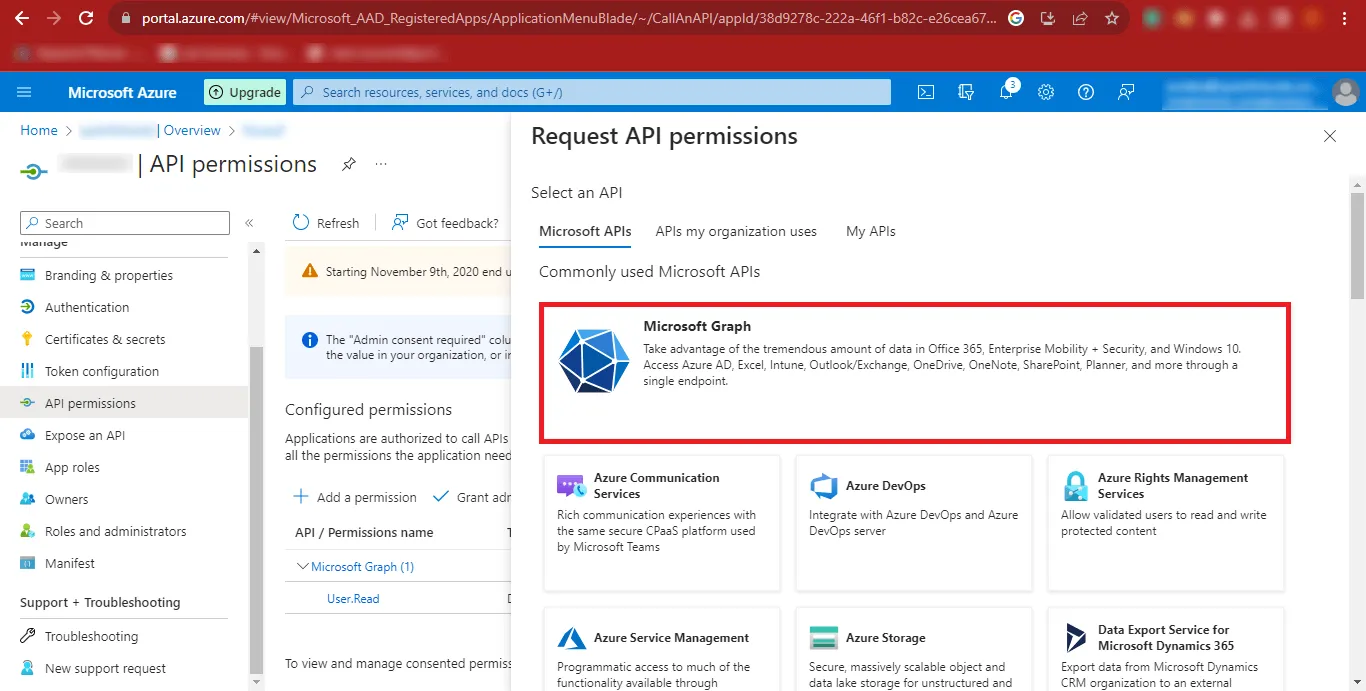
Step 18: Choose Microsoft Graph in the Request API Permissions panel.
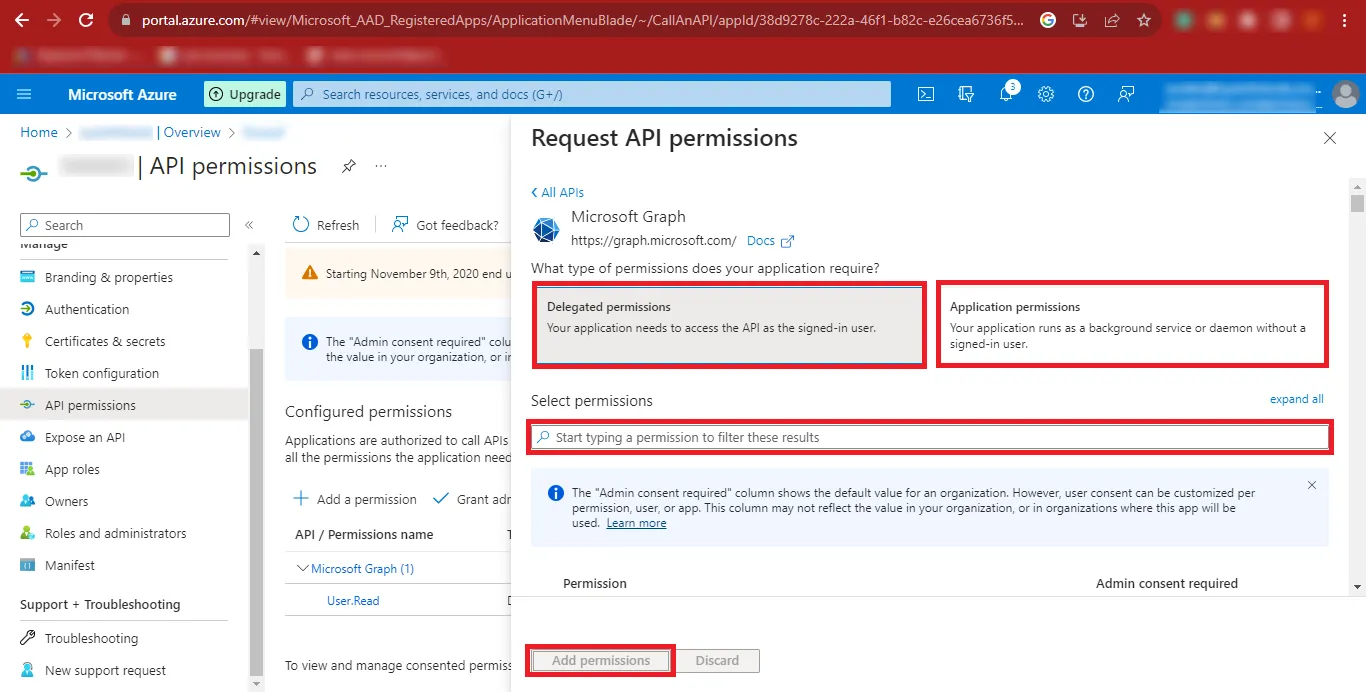
Step 19: Select both Delegated Permissions and Application Permissions as required.

Step 20: Search for the permissions listed in the table below and add them.
Delegated Permissions
| API/Permissions Name | Description | Admin consent required | Status |
|---|---|---|---|
| DelegatedPermissionGrant.ReadWrite.All | Manage all delegated permission grants | Yes | Granted for Project |
| Directory.Read.All | Read directory data | Yes | Granted for Project |
| Directory.ReadWrite.All | Read and write directory data | Yes | Granted for Project |
| Files.Read | Read user files | No | Granted for Project |
| Files.Read.Selected | Read files that the user selects (preview) | No | Granted for Project |
| Files.Read.Write | Have full access to user files | No | Granted for Project |
| Files.ReadWrite.All | Have full access to all files user can access | No | Granted for Project |
| Files.ReadWrite.AppFolder | Have full access to the application's folder (preview) | No | Granted for Project |
| Files.ReadWrite.Selected | Read and write files that the user selects (preview) | No | Granted for Project |
| Group.ReadWrite.All | Read and write all groups | Yes | Granted for Project |
| Sites.Read.All | Read items in all site collections | No | Granted for Project |
| User.Export.All | Export user's data | Yes | Granted for Project |
| User.Manageldentities.All | Manage user identities | Yes | Granted for Project |
| User.Read | Sign in and read user profile | No | Granted for Project |
| User.Read.All | Read all users' full profiles | Yes | Granted for Project |
| User.ReadBasic.All | Read all users' basic profiles | No | Granted for Project |
| User.ReadWrite | Read and write access to user profile | No | Granted for Project |
| User.ReadWrite.All | Read and write all users' full profiles | Yes | Granted for Project |
Application Permissions
| API/Permissions Name | Description | Admin consent required | Status |
|---|---|---|---|
| Files.ReadWrite.All | Read and Write files in all site collections | Yes | Granted for Project |
| User.Export.All | Application Export user's data | Yes | Granted for Project |
| User.Invite.All | Invite guest users to the organization | Yes | Granted for Project |
| User.Manageldentities.All | Manage all users' identities | Yes | Granted for Project |
| User.Read.All | Read all users' full profiles | Yes | Granted for Project |
| User.ReadWrite.All | Read and write all users' full profiles | Yes | Granted for Project |
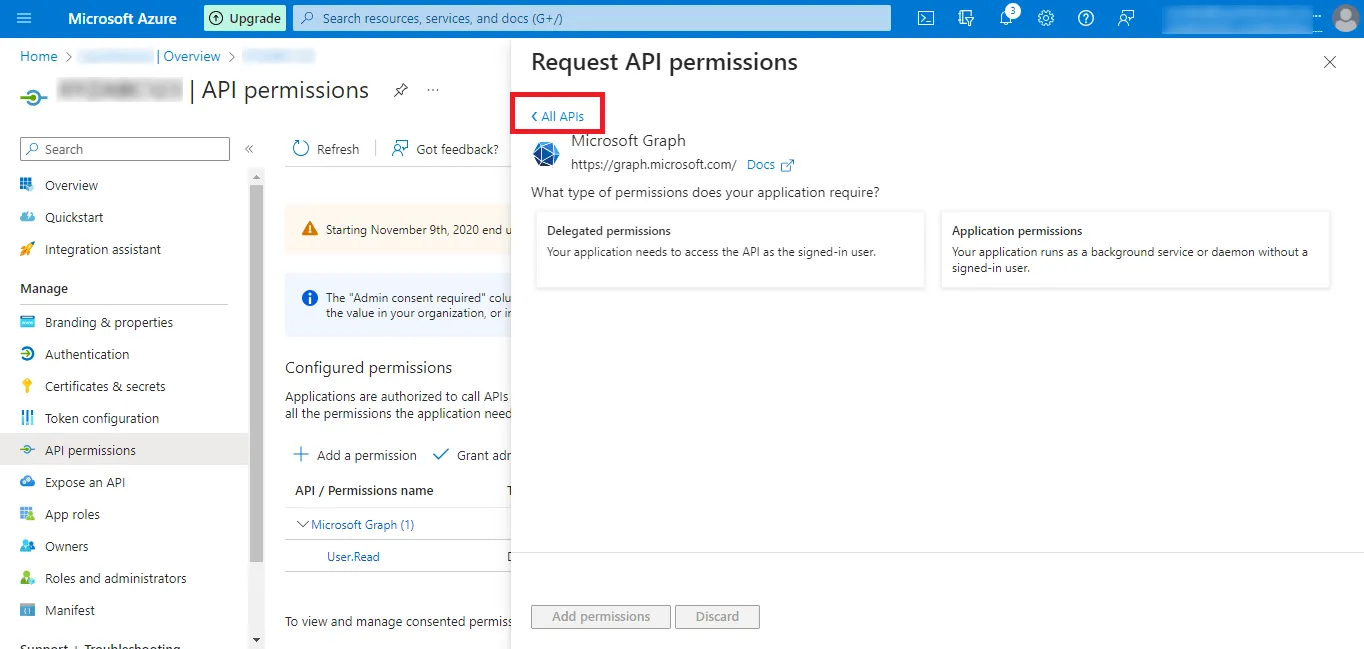
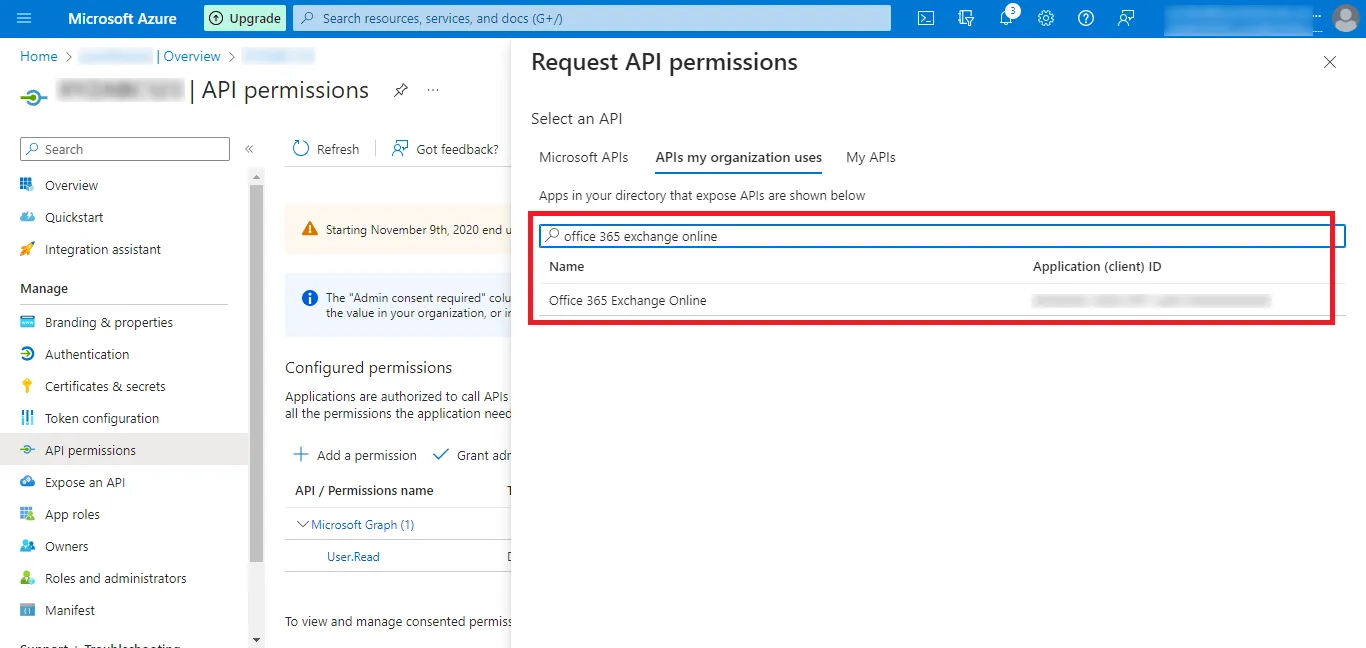
Step 21: Click All APIs, then return to the previous step to add more permissions.
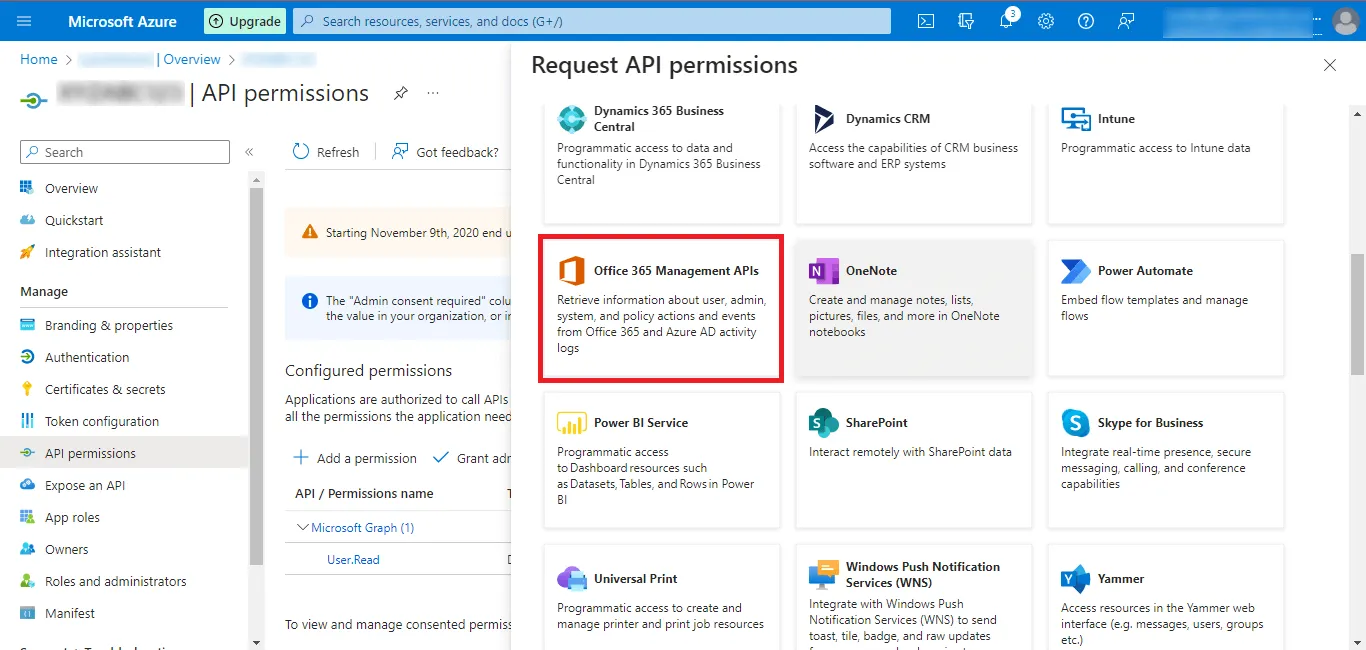
Step 22: Select the Office 365 Management APIs option.
Step 23: Switch to the APIs my organization uses tab.
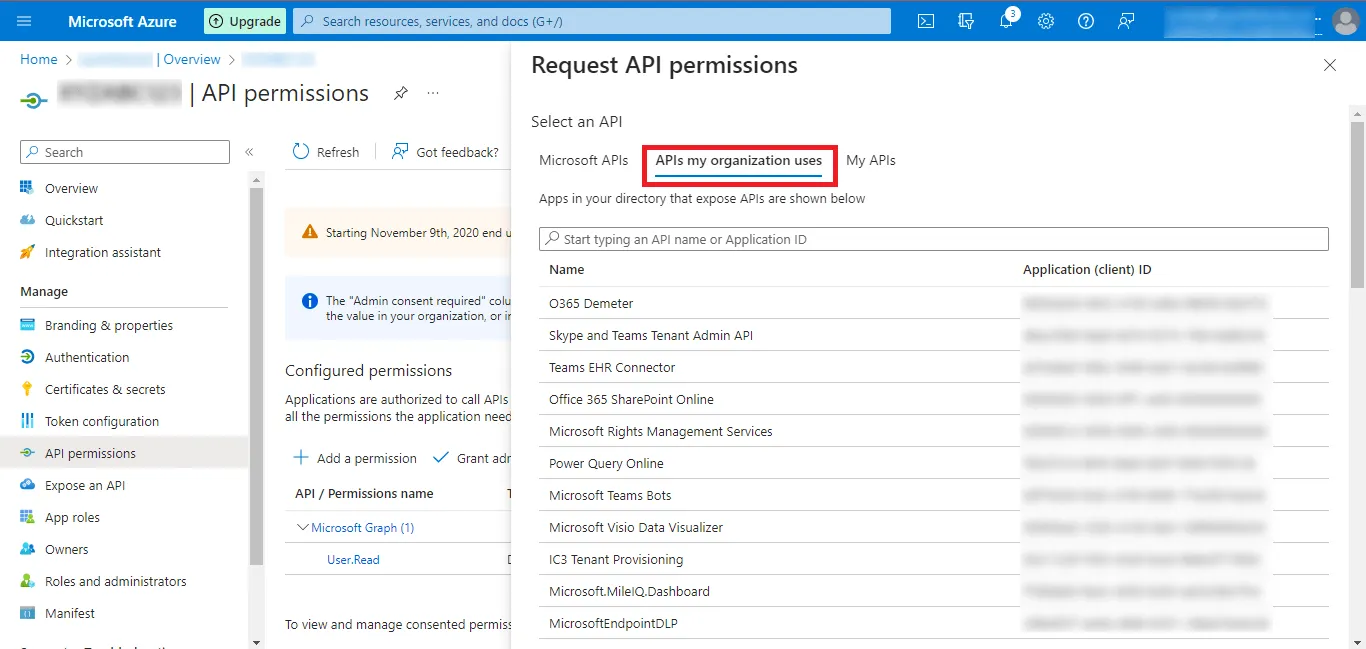
Step 24: Search for Office 365 Exchange Online and click the displayed result.
Step 25: Click the Application permissions option.
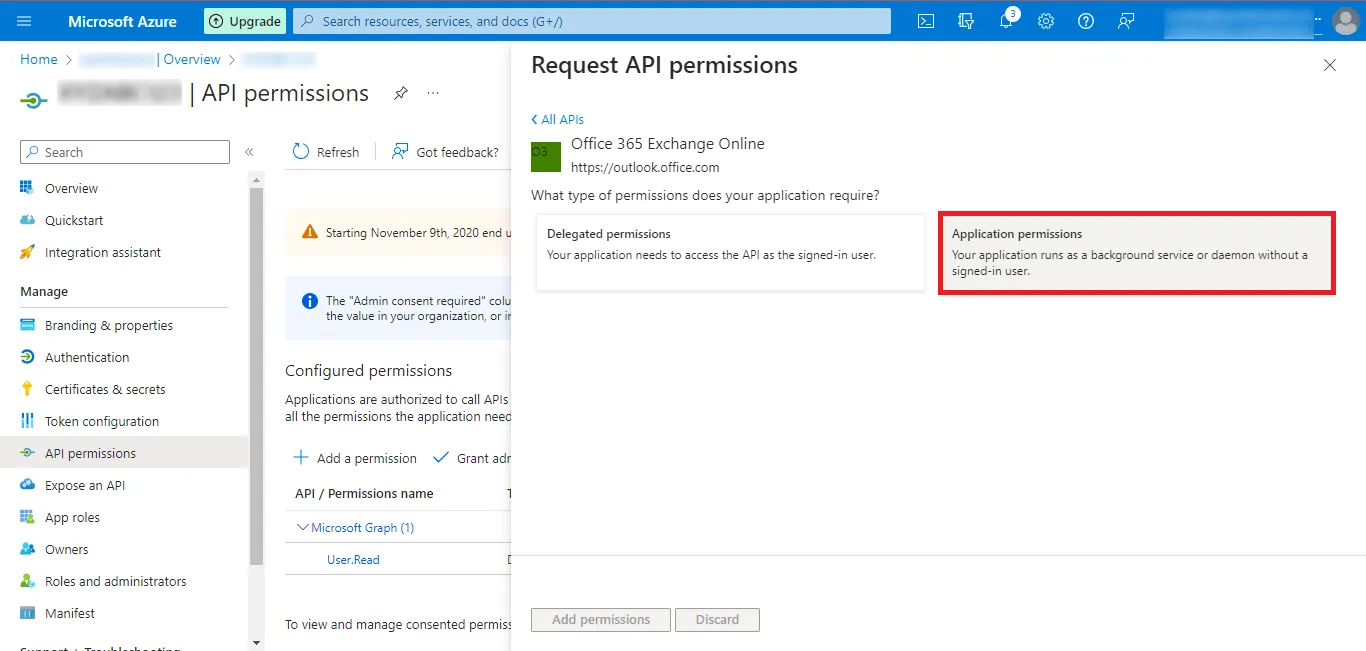
Give the Following Permissions in this Section as Given Below:-
| API/Permissions Name | Description | Admin consent required | Status |
|---|---|---|---|
| full_access_as_app | Use Exchange Web Services with Full Access to All Mailboxes | Yes | Granted for Project |
| Mail.ReadWrite | Read and write mail in all mailboxes | Yes | Granted for Project |
| Tasks.ReadWrite | Read and write tasks in all mailboxes | Yes | Granted for Project |
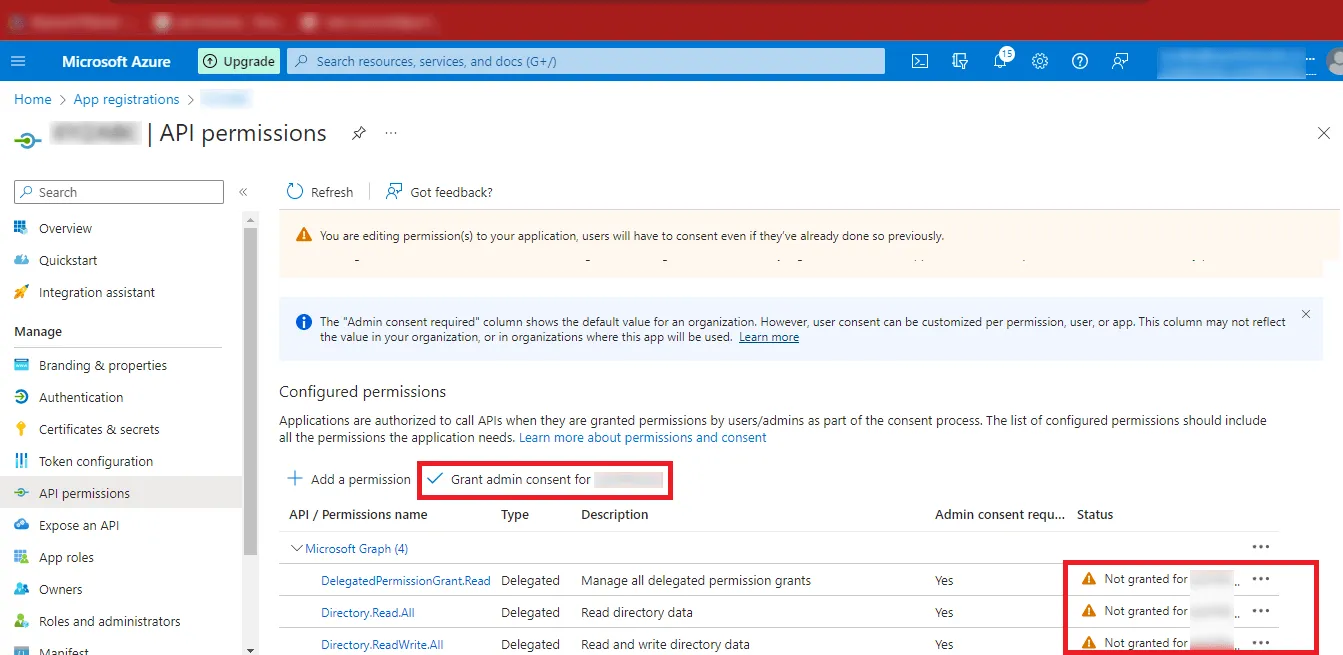
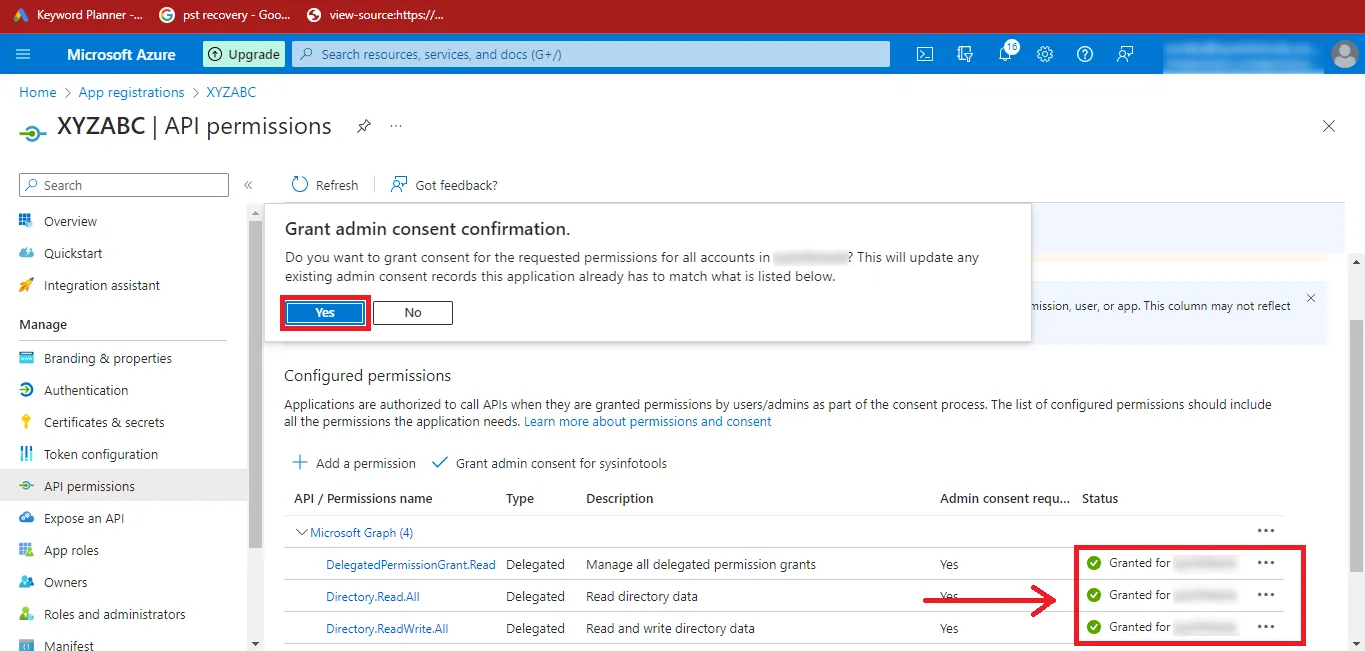
Step 26: After adding the permissions, the status will show as Not Granted. Click Grant admin consent for “YourAccount”.
Step 27: Click Yes to confirm. The permission status will change to Granted.
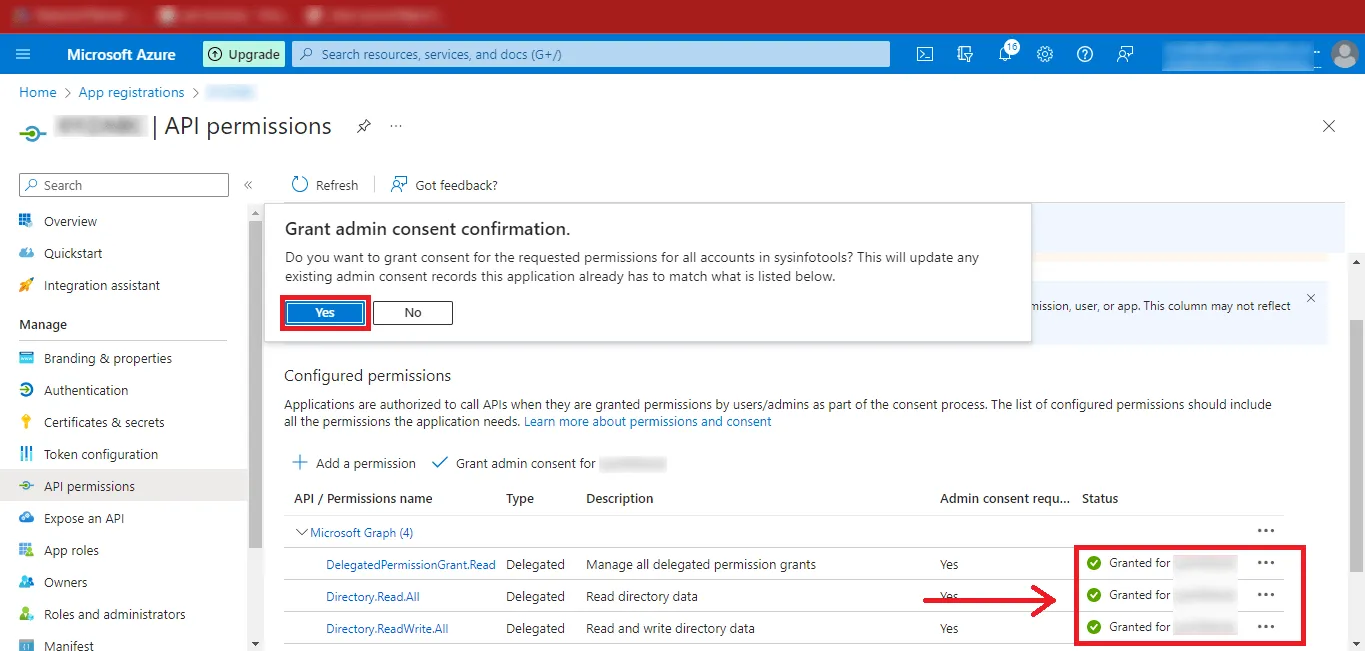
Step 28: You have successfully created the Azure Active Directory application and enabled the required API permissions.
Step 1: Open Google and search for Microsoft Azure Portal.

Step 2: Click the first result in the search results, or directly open: https://azure.microsoft.com/en-us/get-started/azure-portal

Step 3: The Microsoft Azure Portal page will open. Click the Sign In button at the top-right corner of the page.
Step 4: Enter your Microsoft Admin ID and click Next.
Step 5: Enter your password and click Sign In.
Step 6: Click your User ID at the top-right corner and select View Account.

Step 7: Copy your Admin ID and save it in a safe location.

Step 8: Return to the previous page and click the three horizontal bars (menu icon) at the top-left corner.
Step 9: Click Azure Active Directory from the menu.

Step 10: The Azure Active Directory dashboard will appear on your screen.

Step 11: Click Add, then select App Registration from the expanded options.
Step 12: Enter the desired application name and select the third option:
Accounts in any organizational directory (Any Azure AD directory – Multitenant) and personal Microsoft accounts (e.g., Skype, Xbox).
Click Register to continue.
Step 13: After registration, copy the Application (Client) ID and Directory (Tenant) ID, and store them securely.

Step 14: From the left panel, click Certificates & Secrets, then select New Client Secret.
Step 15: Enter a description for the client secret and click Add.

Step 16: Once the secret is created, copy the Secret Value and save it in a safe place.
Step 17: Click API Permissions from the left panel, then click Add a Permission under Configured Permissions.

Step 18: Select Microsoft Graph from the Request API Permissions panel.

Step 19: Choose both Delegated Permissions and Application Permissions as required.
Step 20: Search for the permissions listed in the table below and add them.
Delegated Permissions
| API/Permissions Name | Description | Admin consent required | Status |
|---|---|---|---|
| Delegated.Permission.Grant.Read | Manage all delegated permission grants | Yes | Granted for Project |
| Directory.Read.All | Read directory data | Yes | Granted for Project |
| Directory.ReadWrite.All | Read and write directory data | Yes | Granted for Project |
| Files.Read | Read user files | No | Granted for Project |
| Files.Read.Selected | Read files that the user selects (preview) | No | Granted for Project |
| Files.Read.Write | Have full access to user files | No | Granted for Project |
| Files.ReadWrite.All | Have full access to all files user can access | No | Granted for Project |
| Files.ReadWrite.AppFolder | Have full access to the application's folder (preview) | No | Granted for Project |
| Files.ReadWrite.Selected | Read and write files that the user selects (preview) | No | Granted for Project |
| Group.ReadWrite.All | Read and write all groups | Yes | Granted for Project |
| Sites.Read.All | Read items in all site collections | No | Granted for Project |
| User.Export.All | Export user's data | Yes | Granted for Project |
| User.Manageldentities.All | Manage user identities | Yes | Granted for Project |
| User.Read | Sign in and read user profile | No | Granted for Project |
| User.Read.All | Read all users' full profiles | Yes | Granted for Project |
| User.ReadBasic.All | Read all users' basic profiles | No | Granted for Project |
| User.ReadWrite | Read and write access to user profile | No | Granted for Project |
| User.ReadWrite.All | Read and write all users' full profiles | Yes | Granted for Project |
Application Permissions
| API/Permissions Name | Description | Admin consent required | Status |
|---|---|---|---|
| Files.ReadWrite.All | Read and Write files in all site collections | Yes | Granted for Project |
| User.Export.All | Application Export user's data | Yes | Granted for Project |
| User.Invite.All | Invite guest users to the organization | Yes | Granted for Project |
| User.Manageldentities.All | Manage all users' identities | Yes | Granted for Project |
| User.Read.All | Read all users' full profiles | Yes | Granted for Project |
| User.ReadWrite.All | Read and write all users' full profiles | Yes | Granted for Project |
Step 21: After adding the permissions, the status will appear as Not Granted. Click Grant admin consent for “Your Account”.

Step 22: Click Yes to confirm. The status will change to Granted.
Step 23: You have successfully created the Azure Active Directory application and enabled the required API permissions.