PST stands for Personal Storage Table and is primarily used as a data file in Microsoft Outlook. It is capable of storing local copies of your email messages and their attachments, calendar events, contacts, tasks, and notes. Outlook offers features to save information directly on your computer in a PST file rather than solely on a mail server. However, because these files can become large and may contain data from multiple mailbox folders, managing them can become challenging and risky. Importing Outlook data files (.pst) into Office 365 Online Archive is one of the best ways to improve accessibility, security, and compliance while reducing dependency on local storage. This process also allows you to access, view, and manage mailbox items smoothly.
In this guide, we’ll discuss the step-by-step process to import PST files into Office 365 Online Archive efficiently. Additionally, you can use the BreviSoft PST Converter Tool, which allows you to import bulk PST files to Office 365 Online archive in a single go.
What is Office 365 Online Archive?
Office 365 Online Archive, also known as an Archive Mailbox or In-Place Archiving, is a specialized cloud-based storage solution that provides additional mailbox space for users to store older email messages and other Outlook items. It appears as a separate folder structure in the mailbox hierarchy and is labelled as “Online Archive” followed by the user’s email address. However, it can be easily accessed alongside the primary mailbox in Outlook and Outlook on the web.
Why Do Users Need to Import PST to Office 365 Online Archive?
To back up Outlook mailboxes, organizations and users often save their PST files locally over time. However, due to corruption issues or other unexpected problems, the need to import these files into Office 365 or another platform has arisen. There are additional challenges as well that lead to importing these PST files into Office 365:
- Securely storing Outlook data files in a cloud-based environment.
- Storing files online allows you to access them easily from anywhere via email.
- Importing PST files into the Office 365 Online Archive helps reduce the risk of corruption and data loss.
- Freeing up space in your primary mailbox by offloading older emails to the archive.
These are the main reasons which insist someone to move local folders to Online Archive for safety, backup and easy access.
03 Best Methods to Import PST to Office 365 Online Archive
There are several methods available online that claim to be the easiest ways to upload Outlook PST files to your Online Archive, but many of them do not work properly. Therefore, after conducting thorough research and testing them ourselves, we have decided to suggest three simple methods that allow bulk PST migration to Microsoft 365 accounts.
Method 1: Upload PST file to Office 365 Online Archives Using Outlook
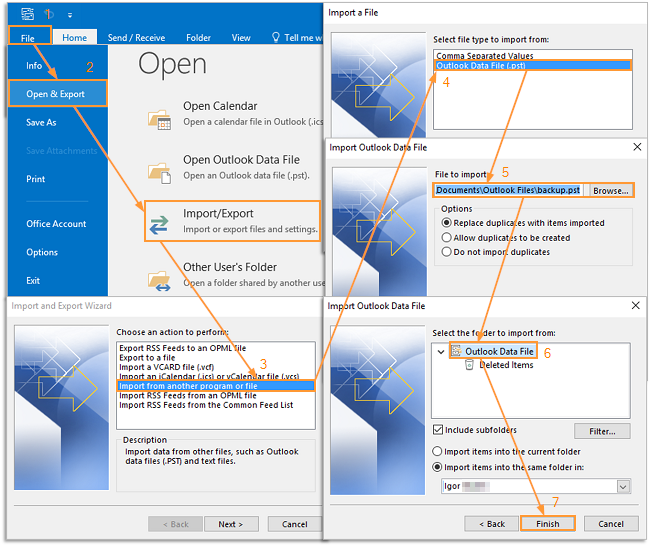
The desktop version of MS Outlook offered a built-in Import/Export feature, which allows users to add PST to Office 365 account in the following simple steps:
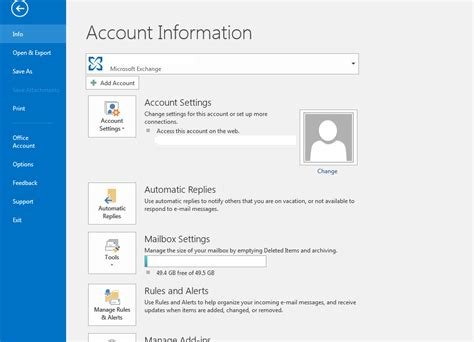
- Open Outlook on your system and click the File tab.
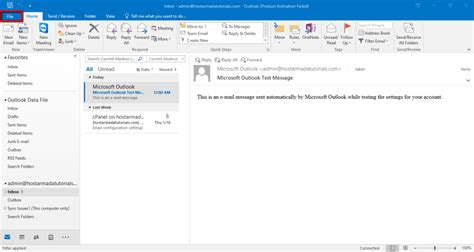
- The Account Information page will open on your screen.
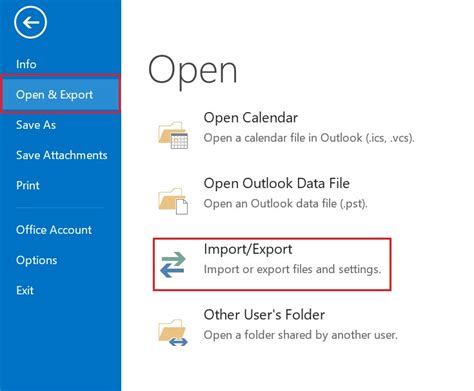
- Go to the Open & Export section and click the Import/Export option.
- In the Import and Export Wizard, choose Import from another program or file, then click Next.
- Select Outlook Data File (.pst) and click Next.
- The Import Outlook Data File dialog box will appear on your screen.
- Click Browse to locate the PST file that you want to import.
- You can also choose options to manage duplicate items in the imported file.
- Click Next to proceed further.
- On the next screen (Import Outlook Data File), click the Filter button if you want to import only specific items (e.g., messages from a particular sender).
- Select your desired options and click Ok to close the Filter dialog box.
- Alternatively, if you want to import the entire .pst file into your Online Archive:
- Select the top-level folder from the Outlook Data File.
- Check the Include subfolders option.

-
- Choose the radio button Import items into the same folder in.
- From the dropdown list, select Online Archive.
- Click the Finish button to complete the import process.
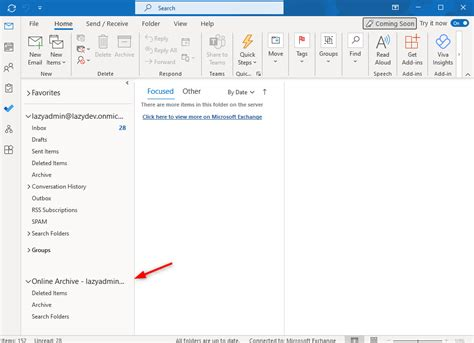
- After completion, the imported PST mailbox data will appear in the Office 365 Online Archive folder.
Method 2: Using Network Upload to Batch Import PSTs into Microsoft 365
This is the best and recommended process for administrators to move the data of multiple users to Office 365. It allows uploading files directly to Azure storage before mapping them to the archive.
Step 1: Access the Import Service
- First of all, Log in to the Microsoft Purview compliance portal using admin credentials.
- Navigate to:
Data lifecycle management → Import - Click on the New import job.
Step 2: Create Import Job
- Enter a unique Job Name.
- Click Next.
- Choose Upload your data (Network Upload method).
- Click the Next button to proceed further.
Step 3: Generate SAS URL
- Click the Show network upload SAS URL.
- Copy the Shared Access Signature (SAS) URL securely.
- This URL provides temporary access to Azure storage for uploading PST files.
Step 4: Prepare PST Files
- Collect all PST files to be imported.
- Store them in a local directory (e.g., C:\PSTFiles).
- Ensure:
- File names are unique and meaningful
- PST files are not corrupted
- Total size is manageable for upload
Step 5: Upload PST Files Using AzCopy
- Download and install AzCopy.
- Open Command Prompt / PowerShell.
- Execute the given below command:
AzCopy.exe /Source:”C:\PSTFiles” /Dest:”<SAS URL>” /V:”C:\Logs\upload.log” /Y
- Replace:
- C:\PSTFiles → Path to PST files
- <SAS URL> → Copied SAS URL
- Verify upload completion using the log file.
Step 6: Create Mapping CSV File
Create a CSV file (e.g., mapping.csv).
Use the following format:
Workload,FilePath,Name,Mailbox,IsArchive,TargetRootFolder,ContentCodePage
Exchange,,file1.pst,user1@domain.com,FALSE,/,
Exchange,,file2.pst,user2@domain.com,TRUE,/Archive,
Field Description:
- Workload → Always Exchange
- FilePath → Leave blank for network upload
- Name → PST file name
- Mailbox → Target user mailbox
- IsArchive → TRUE (archive) / FALSE (primary mailbox)
Step 7: Upload and Validate Mapping File
- Return to the Import Job in the portal.
- Upload the mapping CSV file.
- Click on the Validate.
- Resolve any validation errors if prompted.
Step 8: Submit Import Job
- After successful validation, click Submit.
- The import process will begin.
Step 9: Monitor Import Progress
- Go to the Import Jobs dashboard.
- Track job status:
- Uploading
- Processing
- Completed
Step 10: Verify Imported Data
- Log in to target mailboxes.
- Confirm:
- Emails are correctly imported
- Data is placed in the correct folder/mailbox (primary or archive)
Method 3: Professional Methods to Import PST to Online Office 365 Archive
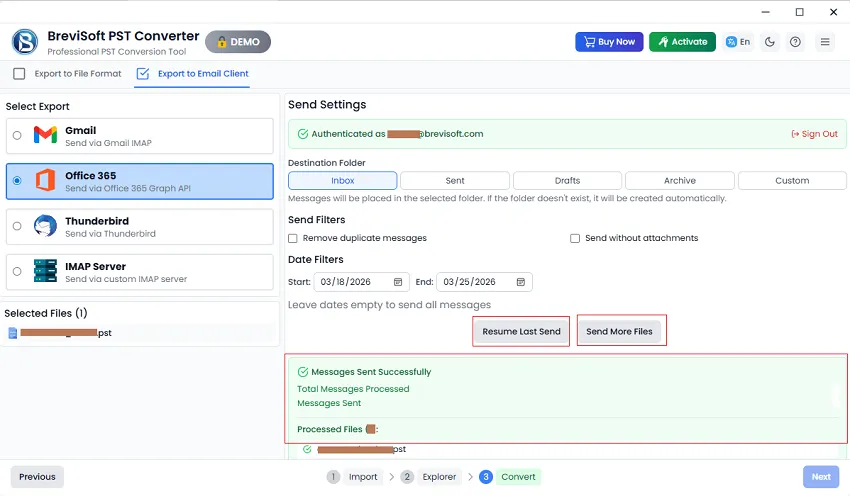
The above manual methods help users move PST files to the Office 365 Online Archive effectively. However, we recommend using an industry-proven BreviSoft PST Converter tool that allows you to import single as well as multiple PST files directly into a Microsoft 365 account without any data loss. This solution ensures a high migration success rate and enables you to transfer mailbox folders seamlessly to your Office 365 account.
The following are simple steps to Add PST File to Office 365 Account:
- Download, install, and run the BreviSoft PST Converter on your system.
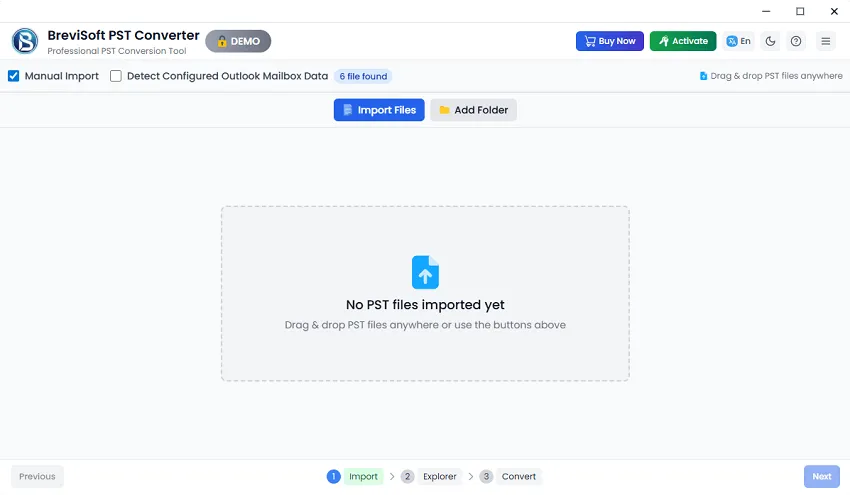
- Click the Add Files option and select multiple PST files.
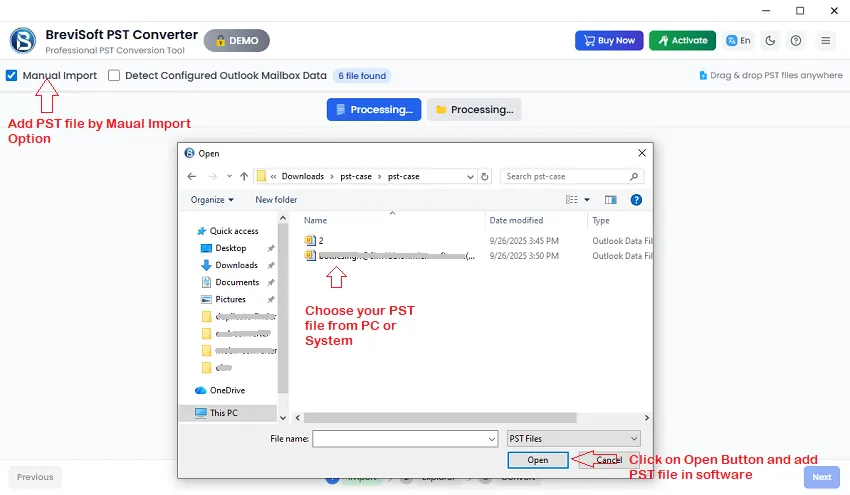
- After selecting the required Outlook data files, click Next.

- The software allows you to preview mailbox folder items; click Next to continue.
- Select Office 365 as the destination and log in with your credentials.
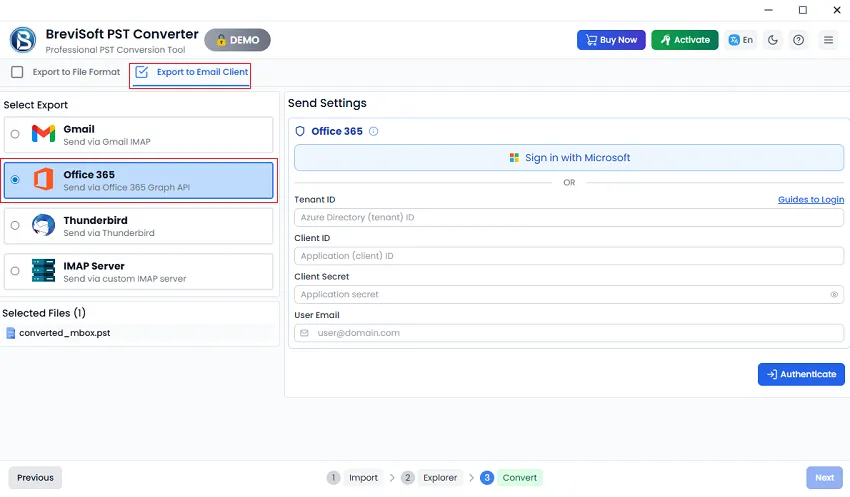
- Choose the desired built-in features and click Export.
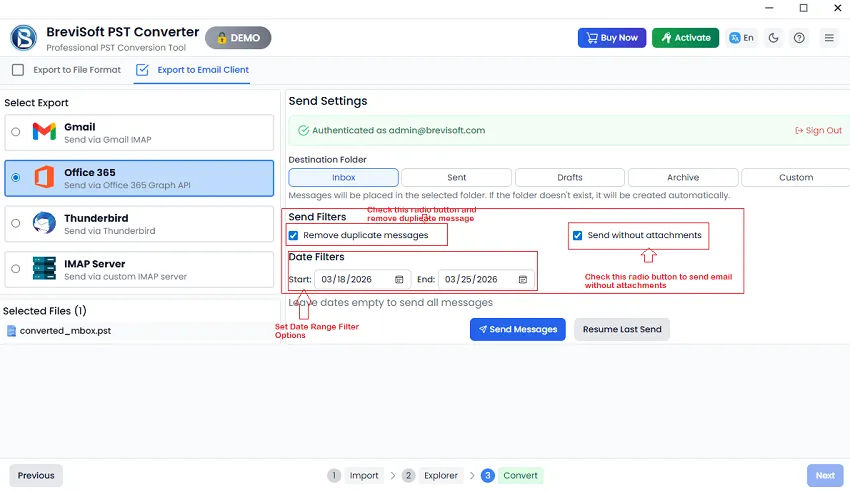
- The PST files will soon be imported into Office 365 successfully.
Outlook Built-in Option vs. Network Upload vs. BreviSoft PST Converter: Which PST Import Method is Best?
|
Feature |
Outlook Built-in Option |
Network Upload (AzCopy) |
BreviSoft PST Converter |
|
Complexity |
Simple (Drag & Drop) |
High (Technical/CLI) |
Very Low (GUI-based) |
|
Speed |
Very Slow |
Moderate |
Fast (Bulk Processing) |
|
Outlook Needed? |
Yes |
No |
No (Standalone) |
|
Bulk Import |
No (One by one) |
Yes (Using CSV Mapping) |
Yes (Automated) |
|
Data Integrity |
High risk of lag/hanging |
Possible mapping errors |
High (Preserves Hierarchy) |
|
Target Folder |
Manual selection |
Via Script/CSV |
Direct Archive Selection |
|
Large Files |
Cannot import |
Often fails |
Supports Large PSTs |
Conclusion
Nowadays, importing PST files to Office 365 Online Archive is a crucial step to protect the mailbox items from corruption and prevent them from becoming oversized. It not only enhances access and security but also allows one to make it accessible from anywhere. The methods discussed above are among the best ways to successfully migrate PST data into Office 365 with minimal disruption. For bulk migrations, try to use the automated tools or professional solutions for a smooth uploading process.
FAQs
Ans – For a manual PST import, you have to use the Microsoft Purview Import Service, which entails uploading the files using Azure AzCopy and creating an elaborate CSV mapping file. The above process is highly technical and time-consuming; hence, it is better to use BreviSoft PST File Converter Tool for a direct and automated Office 365 upload with just a few clicks.
Ans – In the manual way, you will instead drag and drop folders in the Outlook desktop app or set up retention policies to transfer data directly from Admin Center. However, to prevent the migration of PST files with high latency, and eliminating the manual effort to move large-sized folders, it is a wise approach to choose BreviSoft PST File Converter Tool which uses this “Archive Mailbox” directly during the time of migration.
Ans – Microsoft provides a free utility called Azure AzCopy that uses command line and administrative knowledge to perform it, but this is challenging for many users. However, the BreviSoft PST File Converter Tool is a better solution for users who need to work with encrypted or oversized files in a graphical environment as this tool provides secure and easy-to-use environment while maintaining data integrity.
Ans – With no Outlook, it is only possible to upload manually using the Azure network upload through Microsoft 365 Compliance Center, which primarily uses PowerShell scripts and SAS URLs. [Note: The BreviSoft PST File converter tool is a standalone application that connects directly to the cloud, without requiring scripts or Outlook installation, and is therefore more suitable for this purpose.]
Ans – Yes, you can, by manually adjusting the parameters in migration CSV file or move command on Outlook (which is often to cause synchronization errors). The BreviSoft PST File Converter Tool completely outshines the latter due to its inbuilt function for mapping PST data directly to the Online Archive which ensures a smooth and error-free transfer.